The Process:
While baking can be intimidating, I was feeling pretty confident about these cookies because the recipe looked so simple. And simple it was! The entire process, from setup to cleanup, took under an hour with no electric appliances. I discovered that I was missing a few key pieces of equipment, so if you do not yet have a restaurant-quality kitchen check out the tips section below to get some excellent ways to improvise. If you do have a restaurant-quality kitchen, please teach me your ways.
The Verdict:
This could possibly be the perfect Chocolate Chip Cookie recipe. I shared with my roommates, made little gift bags for my neighbors (one came over to thank us!), and took a dozen to a housewarming party, so I will let the taste testers speak for themselves:
- "You nailed it" --Roommate who makes his own cookies from scratch to woo the ladies
- "Have you tried these cookies?! They're freshies...definitely not storebought" --Housewarming party guest who didn't know I made the cookies
- "Pretty much perfect. I think I had four." --Housewarming party guest and cookie connoisseur
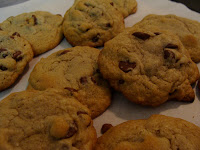
The cookies were soft and chewy with a firm bottom, the ideal thickness and density, and for the first time in my life, they did not spread into one another in the pan. I can't wait to make this recipe again.
 |
| Ready to make an appearance at the housewarming party |
 |
| Get this head shot autographed-- this cookie will soon be famous |
 |
| Good neighbor karma |
 |
| The whole recipe- 48 cookies! |
Yield: 4 dozen cookies
Ingredients:
- 3 cups all purpose flour
- 2 cups semi-sweet chocolate chips
- 1 cup white sugar
- 1 cup brown sugar, packed*
- 1 cup unsalted butter, softened*
- 2 eggs
- 2 tsp vanilla extract
- 2 tsp hot water
- 1 tsp baking soda
- 1/2 tsp salt
- Preheat the oven to 350°.
- In a large mixing bowl, cream together the butter, white sugar, and brown sugar until smooth.*
- Beat in the eggs one at a time, then stir in the vanilla.
- Dissolve the baking soda into the hot water. Add the mixture and the salt.
- Mix in the flour gradually until incorporated.
- Fold in the chocolate chips.
- Place large, even spoonfuls of dough on a parchment-lined baking sheet.*
- Bake for 10 minutes or until the edges are nicely browned. Let cool.*
*Tips:
- Brown sugar: I like to use dark brown sugar, but I am sure that light would work too
- Softened butter: In case you are like me and need your cookies stat, you may not have time to leave your butter out. To soften it, place the butter in a plastic bag and roll over it with a rolling pin (or any heavy jar) until it is soft and flat. Peel off and you're good to go!
- Creaming sugar and butter: I don't have an electric mixer, so I used the back of a large spoon to cream the butter and sugar. I like to call it the "smoosh and swoop." Smoosh the butter with the back of the spoon and swoop it along the side of the bowl to mix. Once the white marbling of the butter has gone away, consider yourself creamed.
 |
| This is the "smoosh," and "swoop" will follow. The butter is still marbled, meaning it is not quite ready. |
- Parchment paper: This stuff is amazing! First of all, no stick whatsoever. But also, the color of the parchment paper is a great indicator of whether your cookies are done or overdone. If the paper is a light golden color, the cookies are probably about right. If it is darker, you may be looking at some toasty cookie bottoms.
- Cooling cookies: If the cookies have lightly browned edges when you take them out of the oven, let them sit on their tray for a bit. If they are nearing the toasty stage, slide the parchment paper onto something cooler and elevated so the cookies stop baking as soon as possible. Don't underestimate the power of a little cooling for texture and firmness.


Sounds like another successful walk, Miss Cookbook!
ReplyDelete