Dear Readers,
Happy Thanksgiving to you and your loved ones! Whether you are sharing it with family, celebrating "Friendsgiving," or find yourself alone on Thursday, know that there are many things to be thankful for. More importantly, know that the world has many reasons to be thankful for YOU!
Enjoy your holiday, and I will pick back up next week for another lovely (and memorized) family dinner. If you have any exciting or favorite Thanksgiving recipes, post them in a comment. I would love to hear from you!
Thank you for being supportive readers and interested cooks... cooking is far more special to me when I get to share it with others!
Tuesday, November 20, 2012
Monday, November 12, 2012
Ethiopian Feast: The 5 Recipes (Whew!)
Check out this recipe on my new and improved website: thewalkingcookbook.com
One of the benefits of life in New York is the bounty of cuisines that it boasts. I use the word cuisine to refer to a set of culinary ingredients, styles, and techniques, all of which can be linked to a specific region (Japanese food, Southern food, Amazonian food), dietary preference (vegetarian, gluten-free, raw), dining culture (street food, fine dining) or even religion (kosher, halal). Within each cuisine are various subcuisines (just think of "American" food and all of its subcuisines). I feel like I can confidently say that if New York's five boroughs does not have a particular cuisine, it probably only exists in its region of origin. I can't imagine a regional cuisine traveling outside its birthplace and not making its way to this amazing city.
I had Ethiopian food for the first time when I visited New York to interview for my teaching job, and I have been a little obsessed with it ever since. In larger cities it is becoming more common to hear the words injera, alicha, and wat used when talking about what to get for dinner. However, it still has not had its big break to arise to the levels of Thai, Chinese, or Indian food.
In case you have not had Ethiopian food, here are a few things you can expect:
 |
| Ethiopian food is served on a piece of injera, with many dishes to try |
One of the benefits of life in New York is the bounty of cuisines that it boasts. I use the word cuisine to refer to a set of culinary ingredients, styles, and techniques, all of which can be linked to a specific region (Japanese food, Southern food, Amazonian food), dietary preference (vegetarian, gluten-free, raw), dining culture (street food, fine dining) or even religion (kosher, halal). Within each cuisine are various subcuisines (just think of "American" food and all of its subcuisines). I feel like I can confidently say that if New York's five boroughs does not have a particular cuisine, it probably only exists in its region of origin. I can't imagine a regional cuisine traveling outside its birthplace and not making its way to this amazing city.
I had Ethiopian food for the first time when I visited New York to interview for my teaching job, and I have been a little obsessed with it ever since. In larger cities it is becoming more common to hear the words injera, alicha, and wat used when talking about what to get for dinner. However, it still has not had its big break to arise to the levels of Thai, Chinese, or Indian food.
In case you have not had Ethiopian food, here are a few things you can expect:
- No utensils-- injera, a gluten-free spongey crepe-like bread, is used as a utensil to scoop up all of the food. I still haven't figured out what to do when they serve you salad-- please comment if you have some insight
- A high presence of turmeric, cardamom, and berbere (pronounced somewhere in between "bear berry" and "Burberry"), a spice blend that adds heat to many dishes
- Most dishes are stews or purees, slow cooked with aromatic ingredients
- Plenty of vegetarian and meat options
I got excited about the prospect of learning Ethiopian cuisine when I read about it in my Food & Wine magazine (Nov. 2012). The article highlights a man named Hiyaw Gebreyohannes, who developed a line of prepared Ethiopian food, Taste of Ethiopia, which is actually now available at Fairway Market, Whole Foods, Brooklyn Fare, and Union Market. He included some recipes, which made me feel less daunted by the idea of making Ethiopian in my own kitchen.
This week I will be cooking a vegan and gluten-free Ethiopian feast with four dishes (I like going between multiple flavors as I eat) plus a boatload of injera (be advised that the injera needs to sit overnight, so get an early start!). Although the spices will be a little costly to get started, the staple ingredients are extremely affordable: onions, garlic, lentils, cabbage, collard greens, etc. If this is successful, then future Ethiopian dinners will be done on the cheap!
The Recipes:
 |
| Tear this bread apart to scoop up your food-- it replaces silverware |
Injera (crepe-bread), adapted from Food & Wine
Yield: Eight 12" pieces
Ingredients:
- 4 cups (5 oz.) teff flour
- 5 cups water
- 1 1/2 tsp salt
Preparation:
- In a large bowl, whisk the teff flour with the water until a smooth batter forms.
- Cover the bowl with plastic wrap and let stand at room temperature overnight; the batter should be slightly foamy.
- Heat a 12-inch nonstick skillet over high heat.
- Whisk the salt into the batter.
- Ladle 3/4 cup of batter into the skillet and swirl to cover the entire skillet.
- Cook over medium-high heat until the injera starts to bubble, about 30 seconds.
- Cover the skillet and cook for 30 more seconds, until the injera is cooked through and the surface is slightly glossy.
- Invert the injera on a work surface and repeat with the remaining batter.
- Fold the injera into quarters to serve.
NOTE FROM THE WALKING COOKBOOK:
This injera was an embarrassing failure and led me to buy premade Injera from a local Ethiopian restaurant... I attribute it to incorrect measurements in the recipe, which calls for 4 cups (5 oz.) of flour. Four cups is definitely not 5 oz (it's more like 20 oz), so unless they were referring to 5 oz per cup, the recipe was just wrong. See Ethiopian Feast: The Results and Modified Recipes for details!
 |
| Don't let the spoon deceive you-- you will still be scooping |
Gomen (collard greens), adapted from Saveur
Yield: 4 servings
Ingredients:
- 1/4 cup plus 2 tbsp olive oil
- 1/8 tsp cardamom seeds
- 1/8 tsp ground fenugreek seeds
- 1/8 tsp nigella seeds
- 1 1/2 lbs. collard greens, stemmed and cut crosswise into 1/4" wide strips
- 1 1/2 cups water
- 1 large yellow onion, minced
- 3 cloves garlic, minced
- 2 Thai chiles or 1 jalapeño, stemmed, seeded, and minced
- 1" piece of ginger, peeled and minced
- salt and pepper, to taste
- Heat 4 tbsp oil in a large pot over medium heat.
- Add cardamom, fenugreek, and nigella and cook, stirring often, until fragrant, (1-2 minutes).
- Increase heat to medium-high and add the remaining oil.
- Add onions and cook, stirring often, until browned (10 minutes).
- Add garlic, chiles, and ginger and cook, stirring often, until soft and fragrant (3 minutes).
- Add collard greens, water, and salt and pepper.
- Cover and bring to a boil.
- Reduce heat to low and cook, stirring occasionally, until the greens are tender, 50-55 minutes.
 |
| This dish is perfect for the guests that don't like spice. I like going back and forth between the spicier Misir Wat and this Kik Alicha to tame the spice on my own. |
Kik Alicha (Mild Split Peas), adapted from The Culinary Life
Yield: 4 servings
Ingredients:
- 1 yellow onion, minced
- 1 large tomato, very finely chopped
- 1/2 lb. yellow split peas
- 2 cups water
- 1/4 cup plus 2 tbsp. olive oil
- 2 tbsp garlic, minced
- 1" piece ginger, peeled and minced
- 1 tsp turmeric
- 1/2 tsp bessobela (Ethiopian basil-- dried basil works too)
- 1/2 tsp ground cardamom
- salt and pepper, to taste
Preparation:
- Wash split peas in warm water. Drain and set aside.
- In a large pot, cook onions over medium heat for about 5 minutes or until translucent, adding water as needed.
- Add tomatoes and garlic and cook for 5 minutes (do not let them brown or burn)
- Add the ginger and cook for 5 more minutes (add water if necessary but don't let the mixture get soupy)
- Add olive oil and stir until well mixed. Cook briskly, uncovered, for 5 minutes.
- Add split peas, turmeric, bessobela, cardamom, salt, and pepper.
- Cook for 20 minutes, stirring frequently and adding water gradually until split peas are soft but the mixture is not watery (I would add 1/2 cup every time I see the mixture start to get dry).
 |
| Misir Wat-- I will probably try to cook mine so it is slightly thicker than in this picture |
Misir Wat (Red Lentils with Berbere), adapted from Food & Wine
Yield: 4 servings
Ingredients:
- 1/2 lb. red lentils
- 4 cups water
- 1/4 cup olive oil
- 1 1/2 red onions, minced
- 5 garlic cloves, minced
- 1" piece of ginger, peeled and minced
- 1 1/2 tbsp berbere
- 1 tsp nigella seeds
- 1/2 tsp ground cardamom
Preparation:
- In a large casserole pan, heat the olive oil.
- Add the onions and cook over medium-high heat until they are soft and just beginning to brown (8 minutes).
- Add the garlic, ginger, berbere, nigella, cardamom, salt, and pepper and cook until fragrant and deeply colored (10 minutes).
- Add the red lentils and water and bring to a boil.
- Cover and cook over moderately low heat, stirring occasionally, until lentils are softened and the mixture has thickened (25 minutes).
- Season with salt and pepper and sprinkle with berbere.
 |
| Atkilt Wat usually has potatoes as well, but Food & Wine adapted the recipe, omitting them |
Atkilt Wat (Cabbage and Carrots, minus the potatoes), adapted from Food & Wine
Yield: 4 servings
Ingredients:
- 2 1/2 lbs green cabbage, cored and cut into 3/4" pieces
- 1/2 lb carrots, quartered and cut into 1 1/2" lengths
- 1/4 cup olive oil
- 1/4 cup water
- 1 1/2 red onions, finely chopped
- 5 garlic cloves, minced
- 1" piece ginger, peeled and minced
- 1 tbsp turmeric
- salt and pepper, to taste
Preparation:
- In a large casserole pan, heat the olive oil.
- Add the onions and cook over medium-high heat until they are soft and just beginning to brown (8 minutes).
- Add the garlic, ginger, turmeric, salt, and pepper and cook until softened and fragrant (5 minutes).
- Add the carrots and water and cook over medium heat, stirring, until the carrots are just starting to soften (7 minutes).
- Stir in the cabbage in large handfuls, letting each batch wilt slightly before adding more. Add a little water if the pan begins to dry out.
- Once all the cabbage has been added, cover and cook over medium-low heat, stirring occasionally, until the cabbage is soft and tender, (30-40 minutes).
Time to Memorize: 4 days (And yes, I will be memorizing all of these)
Sunday, November 11, 2012
Veggie Pot Pie: Recipe and Results
Check out this recipe on my new and improved website: thewalkingcookbook.com
The Process:
When I was vegan (2006-2009-- I rolled with the social justice crew in college), I got a super hip cookbook by a super hip vegan named Sarah Kramer. With her kitten heels (I bought some), dyed black hair (got pretty close), bright red lipstick (had some but was too afraid to wear it), tattoos (still want one), and ugly/awesome ultra-short bangs (didn't do that, thank goodness), I somewhat secretly thought she was the coolest person ever. Of course, I knew would have to move to Europe and change my name in order to pull off being Sarah Kramer (same reality check as when I wanted to be Gwen Stefani in high school), so I proceeded to be myself... just the vegan version.
Her book, La Dolce Vegan, had a phenomenal Veggie Pot Pie recipe that I made on a regular basis. I think I may have even taken one to my family's Thanksgiving dinner to share. It worked beautifully as a main course for me and a side for all the turkey eaters. When I decided that this would be the week to do a Veggie Pot Pie, I discovered that my vegan cookbook was back in California, stored with all my other childhood and college artifacts. So, of course, I started searching online. I remembered that there were a lot of root vegetables and that it had thyme and soy sauce. Random memory, I know. The closest recipe I found was an adapted version of the book's Portobello Pot Pie, so I adapted the adaptation and rolled with it. I took only a few days to memorize the recipe, which is why I only have one post for you.
The Verdict:
The filling of the pot pie could have been a bit soupier (it was quite starchy-- not a bad thing, but not what I think of when considering pot pie). Aside from that, it had magnificent flavor. Don't be afraid of all the soy sauce-- when mixed in with the water it does not taste too salty. This dish definitely should be served with a light fall salad (mine was mixed greens, pomegranate, and toasted walnut). It is quite simple-- make the crust, make the filling, put together, and bake. If you have a vegan guest, make this for a fall get together and pat yourself on the back for being such an accommodating host!
The Recipe: Veggie Pot Pie, adapted from food.com
Yield: 1 pot pie (8 servings)
Ingredients:
Crust:
The Process:
When I was vegan (2006-2009-- I rolled with the social justice crew in college), I got a super hip cookbook by a super hip vegan named Sarah Kramer. With her kitten heels (I bought some), dyed black hair (got pretty close), bright red lipstick (had some but was too afraid to wear it), tattoos (still want one), and ugly/awesome ultra-short bangs (didn't do that, thank goodness), I somewhat secretly thought she was the coolest person ever. Of course, I knew would have to move to Europe and change my name in order to pull off being Sarah Kramer (same reality check as when I wanted to be Gwen Stefani in high school), so I proceeded to be myself... just the vegan version.
Her book, La Dolce Vegan, had a phenomenal Veggie Pot Pie recipe that I made on a regular basis. I think I may have even taken one to my family's Thanksgiving dinner to share. It worked beautifully as a main course for me and a side for all the turkey eaters. When I decided that this would be the week to do a Veggie Pot Pie, I discovered that my vegan cookbook was back in California, stored with all my other childhood and college artifacts. So, of course, I started searching online. I remembered that there were a lot of root vegetables and that it had thyme and soy sauce. Random memory, I know. The closest recipe I found was an adapted version of the book's Portobello Pot Pie, so I adapted the adaptation and rolled with it. I took only a few days to memorize the recipe, which is why I only have one post for you.
The Verdict:
The filling of the pot pie could have been a bit soupier (it was quite starchy-- not a bad thing, but not what I think of when considering pot pie). Aside from that, it had magnificent flavor. Don't be afraid of all the soy sauce-- when mixed in with the water it does not taste too salty. This dish definitely should be served with a light fall salad (mine was mixed greens, pomegranate, and toasted walnut). It is quite simple-- make the crust, make the filling, put together, and bake. If you have a vegan guest, make this for a fall get together and pat yourself on the back for being such an accommodating host!
 |
| Hearty enough for a main course, and very inexpensive thanks to root veggies |
Yield: 1 pot pie (8 servings)
Ingredients:
Crust:
- 2 cups all-purpose flour
- 2/3 cup vegetable shortening, chilled
- 5 tbsp ice water
- 1/2 tsp salt
- 5 red potatoes, cut into 1" cubes
- 1/2 yellow onion, cut into 1/2" thick half-rings
- 2 portobello mushroom caps, cut into 1" cubes
- 2 celery stalks, chopped
- 1 carrot, chopped
- 1 cup dried shiitake mushrooms, roughly chopped
- 1/4 cup soy sauce
- 5 tbsp all-purpose flour
- 3 tbsp olive oil
- 3 sprigs fresh rosemary
- 2 tsp dried sage powder
- 1 tsp dried thyme
Preparation:
- Bring a large pot of water to a boil. Add the potatoes and cook for 15-20 minutes, until soft. At the 10-minute mark, add the dried shiitake mushrooms to reconstitute them. Save 2 cups of cooking water in a separate bowl, drain the rest and return to the pot.
- Meanwhile, heat olive oil in a large pan.
- Add the onion, celery, and carrot and cook until slightly translucent, about 4-6 minutes.
- Add the portobello mushrooms, rosemary sprigs, sage, and thyme. Cook for about 3 minutes.
- Pour in soy sauce and reserved potato cooking water and simmer for 5 minutes. Gradually add the flour, stirring until the liquid thickens and resembles a gravy. Turn off the heat and remove rosemary sprigs (the leaves can stay as long as the stems are gone).
- Pour the vegetable mixture over the potatoes and shiitake mushrooms. Stir thoroughly until incorporated.
 |
| Using the cooking water to make the gravy preserves the veggie flavor |
 |
| Be sure to stir carefully so you don't break up the rosemary too much. You'll need to remove the stems later. |
 |
| Measure out the flour ahead of time, and it will be easier to control how much goes in the pan. |
 |
| Mix thoroughly to ensure the most even distribution of ingredients. |
- To make the crust, mix the flour and salt together, then cut in the shortening.*
- Once the dough looks looks like it has large pearls of shortening in it (we don't want the lumps much bigger or smaller), add the water gradually and stir until the dough comes together.
- Divide the dough into two equal pieces. Roll them out on a floured surface to make two pie crusts (9" diameter).
- Line a pie tin with one of the crusts. Press gently around the bottom of the tin, so there is no air in between the tin and the crust. The crust edge should slightly hang over the edge of the tin.
- Fill the crust with the filling.
- Lay the second crust over the top. Pinch the edges closed and cut off the excess pie crust.
- With a fork, gently poke the top of the crust about 5 times.
- Put the pot pie in the oven for 30-40 minutes, until the crust has baked to a firm, golden-brown shell.
 |
| The dough should not feel wet, but it should be soft and stay together fairly well. My roommate tackled and mastered the pie crust on his first try! |
 |
| My preferred surface for rolling out dough is a floured counter or table... cutting boards are far too wiggly. |
 |
| I made two pot pies :) |
 |
| Pinch and cut |
 |
| Poke, poke, poke, poke, poke |
 |
| Don't be fooled by the size of the pie-- these portions are dense! |
*Tips:
- Cutting in shortening: The thing that makes pie crust nice and flaky is the small pockets of fat (shortening, in our case) that stay separate from the flour until the dish is baked. For that reason, you should take every precaution possible to ensure that the fat does not get too warm and therefore mix in too thoroughly with the flour. Some tricks for this are below:
- Use chilled shortening
- Use ice water
- Use your hands as little as possible. To incorporate the flour and shortening, I use two table knives and move through the dough in an X motion, cutting first from top-left to bottom-right (with my right hand), then from top-right to bottom left (with my left hand). Check out this video for the cutting technique (skip to :50 for the cutting technique-- the ingredient list is a bit different from ours, so you can ignore it)
- Make your pie crust not too long before you fill and bake the dish (otherwise keep them in the fridge until you are ready to bake).
Wednesday, November 7, 2012
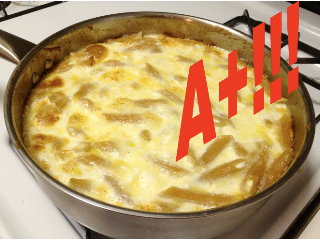
Pop Quiz! Mac & Cheese
Check out this recipe on my new and improved website: thewalkingcookbook.com
This is the first of (many?) pop quizzes that I bring upon myself. Any dish that is part of my Walking Cookbook index (aka: my memory) could be the topic of a pop quiz, meaning I will make it again without looking back at the recipe I used. This time it was Macaroni and Cheese.
Why Mac and Cheese? Well...
- The Mac and Cheese from my first run had twice the amount of pasta as it was supposed to (remember that?)
- I couldn't actually taste or smell anything the first time I made it because of my cold
- I had pasta, cheese that was going to expire soon (don't worry-- it was still good), cream, milk, and eggs on hand
- I had an extra hour
- The fridge and pantry were really full, so it was partially a clear-out meal
- I was cold and the oven heats up the kitchen nicely
Really, there was really no reason NOT to make Mac and Cheese. So I did, and it was incredible! I used whole-wheat pasta, which lets me pretend it's healthy, and I didn't have whole milk so I just used normal milk. I also added a little bit of parmesan. Here are the answers I came up with for my pop quiz:

Pop-Quiz Mac and Cheese
Yield: 8 servings
Ingredients:
- 3/4 lb. whole-wheat penne (or any other bite-sized pasta)
- 4 oz. extra sharp cheddar cheese, grated
- 4 oz. sharp cheddar cheese, grated
- 4 oz. colby jack cheese, grated
- 2 oz. parmesan cheese, grated
- 4 oz. cream cheese, cut into small chunks
- 2 cups heavy cream
- 1 cup milk
- 2 eggs
- 1/2 tbsp butter
- 1/2 tsp nutmeg
- salt
- pepper
Preparation:
- Preheat the oven to 350°F.
- Bring water to a boil on the stove.
- Add the pasta and cook for 5-6 minutes (whole-wheat pasta) or 3 minutes (white pasta), until the outside of the pasta has softened but it is still uncomfortable to chew.
- Meanwhile, mix all grated cheeses with the cream, milk, nutmeg, eggs, and salt and pepper to taste.
- Butter the bottom and sides of a casserole dish or high-edge saucepan (about 10-12" diameter).
- Drain the semi-cooked pasta, rinse once with cool water, and add to the sauce mix.
- Pour into the casserole dish or pan, even out any huge clumps of cheese, and plop the cream cheese on top
- Bake for 5 minutes, spread out the cream cheese on top, then bake for 30 more minutes, until bubbly and golden on top.
The Grade: 98%
This was a delicious Mac and Cheese... it is everything I love about the dish: hearty, gooey, and flavorful (different cheeses stand out in different bites). It was obviously cheesier and less crunchy than the mistaken Mac and Cheese from before, but it also was greasier. With less pasta to soak up the sauce, there was a bit of a greasy residue in the dish (particularly the next day after reheating).
At the school where I teach, we define mastery of a topic as the understanding and use of skills with 80% accuracy. In other words, 80% is the minimum grade required to pass a test, class, etc.
Although I lost 2% for the oily nature of this dish, I still totally mastered it with a 98%!
Saturday, November 3, 2012
Thai Pumpkin Curry: The Results and Modified Recipes
Check out this recipe on my new and improved website: thewalkingcookbook.com
The Process
Being relatively unexperienced in Thai cooking, I tried to do a lot of research as I made this recipe. First of all, curry paste from scratch confused me because there was no curry powder in the ingredient list. Then I learned (a little late in life) that curry powder is not actually a base ingredient-- it is a blend. There is no such thing as a curry plant (oops), and when you look up what is actually in a Thai curry powder product, there is a lot of the same stuff that I used in my fresh paste. The word curry, according the Henry Yule Hobson-Jobson Glossary of Colloquial Anglo-Indian Words and Phrases, is derived from the Tamil word kari, meaning "sauce." So there you have it... curry is, in the simplest terms I can derive from my gastrolinguistic field trip, a sauce made with ingredients from South-Asian countries.
Since I have you hooked with my fancy words (I thought I invented the word gastrolinguistic, but when I checked to see if anyone else had used it, Google showed 144 hits. Still semi-original, I guess, in a world of 7 billion people), I would like to take this moment to share my thoughts on Wikipedia.
*Skip to "The Verdict" if you don't care about my soapbox ramblings. I won't be offended.
You see, when I am not memorizing, cooking, and blogging I actually have a job, which for the past 4 years has been teaching middle and high schoolers in a NYC public school. I love my students, but I want to pull my hair out every time I see someone cite Google or Wikipedia on their research projects. On the flip side, however, I get irritated when people say that Wikipedia is completely unreliable and has no business in the classroom. Why?
I guess I can conclude these musings with this: Wikipedia is real, relevant, and often reliable. People who care deeply about a topic write in, get approved, and back up what they write with references. While I cringe at the thought that a student would take Wikipedia as inerrant truth (much like I would cringe if they cited their friend or their uncle as an expert source in a research paper), I also am grateful for the availability of a resource that puts unknown topics into user-friendlier words and guides learners to the wealth of texts that are out there. Like with any tool, having it is great, but knowing how to use it well is invaluable.
The Verdict:
This recipe was one of my absolute favorites! I would make it again and again, and I am already thinking of a way to make it year-round with seasonal produce (cauliflower, eggplant, zucchini, potato, chick pea... apple?). I am looking forward to making some more curry paste and freezing it in cubes for quick use in the future.
Since the sauce cooks for long enough that the pumpkin gets pretty soft, I highly recommend cooking your rice a bit al dente. This will add the textural component that the sauce lacks on its own.
Finally, the Shrimp Lettuce Wraps were a huge hit, so I am going to link that recipe again even though it was not the one I memorized. It was the perfect addition of crunch, coolness, and protein to complement a warm vegetable entree. Definitely chop everything up, and mix in the sauce at the very end so they don't get soggy.
The Modified Recipe: Vegetarian Pumpkin Curry, adapted from Thai Table
Yield: 8 servings
Ingredients:
The Process
Being relatively unexperienced in Thai cooking, I tried to do a lot of research as I made this recipe. First of all, curry paste from scratch confused me because there was no curry powder in the ingredient list. Then I learned (a little late in life) that curry powder is not actually a base ingredient-- it is a blend. There is no such thing as a curry plant (oops), and when you look up what is actually in a Thai curry powder product, there is a lot of the same stuff that I used in my fresh paste. The word curry, according the Henry Yule Hobson-Jobson Glossary of Colloquial Anglo-Indian Words and Phrases, is derived from the Tamil word kari, meaning "sauce." So there you have it... curry is, in the simplest terms I can derive from my gastrolinguistic field trip, a sauce made with ingredients from South-Asian countries.
Since I have you hooked with my fancy words (I thought I invented the word gastrolinguistic, but when I checked to see if anyone else had used it, Google showed 144 hits. Still semi-original, I guess, in a world of 7 billion people), I would like to take this moment to share my thoughts on Wikipedia.
*Skip to "The Verdict" if you don't care about my soapbox ramblings. I won't be offended.
You see, when I am not memorizing, cooking, and blogging I actually have a job, which for the past 4 years has been teaching middle and high schoolers in a NYC public school. I love my students, but I want to pull my hair out every time I see someone cite Google or Wikipedia on their research projects. On the flip side, however, I get irritated when people say that Wikipedia is completely unreliable and has no business in the classroom. Why?
- First of all, those people would be lying if they said they had never consulted Wikipedia. I don't buy it, and I don't like hypocrisy.
- Second of all, Wikipedia has been under the microscope so much that it is now probably better monitored than many other websites (I have no stats to back this up, but it is a logical assumption).
- Finally, Wikipedia has these beautiful gems called citations, which lead you to a (possibly) more reputable website that can then be cited with much pride. My entire first paragraph about the origins of curry led me to the University of Chicago website and the esteemed linguistic site, Ethnologue. But guess where my search began? Click for a not-so-surprising answer.
I guess I can conclude these musings with this: Wikipedia is real, relevant, and often reliable. People who care deeply about a topic write in, get approved, and back up what they write with references. While I cringe at the thought that a student would take Wikipedia as inerrant truth (much like I would cringe if they cited their friend or their uncle as an expert source in a research paper), I also am grateful for the availability of a resource that puts unknown topics into user-friendlier words and guides learners to the wealth of texts that are out there. Like with any tool, having it is great, but knowing how to use it well is invaluable.
The Verdict:
This recipe was one of my absolute favorites! I would make it again and again, and I am already thinking of a way to make it year-round with seasonal produce (cauliflower, eggplant, zucchini, potato, chick pea... apple?). I am looking forward to making some more curry paste and freezing it in cubes for quick use in the future.
Since the sauce cooks for long enough that the pumpkin gets pretty soft, I highly recommend cooking your rice a bit al dente. This will add the textural component that the sauce lacks on its own.
Finally, the Shrimp Lettuce Wraps were a huge hit, so I am going to link that recipe again even though it was not the one I memorized. It was the perfect addition of crunch, coolness, and protein to complement a warm vegetable entree. Definitely chop everything up, and mix in the sauce at the very end so they don't get soggy.
 |
| A kaffir lime leaf makes a nice garnish for the final fall entree |
Yield: 8 servings
Ingredients:
- 2 chile peppers (make your spiciness decision here)*
- 2 cups coconut milk
- 8-10 kaffir lime leaves*
- 4 lb. pumpkin (the eating, not the decorative kind)*
- 6-8 sprigs Thai basil*
- 1 cup water
- 2-4 tbsp. vegetarian red curry paste (see recipe below)
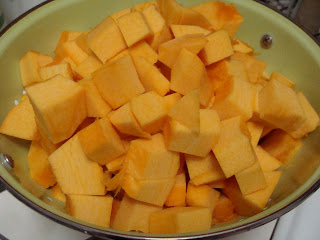
- Slice pumpkin open and remove seeds.*
- Cut the pumpkin into chunks and cut off the peel.
- Cut the pumpkin flesh into 1 1/2 inch cubes.
- Remove basil and kaffir lime leaves from stem.
- Julienne red chili pepper.
- Pour half of the coconut milk into a pot over medium heat.
- Add the red curry paste and mix it well, stirring frequently.
- Add the pumpkin and kaffir lime leaves and stir to coat with curry sauce.
- Add the rest of the coconut milk and water.
- Season gradually with salt, tasting frequently (the curry paste provides plenty of salt, so you don't want to add too much)
- Simmer the pumpkin until soft, about 15 minutes, and longer if you want a thicker curry.
- Add Thai basil and sliced chile and remove the kaffir lime leaves.
- Serve hot with rice.
 |
| Letting the sauce heat up with kaffir lime leaves in it is a great way to infuse the leaves' flavor into the finished product (much like bay leaves in Italian cooking) |
 |
| Evolution of Pumpkin, Stage 1 (make sure it gets coated by the sauce) |
 |
| Evolution of Pumpkin, Stage 2 (starting to soften as the sauce thickens) |
 |
| Evolution of Pumpkin, Final Stage (nice and soft, slightly integrated into the sauce) |
The Other Modified Recipe: Vegetarian Red Curry Paste, adapted from Thai Table
Yield: 3/4 cup
Ingredients:
Preparation:
Yield: 3/4 cup
Ingredients:
- 4-5 dried whole chiles (make your spiciness decision here)*
- 1/2 cup shallots, peeled
- 1/4 cup garlic, peeled
- 3-4 tbsp lemongrass, chopped finely
- 2 tbsp salt
- 1 1/2 tbsp galangal (ginger works too)
- 1 tbsp cilantro root (the stem can work too, but it is a little stronger)
- 1 tbsp coriander
- 1 tbsp kaffir lime zest (normal lime is acceptable also)
- 1/2 tsp cumin
- 1/2 tsp pepper
 |
| The curry paste line-up (from 12:00): shallots, ginger, cilantro root, salt, lime zest, coriander, cumin, lemongrass, ancho chile, garlic (just missing the pepper) |
- Soak chiles for 10 minutes until soft. Remove the stem and seeds. Squeeze out water.
- Add lemongrass pieces to a food processor. Pulse until minced.*
- Add all ingredients to a food processor (or keep it traditional with a mortar and pestle) and blend until they become a firm, red-orange paste.
- To save for later, you can refrigerate for a few weeks or freeze for up to a year.
 |
| Before the ride |
 |
| After the ride- you want a nice, dry, pasty paste. No juice. |
*Tips:
- Choosing fresh chiles for the main dish: Since the chiles used in the final dish are practically raw (only staying in the pan for 3 minutes or so), you will want to ensure that you choose a chile that fits the spice tolerance of your guests. I think I handle heat worse than anyone else in my apartment, so I kept it mild with a cherry pepper. It has a color and flavor resembling a red bell pepper, but it's slightly more potent and less sweet. With the sweetness of the coconut milk and pumpkin meat, I wanted to avoid any more or the same flavor profile. I also bought a jalapeño, but I got too scared to include it. An option for a middle ground that is to put large chunks of jalapeño (seed free, of course) in the coconut milk as it is heating. With frequent taste tests, remove the jalapeño just before it gets to the spice level you want. The flavor will consolidate as the sauce thickens, and you won't risk a spice attack on your taste buds by accidentally chomping on a piece of chile.
 |
| Cherry Pepper-- not too hot, not too sweet |
- Kaffir lime leaves and Thai basil: While these two ingredients usually require a specialty store to find fresh, they are available dried at Whole Foods and other markets with a comprehensive Asian section. I soaked my lime leaves in water for about 10 minutes before adding them to the recipe, but I still removed them after letting their flavor infuse the curry because they were a bit too tough. I also bought dried Thai basil, which I crumbled between my fingers before adding to the curry. Oddly enough, I kind of wish I had used a mixture of fresh (regular) basil and a tiny bit of mint to replace Thai basil rather than using a dried product, but I'll save that substitution for next time.
- Choosing a pumpkin: Any pumpkin that is not labeled "decorative" is fair game for this recipe, as is acorn squash or any other firm-fleshed orange winter squash. Just weigh it to ensure you'll have enough meat. Pumpkin meat is also available freshly packaged at most grocery stores this time of year (usually on a styrofoam tray wrapped in plastic wrap-- waste alert!). The benefit of using a whole pumpkin is that you can decorate it beforehand. Also, you can save the seeds (see the next tip).
- Prepping your pumpkin: I could not have made this recipe without my roommate's help! He prepped the entire pumpkin: removing the stem (aka: making a hat), scooping out the pulp and seeds, washing the seeds so we could roast them (wasting pumpkin seeds is a sin), cutting the peel off, and cutting the flesh into chunks to use in the recipe. It's a lot of work, but he did it like a boss!
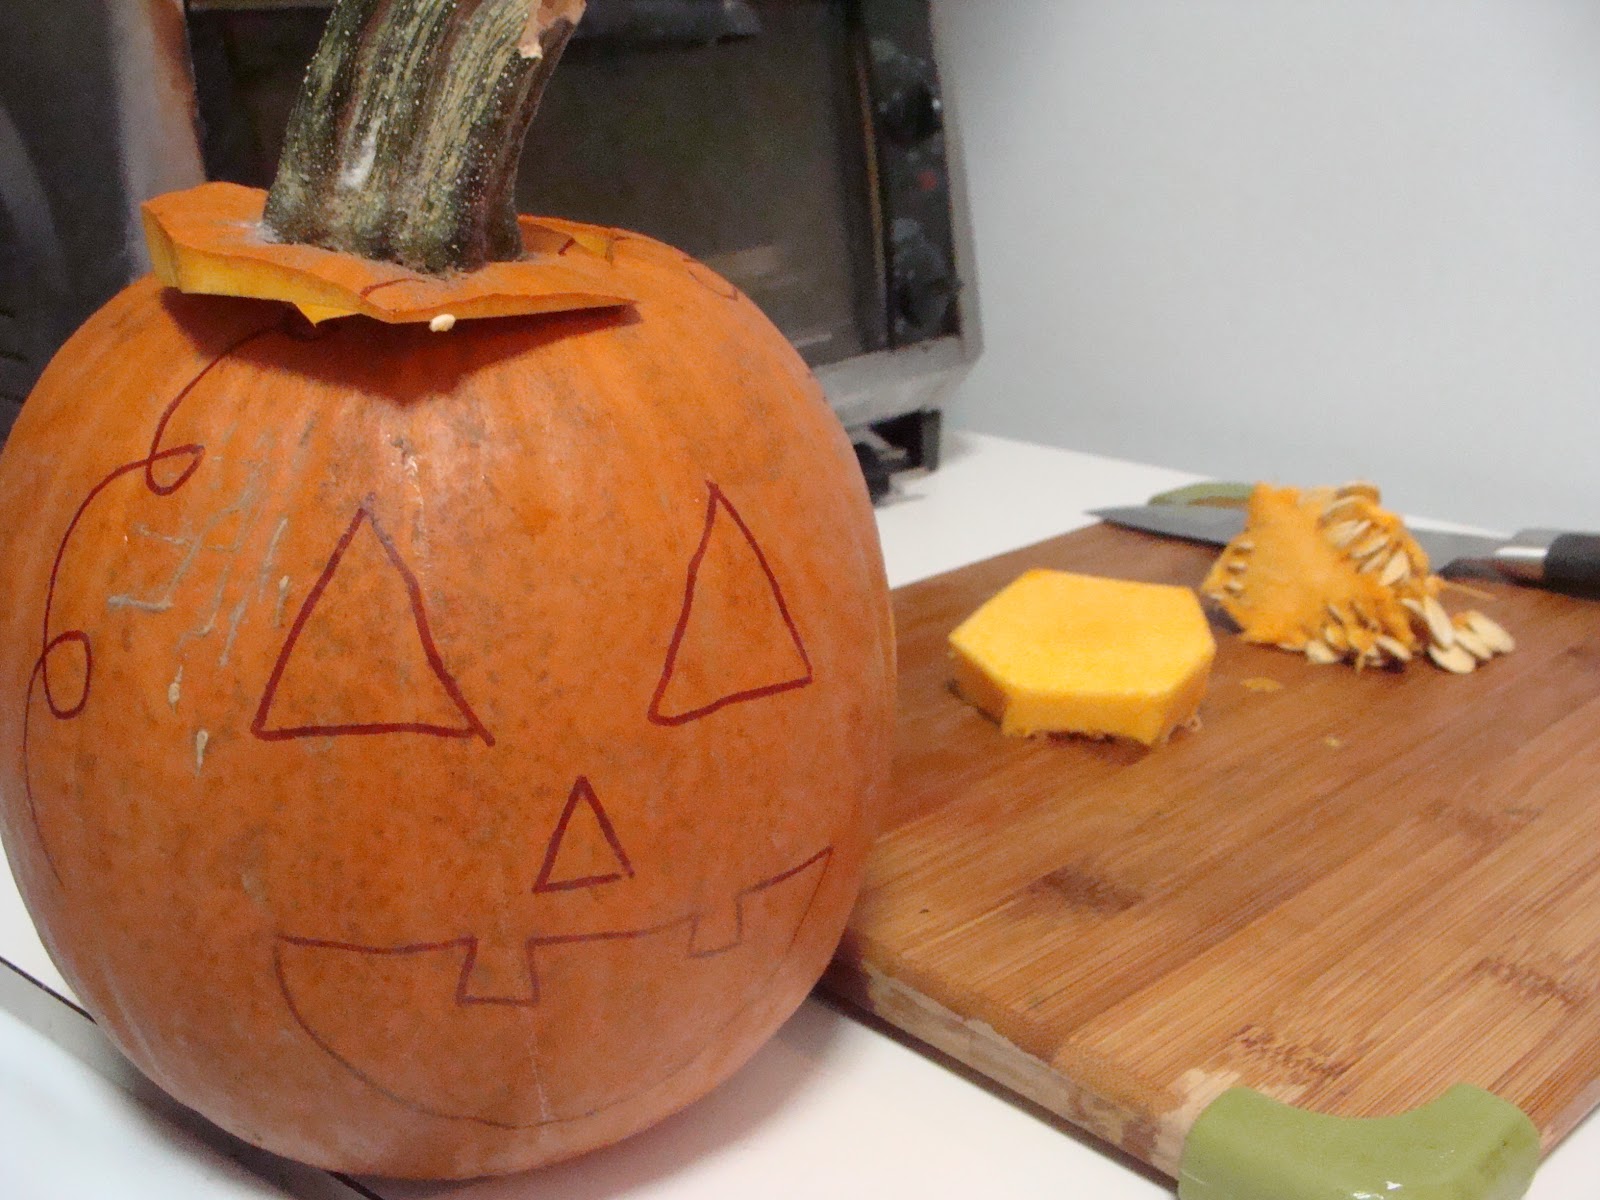 |
| "Happy Halloween, m'lady!" (Get it? He's tipping his hat) |
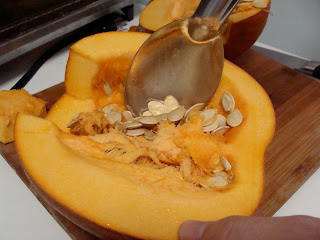 |
| An ice cream scoop is a nice way to get the pulp out of a pumpkin because of the sharper edges. |
 |
| All of this came from the one little pumpkin |
 |
| Never waste pumpkin seeds. Wash, dry, oil, salt, and bake at 375° for 25 min. Check on them frequently. |
- Choosing dried chiles for the curry paste: I was hoping to find dried Thai chiles at the market to make this a true Thai curry paste, but since they were nowhere to be found I took a stroll to the Mexican section and found a treasure trove of dried chiles. I opted for ancho chiles, which are quite mild but have a nice deep flavor. Again, this is where you get to pick the spice level of your meal, so choose wisely. The bigger the chile, the fewer you need, so I only used 2 ancho chiles in my curry paste. If I had chosen smaller ones, I definitely would have used more. You basically want 1/3 cup once they are soaked, squeezed, and chopped.
 |
| Ancho Chiles taking a bath |
- What to do about lemongrass: Having never cooked with lemongrass before (but knowing the flavor well), I was terrified about how tough and fibrous it was. It was nearly impossible to cut through the pinky-sized core, and when I tasted a tiny piece, I felt like I was chewing through twine. I started to imagine that a dinner guest would get a piece that the food processor missed and be turned off from the food, so I decided to give the lemongrass its own private spin in the food processor. Once it looked minced, I then added the rest of the ingredients. The process (and results) were literally very smooth.
Subscribe to:
Posts (Atom)