Tuesday, September 4, 2012

Pad Thai: The Recipe

Check out this recipe on my new and improved website: thewalkingcookbook.com

It's going to be a special Family Dinner this Thursday... I will have just completed the first day of the fourth year of my teaching career. For someone who wasn't even sure that she would make it through two years, my school and students have become an invaluable part of my life. As my NYC "family" (roommates, friends, visitors, etc.) and I say goodbye to our summer days, I have to admit that I'm not quite ready to start cooking the real comfort food. My pot pies, mac & cheese, and other sources of warmth will have to wait a little longer. This week, I will be having fun with Pad Thai.

As common as Pad Thai is in my gastronomic repertoire as a consumer, it is not even close to my culinary comfort zone. Woks are involved, measurements are not precise, and to top it off, the ingredients are going to be a beast to find, even in the Big Food-Mecca Apple. However, if I am truly to become a Walking Cookbook, I have to jump this hurdle sometime. For this, I turn to the experts. Chef McDang, the king of Thai cuisine according to most of my sources, offered up his complex recipe on his website. Impressive, yes, but I ended up going the training-wheel route with Pim Techamuanvivit's wordier but somehow less intimidating version. Pim is a blogger, so her conversational style gave me just enough hand holding that I felt I could take on the task. Of course, I pared it down to my own virgo-esque list format.

I hope I am able to find the ingredients needed for a true Pad Thai, because as open as I am to substitutions, I don't want my entire meal to be made of replacement ingredients. So it's off to Kalustyans I go to search their shelves for the more esoteric (read: authentic Thai) ingredients in the recipe. Oh yeah, and I have to buy a wok...


Pim's mouthwatering results


The Recipe: Pad Thai for Beginners, adapted from Chez Pim
Yield: 6 servings
Sauce Ingredients:
  • 1/2 cup tamarind pulp (no sugar added)
  • 1/2 cup fish sauce
  • 1/2 cup palm sugar (about the color of cookie dough)
  • 2-4 tsp Thai chili powder or paprika
Pad Thai Ingredients:

  • 16 oz. thin rice noodles (aka: Rice Sticks, Banh Pho, or Chantaboon)
  • 42 medium shrimp, peeled, deveined, and tails removed
  • 2 packs firm or extra-firm tofu, drained and cut into bite-sized pieces (picture the size of a Starburst candy)
  • 6 eggs
  • 3/4 cup roasted unsalted peanuts, finely chopped
  • 12 garlic chives (or the green part of a green onion), cut into 2" pieces
  • 3 cups bean sprouts
  • 1 lime
  • 2 cups peanut oil

Sauce Preparation:
  • In a small saucepan, melt the tamarind pulp, fish sauce, and palm sugar together over a low flame.
  • Add the chili powder or paprika teaspoon by teaspoon until reaching the desired level of spice.
  • Bring to a simmer and remove from the heat.

Pad Thai Preparation: Make no more than 2 portions at a time
  • Soak the rice noodles in water until they are very al dente. Drain.
  • Prepare all other ingredients as described in the ingredients list and set in containers near the stove.
  • Heat a large wok over high heat until very hot, to the point of smoky.
  • Add a splash of oil, about 3-4 tablespoons.
  • Add 1/3 of the tofu to the pan and cook for one minute until the tofu is crisp and slightly brown at the edges.
  • Add about 4 loosely packed cups of noodles, and ladle about 1/2 cup of warm sauce. Stir vigorously, keep everything moving in the wok, and cook the noodles until soft. Remember to break up the noodles and don’t let them lump together. If the sauce evaporates too quickly and your noodles aren't quite ready, sprinkle a bit of water and keep stirring. Add a bit of oil if the noodle still stubbornly sticks together. 
  • When the noodles are ready (taste to be sure), push them up to one side of the wok and crack 2 eggs into the middle. Let set for 10-15 seconds and toss everything together.
  • Add 1/3 of the shrimp, ground peanuts, and bean sprouts and cook for 1-2 minutes, until shrimp turn pink and are cooked through. Keep things moving. Add more sauce if it looks a little pale.
  • Add a handful of garlic chives. 
  • Turn the heat off, and quickly give the wok a good stirring to mix everything together.
  • Add the finished Pad Thai to a plate and serve. 
  • Give the used wok a quick rinse with warm water, wipe off any excess bits of food with a warm towel, then put the wok back on to the fire.
  • As soon as the wok heats back up to a smoking point, you’re ready to do another portion. Repeat this process until all your dinner guests are fed.

Time to Memorize: 3 days

Saturday, September 1, 2012

Marinara Sauce: The Results and Modified Recipe

Check out this recipe on my new and improved website: thewalkingcookbook.com

The Process:
Memorizing this recipe was simple, since the ingredients were so basic. However, learning that carrots and celery do the same trick as sugar in sweetening a sauce was nearly essential, since so many jarred sauces sadly have high fructose corn syrup in them (or other evils that I dare not mention). Although sauce takes a while, it can be made in enormous batches and used long into the future*.

The Verdict:
I understand why this sauce was considered the most "boss" of them all. It's bright, acidic, tomatoey flavor struck a perfect balance between the light taste of fresh tomatoes and the comforting warmth of a sweet marinara. It also allowed me to reach the exact level of chunkiness that I wanted by starting with whole canned tomatoes. Finally, since bay leaf is the only herb in the recipe, it is one that I could easily adapt with thyme, rosemary, basil, oregano, or any other herb of my choosing. The sauce went perfectly with the meatballs I made, and the whole meal was quite a hit.

Three days after making the Marinara Sauce, I still think of it often, but not just because of its delicious taste. You see, I finally made my "big error" in this whole learning-to-cook experience: I did not stir the sauce during its simmer time, leading to a 1/2 inch thick crust of blackened marinara sauce on the bottom of our household's big stainless steel pot. I wish I were exaggerating, but the pot is still sitting in my sink, soaking in the highest-powered dish soap I could find. I have soaked it overnight, scraped at it with a spatula (if you think nails on a chalkboard is horrific, try spatula on burnt sauce), and definitely destroyed a sponge. It's getting slightly better, but I cannot say it strongly enough: STIR YOUR SAUCE!

I like a nice, thick sauce, and this is exactly how mine turned out

The Modified Recipe: Marinara Sauce, adapted from Giada de Laurentiis on the Food Network 
Yield: 2 quarts (64 ounces)
Ingredients:
  • 1/2 cup olive oil
  • 1 medium onion, finely chopped
  • 3 garlic cloves, finely chopped
  • 2 stalks celery, finely chopped
  • 2 carrots, peeled and finely chopped*
  • 1/2 tsp salt
  • 1/2 tsp black pepper
  • 2 32-ounce cans whole tomatoes (not drained)
  • 2 dried bay leaves
Preparation:
  • In a large, non-reactive pot, heat the oil over medium-high flame. 
  • Add the onions and garlic and cook until the onions are translucent, about 10 minutes.
  • Add the celery, carrots, salt, and pepper.
  • Saute until the vegetables are soft, about 10 minutes.
  • Crush the tomatoes by hand to your desired consistency and add to the pot.
  • Add the bay leaves and simmer* uncovered over low heat until the sauce thickens, STIRRING FREQUENTLY*, about 1 hour*.
  • Remove the bay leaves and season with more salt and pepper to taste.

*Tips:

  • Storing Marinara Sauce: If you want to keep some fresh sauce on hand for quick meals, you can freeze it easily by cooling the sauce down to room temperature, placing it in a freezer-safe container, and saving the frozen sauce for your next Italian craving. Pouring the Marinara into ice cube trays and tossing the frozen sauce cubes into a freezer bag makes it simple to divvy up smaller portions of the sauce as well for a quick weeknight meal. Your ice cube tray will take a while to stop smelling like tomato, though!
  • Finely Chopping Carrots & Celery: The finer you chop, the faster it softens into an integral part of the sauce (the goal is for people to not know that carrots and celery are part of the recipe). I recommend pieces no larger than a pencil eraser.
Here's a quick idea of what "finely chopped" means in this recipe. 
  • Simmering: This is the point just below boiling, so you should expect to see a couple of bubbles here and there. Anything more will thicken your sauce before all the flavors have set in, in which case it's better to just toss fresh tomatoes on pasta!
  • Stirring the Sauce: I just can't reiterate this enough! Stir, stir, stir!
The consequence if you don't follow the aforementioned tip
(I am too embarrassed to show the bottom of the pot)
  • Simmer Time: The thicker you want your sauce, the longer you should leave it simmering on the stove. The hour cook time ensures that your sauce will be infused with flavor, but it also will allow the liquids to evaporate. I like my sauces thick, so I left mine on the stove a little longer than an hour.

Monday, August 27, 2012

Marinara Sauce: The Recipe

Check out this recipe on my new and improved website: thewalkingcookbook.com

Pasta is the perfect dish to serve for a large group-- a big pot of noodles, a big pot of sauce, and a big bowl of salad can please even the pickiest crowd. For this week's recipe, I will attempt a basic marinara sauce from scratch and serve it with some spaghetti, meatballs, tempeh balls, salad, and a grapefruit granita for dessert.

Marinara is a simple sauce but ultra useful. High-quality, non-sugar-laden sauces can run upwards of $8 for a 24-ounce jar (ahem... Rao's). Considering the fact that it's basically just some inexpensive veggies, herbs, and olive oil, manufactured tomato sauce might just be the second biggest food rip-off ever (of course, the gold medal goes to movie theater snacks).

I was shocked by the lack of basic Marinara recipes I found in my cookbook collection. However, hope was restored when I found out that Consumer Reports had dubbed Giada de Laurentiis the "Sauce Boss" based on her Tomato Basil Marinara. I trust Consumer Reports, I trust Giada, and I trust things that rhyme, so the Sauce Boss recipe made the cut with one caveat. I nixed the basil so any herb can be substituted for it (or not) depending on the cook's personal taste and the other flavors of the meal. Aside from that, I kept it as-is. I don't want to mess with the boss!


This is only a tiny amount of the huge batch this recipe will make


The Recipe: Marinara Sauce, adapted from Giada de Laurentiis on the Food Network 
Yield: 2 quarts (64 ounces)
Ingredients:
  • 1/2 cup olive oil
  • 2 small onions, finely chopped
  • 2 garlic cloves, finely chopped
  • 2 stalks celery, finely chopped
  • 2 carrots, peeled and finely chopped
  • 1/2 tsp salt
  • 1/2 tsp black pepper
  • 2 32-ounce cans whole tomatoes (not drained)
  • 2 dried bay leaves
Preparation:
  • In a large, non-reactive pot, heat the oil over medium-high flame. 
  • Add the onions and garlic and cook until the onions are translucent, about 10 minutes.
  • Add the celery, carrots, salt, and pepper.
  • Saute until the vegetables are soft, about 10 minutes.
  • Crush the tomatoes by hand to your desired consistency and add to the pot.
  • Add the bay leaves and simmer uncovered over low heat until the sauce thickens, about 1 hour.
  • Remove the bay leaves and season with more salt and pepper to taste.
Time to Memorize: 2 days

Shrimp Prepared Scampi Style: Results and Modified Recipe

Check out this recipe on my new and improved website: thewalkingcookbook.com

The Process:
Though I was a bit overwhelmed by the excitement of having my college roommates in town, I was still able to memorize this recipe in three days. The good news with cooking as opposed to baking is that measurements can be a little bit off without committing a major culinary faux pas. Just pretend it's on purpose.

In the mix of all of the ingredients for this Scampi-style shrimp, not to mention the arugula salad (topped with grapefruit, fennel, toasted almonds, avocado, and balsamic), linguini, and dessert (chocolate-covered strawberries) that I made to accompany the shrimp, I remembered to include all components except for my usual favorites-- salt and pepper. That's right, dear reader-- there was no salt or pepper added to my meal. Somehow I remembered to salt the pasta water, but nothing else. Sorry, taste buds. You are welcome, blood pressure.

The Verdict:
Despite the lack of salt and pepper, I wouldn't say the dish was bland. For those of you watching your sodium intake, keep this in mind. The garlic, shallots, lemon, wine, and herbs provided a blast of complementary flavors, all without the salt. I would absolutely add it next time, though. Thanks to my friend Rob for chiming in another excellent way to kick up the flavor of the dish. He makes a gremolata (lemon zest, minced garlic, and chopped parsley) as an edible garnish. Brilliant, Rob! Do I smell a guest blog contributor?

Since (as we learned in the last post) Scampi is a dish that started as an ingredient and has since evolved into a preparation style, it is open to interpretation. Lidia Bastianich adds her own touch with tarragon, but after tasting it alone and using a teeny bit in this recipe, I decided to omit it from the updated recipe. Thyme and parsley are more than enough. But I will say that fresh herbs are essential for this recipe.

Finally, I used far less compound butter* than called for in Bastianich's recipe. About half, in fact. I am glad I did, too, because it came in handy for when the linguini started to stick together. The shrimp were still nice and tender.

As for my guests' comments, one of my roommates informed me that if I owned a restaurant I could charge $20 for my entree. Others, however, said that their favorite part was the salad (go figure-- I whipped that up in thirty seconds). I wouldn't say this is the winningest recipe I've made so far, but then again, there was no salt. And food without salt is like a song without harmony... it can be decent, but it's never going to move me.

The final dish-- any size shrimp would work,
but I do love the big guys for the sake of presentation
No recipe for this, but it was too pretty to leave out

The Updated Recipe: Shrimp Prepared Scampi Style, adapted from Lidia's Italian-American Kitchen
Yield: 6 servings
Ingredients:
  • 18 extra jumbo (16/20) shrimp*
  • 8 sprigs fresh thyme
  • 3 large garlic cloves, minced
  • 1 stick unsalted butter at room temperature
  • 1/2 cup dry white wine*
  • 2 tbsp shallots, finely chopped
  • 2 tbsp extra virgin olive oil
  • 2 tbsp fresh lemon juice
  • 2 tsp fresh Italian parsley, minced
  • salt and pepper
Preparation:
  • Heat the olive oil in a small skillet over medium heat. 
  • Add the garlic and cook until pale golden, about 1 minute. 
  • Stir in the shallots, season generously with salt and pepper, and continue cooking, shaking the skillet, until the shallots are wilted, about 2 minutes. 
  • Add 1/4 cup of wine and 1 tbsp lemon juice, bring to a boil, and cook until about half of the wine has evaporated. 
  • Transfer to a large plate and cool completely.
  • Add to a bowl containing the butter and parsley and stir until blended. 
  • Spoon the compound butter* onto a 12-inch length of plastic wrap and roll it into a log shape, completely wrapped in plastic. Chill thoroughly. 
Compound butter rolled into a log.
The colder it gets, the easier it will be to cut.

  • Place the rack in the lowest position and preheat the oven to 475°F. 
  • Peel, devein, and butterfly the shrimp*, leaving the tail and last shell segment attached. 
  • Using some of the flavored butter, lightly grease a shallow baking pan into which the shrimp fit comfortably without touching.
  • Arrange the shrimp, tails up, on the prepared pan.
The size of your pan doesn't matter, as long as the shrimp
get lined up along the edge with their tails pointing upward.
My pan was enormous, but the empty space did no harm.
  • Cut half of the compound butter into 1/2-inch cubes and disperse the cubes among the shrimp. Save the rest for other uses.
  • Mix the remaining 1/4 cup wine and 1 tablespoon lemon juice and add to the pan. 
  • Scatter the thyme sprigs over and around the shrimp. 
  • Season with salt and pepper and place the pan on the oven rack. 
  • Roast until the shrimp are firm and crunchy and barely opaque in the center, about 7 minutes. 
  • Transfer the shrimp to a hot platter and drain the pan juices into a small pan. 
  • Bring juices to a boil over high heat and boil until the sauce is lightly thickened, 1 to 2 minutes. 
  • Spoon the sauce over the shrimp and serve.

*Tips:
  • Shrimp size: I like giving a shrimp count (rather than poundage) because as long as you need 25 or fewer, the person at the seafood counter should be willing to count them out. After that, you become a little bit obnoxious. However, if you are reading any recipe that refers to pounds of shrimp, each different type of shrimp contains a different quantity of the little guys per pound, so pay attention. My 18 "extra jumbo" shrimp ended up being about one pound.
  • Dry white wine: I always seem to hear the phrase "dry white wine" when it comes to recipes, but have I ever known what that meant? Nope. Thankfully Wine Folly has some words of wisdom on the matter. First of all, never, ever, ever use "cooking wine" from the grocery store. Use something you will actually drink, for heaven's sake! Beyond the golden rule, here are some basic guidelines:
    • Chardonnay (rich and dry) for chicken, cream sauces, and gravies
    • Pinot Grigio/Gris (crisp and dry) for seafood and shellfish
    • Sauvignon Blanc (light and dry) for veggies
  • Cooling sauces: If you need a sauce cooled quickly, pour it into the most shallow heatproof dish possible and pop it in the freezer. The combo of maximum surface area and modern technology will cool it down in no time.
  • Compound butter: This is one of my favorite techniques because of its simplicity and versatility. Compound describes something consisting of two or more separate components (compound sentences, compound numbers, chemical compounds, etc.). So add anything to butter and you have a compound butter. Keep them on hand to spread on bread, top pasta or rice, or pop on a piece of meat before you bake it. Make it sweet, savory, bizarre... whatever your indulgent heart desires.
  • Preparing raw shrimp:
    • Pull of the little legs and run your finger down the front center so the connective tissues break
    • Peel off the shell (leaving the last segment attached if you decide to keep the tail)
    • Run a knife down the back of the shrimp (about 1/4 inch deep)
    • Pull out the digestive tract. (Deveining has nothing to do with veins, although I appreciate the euphemism. Nobody wants to read a cookbook with the word depooping in it.)
    • Feel an overwhelming sense of satisfaction knowing that your shrimp are clean
My trooper sous chef roommate removing the "vein"

Sunday, August 19, 2012

Shrimp Prepared Scampi Style: The Recipe

Check out this recipe on my new and improved website: thewalkingcookbook.com

Shrimp Scampi may be the biggest misnomer in the culinary world (except for sweetbreads--eew). As a linguist, I was fascinated to find out that scampi are not shrimp at all but actually the tail of a type of shellfish called Langoustine, Nephrops, or Dublin Bay Prawn. So when we say "shrimp scampi," it's kind of like we are saying "shrimp prawns," which is as silly as Chai tea ("tea tea") or ATM machine. 

But I digress. Real scampi were traditionally prepared by Italian immigrants in the style that we now know as scampi, but the immigrants' Italian-American descendants now use common shrimp instead of the elusive Nephrops. Complex history, no? If you are learning this for the first time, don't worry--you are in bloody good company. Apparently in 2011, "What is scampi?" was the second most common "What is?" Google search among Britons. Who knew that the UK has such a fascination with esoteric shellfish?


List courtesy of BBC News and Google Zeitgeist
Since scampi as we know it is not quite as traditional as we may have thought, it was tough to find a traditional recipe for it. The two biggest questions for me: 

  1. To breadcrumb or not to breadcrumb?
  2. To bake or to pan fry?

Thanks to NY Times food writer Melissa Clark, I was led to Lidia Bastianich's expertise on the matter. Since she is the only chef I found who used the proper terminology in her recipe ("Shrimp Prepared in the Scampi Style"-- so precise!), she won my trust, meaning I had my two biggest questions answered: no breadcrumbs, and definitely bake.

Before we get to the classic recipe, I have to tie up one loose end. I will not be able to sleep through my guilt tonight if I don't send some culinary love to Ina Garten, whose breadcrumb-positive version of this dish inspired my love for the scampi style. Her recipe is sinfully buttery and well worth the indulgence.

My college roommates are coming to NYC on Wednesday from Los Angeles and Denver, and before we go out and paint the town red, we'll be coming together to eat like we used to so often at our old house. I can't wait to see them and add another recipe to my Walking Cookbook collection!


Lidia's mantra is "Everyone to the table to eat."
This will be a great dish for large groups.
The Recipe: Shrimp Prepared Scampi Style, adapted from Lidia's Italian-American Kitchen
Yield: 6 servings
Ingredients:
  • 36 shrimp (about 3 1/2 lbs)
  • 8 sprigs fresh thyme
  • 3 large garlic cloves, minced
  • 1 stick unsalted butter at room temperature
  • 1/2 cup dry white wine
  • 2 tbsp shallots, finely chopped
  • 2 tbsp extra virgin olive oil
  • 2 tbsp fresh lemon juice
  • 2 tsp fresh Italian parsley, minced
  • 2 tsp fresh tarragon, minced
  • salt and pepper
Preparation:

  • Heat the olive oil in a small skillet over medium heat. 
  • Add the garlic and cook until pale golden, about 1 minute. 
  • Stir in the shallots, season generously with salt and pepper, and continue cooking, shaking the skillet, until the shallots are wilted, about 2 minutes. 
  • Add 1/4 cup of wine, bring to a boil, and cook until about half of the wine has evaporated. 
  • Transfer to a small bowl and cool completely. 
  • Add the butter, parsley, and tarragon and beat until blended. 
  • Spoon the flavored butter onto a 12-inch length of plastic wrap and roll it into a log shape, completely wrapped in plastic. Chill thoroughly. 
  • Place the rack in the lowest position and preheat the oven to 475 degrees F. 
  • Peel, devein, and butterfly the shrimp, leaving the tail and last shell segment attached. 
  • Using some of the flavored butter, lightly grease a shallow baking pan into which the shrimp fit comfortably without touching.
  • Arrange the shrimp, tails up, on the prepared pan.
  • Cut the remaining flavored butter into 1/2-inch cubes and disperse the cubes among the shrimp. 
  • Mix the remaining 1/4 cup wine and 1 tablespoon lemon juice and add to the pan. 
  • Scatter the thyme sprigs over and around the shrimp. 
  • Season with salt and pepper and place the pan on the oven rack. 
  • Roast until the shrimp are firm and crunchy and barely opaque in the center, about 5 minutes. 
  • Transfer the shrimp to a hot platter and drain the pan juices into a small pan. 
  • Bring juices to a boil over high heat and boil until the sauce is lightly thickened, 1 to 2 minutes. 
  • Spoon the sauce over the shrimp and serve.
Time to Memorize: 3 days (eek!)

Friday, August 17, 2012

Tuna Tartare: Results and Modified Recipe

Check out this recipe on my new and improved website: thewalkingcookbook.com

The Process:
Tampering with fame can be like playing with fire, and I felt like I did that a bit with this Ripert recipe. But as they say, the greater the risk, the greater the reward, and my fire play definitely paid off. The ingredient list in this recipe was hefty, but I was able to tackle it by keeping in mind that all I really have to do is measure and mix. 

When I was in high school and studied for my AP classes, I would always wake up at 4:00 the morning of a test, grab a bowl of blueberries, and rewrite my vocabulary words on green flashcards in green ink while sniffing a peppermint scented candle. Those were my memorization techniques based on something I read in some "highly reputable" magazine that said blueberries, peppermint, and the color green were all good for memory (the 4:00 AM part was my own crazy plan). I think I have developed a better strategy for this blog... I memorize the ingredient list from largest to smallest quantity. For any of you playing along at home, I will try to write all my recipes the way I think of them now, because just knowing that there are x ingredients that call for y tablespoons is enough to remind me what they are, and hopefully it will help you remember too. According to my most recent graduate education course, they call that "chunking," and it helps home cooks and struggling readers alike.

The Verdict:
I made this dish for the largest crowd I have served yet (eight-person dinner at my apartment, stretching the six-serving recipe a bit) and everyone's plates were totally clean. It got two thumbs up from my roommate's dad, who is a sushi buff and eats the most divine seafood straight out of the water in Baja California, Mexico (jealous). And an extra special guest who does not usually like fish or wasabi worked through it with no problems. He surprised even himself!

One bite into the Tuna Tartare had me wishing I had made more. It was light and refreshing yet filling, zesty but not spicy by any means, and had just enough texture on its own with the avocado and scallion. Of course, I would never take credit away from the crackers for adding real crunch (and bragging rights for making homemade crackers).

Now for my modifications... I added the avocado to the whole recipe because it bulked up the dish a bit and gave a creamy element. I was very happy with those results. Oddly enough, Whole Foods was out of fresh jalapeños, so about 1 1/2 serrano chiles did the trick. The only thing I would do differently in the future is significantly reduce the amount of oil in the marinade-- really, only 1/4 cup total is necessary, and the rest gets all over the plate. Stick with the ginger oil because of its delectable Asian flair. The updated recipe is below.

To make sure everyone left dinner full and content, I served the Tuna Tartare with a Cold Sesame Noodle Salad and we had Chocolate Mousse (plus gourmet takes on Hostess classics from Empire Cake) for dessert. As one of my wonderful dinner guests said, "You've really outdone yourself this time!" If you're looking to impress, read on...

Cool, quick, and healthy-- my idea of the perfect summer dinner

The Modified Recipe: Marinated Yellowfin Tuna Tartare with Ginger Oil and Flatbread Crackers, adapted from On the Line
Yield: 6 servings (4 oz. tuna with 4 crackers)
Tuna Tartare Ingredients:
  • 1.5 lbs yellowfin tuna*
  • 1 lemon, cut into 6 wedges
  • 1 avocado
  • 1/4 cup ginger oil (recipe follows)
  • 3 tbsp minced scallion (white part only)
  • 3 tbsp chopped cilantro (leaves only)
  • 3 tbsp lime juice
  • 1 tbsp wasabi paste
  • 1 tbsp minced serrano chile, seeds removed
  • 1 tsp Sriracha chile sauce
  • Salt and pepper
Tuna Tartare Preparation:
  • Cut the tuna, first on the bias*, then into a 1/4 inch dice. Remove any sinewy bits. Put in the refrigerator in a large bowl until ready to mix.
  • Combine the ginger oil, wasabi, scallion, jalapeño, cilantro, lime juice, Sriracha, salt, and pepper in a measuring cup or bowl. Whisk and pour over tuna.
  • Cut the avocado in half and remove the pit. Use a sharp knife to make 1/4 inch grid cuts in each half of the avocado.*
  • Scoop the avocado out of its skin onto the tuna and break the pieces apart. Mix gently, trying not to mash the avocado.
  • Garnish with a lemon wedge and serve.*
Ginger Oil Ingredients:
  • 4 oz ginger, peeled and minced
  • 1/2 cup canola oil
Ginger Oil Preparation:
  • Put the ginger in a clean jar and add the oil.
  • Seal tightly and let stand at room temperature for 2 hours or refrigerate overnight.
  • Can be stored in the refrigerator up to 2 weeks.
Flatbread Cracker Ingredients:
  • 3/4 cup all-purpose flour
  • 1/4 cup water
  • 1 tsp extra virgin olive oil
  • 1/2 tsp fine salt
Flatbread Cracker Preparation:
  • Combine the flour and salt in a mixing bowl.
  • Whisk together the water and olive oil, add to the flour and mix until smooth.
  • Cover the dough and refrigerate for 1 hour.
  • Preheat the oven to 300°.
  • On a lightly floured surface, roll out the dough very thin and slice into 1.5"x4.5" rectangles. 
  • Place the rectangles on a parchment-lined baking sheet and bake 10-15 minutes until golden brown.
  • Cool on a rack and store for up to a week.

*Tips:
  • Yellowfin tuna: Also known as Ahi, this stuff runs about $21/lb. Get it somewhere good. For that price, you are allowed to be picky at the fish counter and ask for the pieces that are the most vibrant red (lighter coloring usually means there is a lot of sinew, and we don't pay $21/lb for sinew).
  • Cut on the bias: In case you forgot from the days of Ceviche, here's a refresher to get the most tender fish pieces possible. A small dice like in this recipe is a bit more forgiving, though.
  • Cutting an avocado into a grid: In case my description above was confusing to you, check out this beautiful picture from CreateLive. For this recipe, you'll want your grid squares to be much smaller.
These are 1/2 inch grid squares. We want about 1/4 inch.
  • Plating the Tuna Tartare: This is my favorite part. If you don't have a ring mold to make a nice little cylindrical mound like you see in restaurants, line a ramekin or even a dry measuring cup with plastic wrap. Press the Tartare into it to fill all corners, then flip the dish over onto the plate. Tap the bottom of the measuring cup or ramekin a few times and lift straight up. The Tartare should be looking classy on the plate and your plastic wrap should be empty and ready to use for the next serving.

Monday, August 13, 2012

Tuna Tartare: The Recipe

Check out this recipe on my new and improved website: thewalkingcookbook.com

Most people who dine with me in restaurants know that if Tuna Tartare is on the menu, it is hard for me to pass up. I have gotten to enjoy the Tuna Tartare at such places as Lavo, Ed's Chowder House, Lure Fishbar, and Tolani, and I have never been disappointed. Tartare is a French term describing finely chopped raw meat that is seasoned in some way (leave it to France to give a French name to a dish with a generally Asian flavor profile). It can be made up with all sorts of twists (Lavo has an interesting mediterranean take on the dish with garlic and olives), but the freshness of the fish cannot be compromised. We're talking sushi-grade tuna, here.

In my search for the perfect Tuna Tartare recipe, I struck culinary gold! I discovered the book On the Line by Eric Ripert and Christine Muhlke, offering a behind-the-scenes look at the famous restaurant Le Bernardin, that, upon its opening in 1986, "caused a shift in how Americans ate fish." With three Michelin stars and four stars from the New York Times, Le Bernardin is far more than just a French seafood restaurant. Tucked in the back of this insightful book is a recipe for Tuna. As with all of Ripert's dishes, the star ingredient comes first in the title, followed by a description: Seared and Marinated Yellowfin Tuna Tartare "Sandwich" with Ginger Oil. I may not be at a point in life when a $125 prix fixe dinner is in the stars, but I am thrilled to know that I can attempt to create a small taste of Le Bernardin at home.

This week I will be preparing just the marinated part of the Tuna Tartare from On the Line. Although it may be sacrilegious, I'm also going to add some avocado to the recipe. In my humble opinion, a ripe avocado can do only good things to a tartare. I'll make some flatbread crackers to go with the Tuna Tartare (also from Ripert's recipe collection) and serve it with a cold Asian noodle salad to round out the entire meal. This dish is simple in process but complex in ingredients, so making the shopping list will be the true test of memorization.


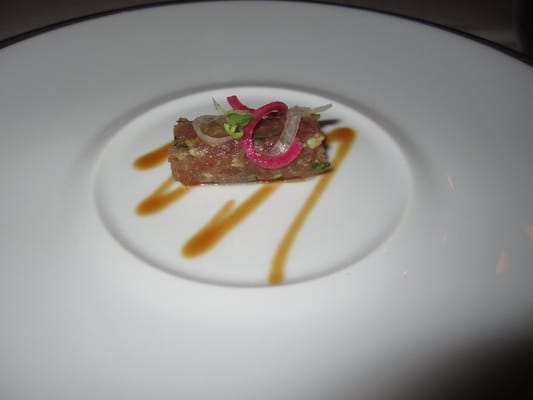
An amuse bouche of Tuna Tartare from Le Bernardin
(photo from Lorraine L. on Yelp)
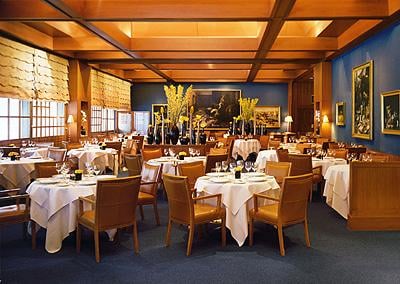
One day I will get to sit here and experience seafood bliss

The Recipe: Marinated Yellowfin Tuna Tartare with Ginger Oil and Flatbread Crackers, adapted from On the Line
Yield: 6 servings (4 oz. tuna with 4 crackers)
Tuna Tartare Ingredients:
  • 1.5 lbs yellowfin tuna
  • 1 lemon, cut into 6 wedges
  • 1 avocado (optional)
  • 1/4 cup canola oil
  • 1/4 cup ginger oil (recipe follows)
  • 3 tbsp wasabi paste
  • 3 tbsp minced scallion (white part only)
  • 3 tbsp cilantro julienne
  • 3 tbsp yuzu (or lime) juice
  • 1 tbsp minced jalapeño
  • 1 tsp Sriracha chile sauce
  • Salt and pepper
Tuna Tartare Preparation:
  • Cut the tuna into a 1/4 inch dice. Put in the refrigerator until ready to mix.
  • Chop avocado into 1/2 inch pieces.
  • Combine the diced tuna, ginger oil, wasabi, scallion, jalapeño, cilantro, yuzu juice, canola oil, and Sriracha in a stainless steel bowl.
  • Gently mix in the avocado and season with salt and white pepper.
  • Squeeze lemon juice over the tuna and serve on flatbread crackers.
Ginger Oil Ingredients:
  • 4 oz ginger, peeled and minced
  • 1/2 cup canola oil
Ginger Oil Preparation:
  • Put the ginger in a clean jar and add the oil.
  • Seal tightly and let stand at room temperature for 2 hours or refrigerate overnight.
  • Can be stored in the refrigerator up to 2 weeks.
Flatbread Cracker Ingredients:
  • 3/4 cup all-purpose flour
  • 1/4 cup water
  • 1 tsp extra virgin olive oil
  • 1/2 tsp fine salt
Flatbread Cracker Preparation:
  • Combine the flour and salt in a mixing bowl.
  • Whisk together the water and olive oil, add to the flour and mix until smooth.
  • Cover the dough and refrigerate for 1 hour.
  • Preheat the oven to 300°.
  • On a lightly floured surface, roll out the dough very thin and slice into 1.5"x4.5" rectangles. 
  • Place the rectangles on a parchment-lined baking sheet and bake 10-15 minutes until golden brown.
  • Cool on a rack and store for up to a week.

Time to memorize: 4 days (I may have to peek at the cracker recipe but the tuna will be memorized!)