Showing posts with label gluten-free. Show all posts

Saturday, March 30, 2013

Remy's Ratatouille

Check out this recipe on my new and improved website: thewalkingcookbook.com


As I watched the Pixar movie Ratatouille to do some "research" for this week's recipe, I couldn't help but get teary eyed. I'm a sucker for a good underdog story, and Remy, the rat who wants to be a chef, is most definitely an underdog. The poor little guy has such a gift and has to battle prejudices to simply do what he loves. While the rat/cooking metaphor might not work for everyone, can't we all sympathize with someone who is told they can't do something because of something they can't change? Sex, race, physical ability... this is only the start of a cumbersome list of ways that people are held down. Ratatouille serves as a reminder that when given a chance, people (and rodents) can do extraordinary things. To honor this message, I made Remy's Ratatouille this week.


About Ratatouille
Ratatouille is a French dish from Nice, and it is considered a "peasant food," basically meaning that it is simple to find the ingredients and inexpensive to make. With only four main ingredients-- eggplant, tomato, squash/zucchini, and bell pepper-- and a touch of olive oil, this dish comes from the French word touiller, which means to toss. Ratatouille is typically sautéed and served as a side dish or stew. Over time, people have added and omitted things based on their preference, just like with all classic dishes.

That brings us to the movie version, which maintains the integrity of the ingredients while changing up the "touille" part. For those of you who have not seen Ratatouille (SPOILER ALERT), the protagonist rat Remy reimagines the peasant dish, making it elegant and refined, and ultimately beating the odds to realize his dreams and win over a haughty food critic. Chef Thomas Keller (The French Laundry, Per Se) was consulted during the creation of the film in order to guide the crew through the dynamics of a professional kitchen and how food is prepped, cooked, plated, and served. He also provided the revamped Raratouille recipe, actually called Confit Byaldi. If you are familiar with Keller and his recipes, you will first notice the relative simplicity of this dish. This video has some words from Keller about his role in the movie.

Regardless of the chosen method of preparation or supplementary ingredients, the key to Ratatouille is to have wonderfully fresh ingredients. Like in a well-balanced orchestra, where neither flutes nor tubas should dominate, the vegetables in a good Ratatouille should work harmoniously.


Choosing the Recipe
My parents were in town this week (woooo hooooo!), and both of them have been diligent with their Weight Watchers Points Plus program. I don't know a ton about the new Points Plus system, but I do know that keeping food relatively low in fat, low in carbs, high in protein, and high in fiber is their guide to sensible eating. I decided to browse my Master Plan List for a recipe that would compliment those dietary choices... there weren't many! However, Ratatouille was on the list and I knew I could work with an all-veggie dish, add a baked piece of fish, and I would be in the WW happy zone.

Ratatouille, in modern days, brings the Pixar movie to most of our minds, and I was no exception. After crying my way through the film (Remy's big, innocent mouse eyes made me gush), I knew I had to make Remy's version of the dish. As I mentioned before, it is actually called Confit Byaldi (there is not touiller involved whatsoever), but I will just call it Remy's Ratatouille (it sounds way cuter).


A little rat with big dreams
Memorizing the Recipe
I knew from the get-go that my version of Remy's Ratatouille would be a little more like the cartoon and a little less like Thomas Keller's Confit Byaldi. With hosting my parents, I didn't want to pick anything overly complex or onerous. They didn't travel across the country to see me stressing out because my home-cooked meal is not of French Laundry caliber. Nevertheless, there are three main components to the dish that I wanted to include: a piperade (pepper and tomato sauce) that goes in the bottom of the pan, the thin-sliced vegetables, and the vinaigrette for the top. All three of them needed to be present for the dish to come together.


The Verdict
Although Remy's Ratatouille was labor intensive (amazing that a rat could pull it off!), it was well worth the effort to produce this fresh, healthy, beautiful side dish. While the thin-sliced vegetables made the bulk of the dish pretty mild in flavor, the coming together of the balsamic, oil, and piperade at the bottom of the pan created an explosion of flavors that I could have eaten by itself or put on top of pasta. It had acidity, a little fat, and a warm, slow-cooked meltiness to it that I can't imagine acquiring any other way than by baking it low and slow. Served with some flounder and a Brussels sprout salad, the meal was a lovely, simple delight. And if you are looking for a healthy party piece, the fanned vegetables are a beauty to behold.


The Recipe
Remy's Ratatouille (aka Confit Byaldi)
adapted from The New York Times, courtesy of Thomas Keller
Yield: 8 side servings

Piperade Ingredients:

  • 1/2 yellow bell pepper, seeds and ribs removed
  • 1/2 orange bell pepper, seeds and ribs removed
  • 3 Roma (plum) tomatoes
  • 1/2 cup onion, finely diced
  • 1 tsp minced garlic
  • 2 tbsp olive oil
  • 1 sprig thyme
  • 1 sprig flat-leaf parsley
  • 1 bay leaf

Vegetable Ingredients:

  • 2 Japanese eggplants
  • 2 yellow squash
  • 2 zucchini
  • 4 Roma (plum) tomatoes
  • salt and pepper
  • 2 tbsp olive oil

Vinaigrette Ingredients:

  • 2 tbsp extra virgin olive oil
  • 1 tsp balsamic vinegar
  • chopped fresh herbs (I used parsley and dill)
  • salt and pepper

Preparation:

  • Preheat oven to 450°F.
  • Line a baking sheet with foil. Place bell pepper halves cut-side down on the foil and bake for 15-20 minutes, until skin begins to blister and separate from the pepper flesh. Remove from heat and let cool. Lower the oven to 250°F. Once the peppers are cool, scrape the skin off and discard. Chop the pepper flesh into a fine dice.
  • Meanwhile, bring a medium pot of water to a boil. Cut an X shape into the top of three tomatoes (about 1/4 inch deep). Once the water is boiling, place the three tomatoes in the boiling water, one at a time, for 20 seconds each. Remove carefully and place into a bowl of cold water. Once the tomatoes have cooled, remove the skin with your fingers and discard. Cut the peeled tomatoes in half, squeeze their juices into a bowl, and set juice aside. Chop the tomatoes as fine as possible.
  • While the peppers are roasting and the water for tomatoes is coming to a boil, slice the zucchini and squash using a mandoline (or making the slices ridiculously thin with a knife). Slice the eggplant and the remaining four tomatoes as thin as possible with your chef's knife. About 1/16 inch is ideal. If you have a mandoline that can slice an eggplant and tomatoes, feel free to use it! Mine did not work for them because of the skin. Toss all the slices with 2 tbsp olive oil and some salt and pepper.
  • Heat 2 tbsp olive oil in a non-stick pan over medium heat. Add the onions, garlic, and herbs and cook until soft, about four minutes.
  • Add the bell pepper, tomato, tomato juice, salt, and pepper. Cook over medium-low heat until most of the liquid is gone from the pan, about 6-8 minutes. Remove the herbs.
 
  • Spread the piperade (pepper and tomato mixture) into the bottom of an oven-safe serving pan. You may use a casserole, an 8" stainless steel skillet, or any other dish you have that works for you. Just don't make it too large-- the surface area should be about 50 square inches (in round dishes, A=πr^2 and in rectangular dishes A=l*w).
  • Arrange your sliced vegetables on top of the piperade, alternating vegetables in a pattern (I used eggplant, yellow squash, tomato, then zucchini) and keeping them upright like dominoes. Once you work your way around the edge of the dish, fill in the middle with another round (if there is space) or arrange them like a star. Take a look at my picture, or see this video clip for animated details (don't watch it if you don't want the movie ending given away!)

  • Place foil over the top of your cooking dish and seal by crumpling the foil around the edge. Place in the low-heat oven (250°F) for 1.5-2 hours.
  • Combine vinaigrette ingredients and beat together with a fork until emulsified (oil and vinegar united as one).
  • Remove the foil and place the pan under the broiler until lightly browned.
  • Drizzle with the vinaigrette and serve hot.

Monday, March 25, 2013

Clams in Spicy Coconut-Lime Sauce

Check out this recipe on my new and improved website: thewalkingcookbook.com


My favorite thing about clams is that they wear so many hats.
No-- not that kind of hat. But they do relate to so many parts of life! For some, clams evoke memories of spending summer days by the ocean. For others, clams serve as a reminder of what they learned about in biology about the evolution of living organism (something that I have completely forgotten). For yet another group, they conjure up thoughts about an amazing dinner (pasta alle vognole, anyone?). No matter what comes to mind when you think of clams, it's hard to deny that they make a lovely meal. This week I cooked fresh clams for the first time, using Asian flavors like ginger and coconut milk as a broth.


About Clams
Clams are shellfish (hence the shell), and in the US seafood industry they are usually classified based on size and region.

The first main division is between soft-shell and hard-shell clams. Soft-shell clams look quite similar to a hard-shell clam, but the shell is significantly more fragile. Not to be confused with soft-shell crabs, the shells of these molluscs should not be eaten.

Hard-shell clams are more common because there are so many more types. Reluctant Gourmet has a fantastic summary of clam varieties: size, coast, and methods of preparation.

A big thing to consider when cooking clams is that you need a reputable source for them. Please-- please don't get them from a grungy market because they are on sale. Clams are called filter feeders, meaning they hang out on the bottom of the ocean floor and filter in and out all the stuff that comes their way. Without scaring anyone away from trying clams, just be sure that "stuff" doesn't get into your meal. I'll explain the cleaning process along with the recipe.


Scrub before you soak, rinse after you soak.
This eliminates all the grit. Read on for more.

Choosing the Recipe
Since my priority with this recipe was to memorize how to cook clams rather than memorize a specific recipe, I had a lot of flexibility. My first instinct was to do a clam pizza or pasta alle vognole, but I couldn't help but want to branch out. I knew that I wanted to serve the dish with the clams still in their shell but accompanied by something hearty (carbs, basically), and I wanted some strong flavors to go with it. I flipped through my cookbooks and searched online and eventually found a recipe on Epicurious that made me smile: Clams in Spicy Coconut-Lime Sauce. Perfect! I could leave the clams in their shells, serve it on some wonderfully sticky rice, and rest on the strong and complimentary ingredients such as coconut, lime, jalapeño, and ginger.


Memorizing the Recipe
I never knew that preparing clams would be so simple! Since this week's recipe emerged from a desire to have an idea of what to do with fresh clams, the memorized part was almost too easy. Clean, tap, put over heat with some liquid, cover, and seven minutes later you have a lovely seafood dish. I didn't mess with shucking this time around. If the clams were going to be kind enough to open right up for me, I'd take the favor.

As for the actual recipe, I completely botched the shopping list and forgot jalapeño and fresh ginger. Oops. I made a few substitutions (listed in the recipe with the ingredients) and found that cayenne pepper and powdered ginger did the trick to add some spice and zest. Next time I think I'll use the original ingredients.


Step 1: Cook shallots & spices
Step 2: Add liquid
Step 3: Add clams, cover, and boil 7 minutes
Step 4: Keep opened clams & add blanched veggies

The Verdict
This was definitely the first time I have ever cooked a living creature. I'm not usually one to mess with others' lives, but I may have found my exception (further exceptions, like mussels, will probably be coming). It is just too simple. The cleaning process, even though I had to shorten the soaking time a little bit, was a success; I only encountered one gritty clam, and none of my roommates did. The clams were delicious with the slightly sweet, slightly spicy, warm broth (it was more brothy than saucy, in my opinion), and adding snowpeas to the pot made the meal nice and balanced. The dish had protein, carbs, and veggies, we had fruit for dessert, and my dairy came from the excess of cheese that I ate throughout the week. It made my roommate's top five recipes list, though he is biased due to his Bostonian origins. Including soaking time and prep, the meal took 40 minutes to prepare. With a couple of large pots, it would be easy to double or triple the recipe too.


4 simple liquids for the sauce


The Recipe
Clams in Spicy Coconut-Lime Sauce
adapted from Epicurious, with cleaning instructions adapted from The Kitchn
Yield: 4 servings

Ingredients: 
  • 1 tbsp vegetable oil
  • 3 large shallots, chopped
  • 1 tbsp chopped peeled fresh ginger or 1 tsp powdered ginger
  • 1 tsp ground turmeric
  • 2 lbs littleneck clams
  • 1 1/2 cups bottled clam juice
  • 1 cup canned unsweetened coconut milk
  • 1 cup diced canned tomatoes with juices
  • 1 jalapeño chile, seeded and chopped, or 1 tsp cayenne pepper
  • 1 tsp lime zest
  • 3 tbsp fresh lime juice
  • 2 green onions, sliced
  • 1 lb snow peas
  • 1 red bell pepper, seeds removed and julienned
  • 2/3 cup salt (for cleaning)
  • 1/2 cup cornmeal (for cleaning)
Cleaning:
  • Scrub clams shells with a stiff brush under cool running water.
  • If any shells are open, tap them against a hard surface. If they don't close shut, discard them.
  • Examine each shell, discarding any extra beard hairs and any cracked or damaged shells.
  • Place in a bowl of cool water so the water is about 1 inch higher than the clams.
  • Add 2/3 cup of salt and 1/2 cup cornmeal for every 8 cups of water and mix around.
  • Let sit for about 1 hour. 
  • Remove clams with a slotted spoon, tongs, or your hand, and place in a colander. Give them a final rinse with cool water.
  • After your final rinse, the clams are ready to cook.
Preparation:
  • Bring a pot of water to a boil. Add the snow peas, blanch for one minute, drain, and immediately place in extremely cold water. Let sit for two minutes, drain, and set to the side.
  • Heat vegetable oil in a large pot or Dutch oven over medium heat.
  • Add chopped shallots and saute for about three minutes, until tender.
  • Add ginger and turmeric and stir for one minute.
  • Add clams, clam juice, coconut milk, tomatoes with their juices, jalapeño or cayenne pepper, and lime zest and bring to a boil.
  • Cover and cook until clams open, about 7 minutes. Discard any clams that don't open.
  • Stir in lime juice, snow peas, and bell pepper and sprinkle with green onions. Serve over sticky white rice.
I recommend having tongs and a large spoon available for serving
so guests can take out the clams they want and get the flavorful broth

Thursday, January 24, 2013

Corn Bisque with Smoked Paprika Yogurt: The Recipe & Results

Check out this recipe on my new and improved website: thewalkingcookbook.com

Smokey paprika gives an interesting touch to this simple soup.
This week's post will be compact-- recipe and results in the same post! I promise, though, I have spent the last few days memorizing this recipe. I had on my Master List that I wanted to learn to make a bisque, but I then realized that I didn't know the difference between a chowder and a bisque. My hypothesis is the following: A chowder has potatoes and a bisque does not. Research time!

[5 minutes later]


I was wrong. It turns out a chowder and a bisque both have the same beginning preparation and similar ingredients, depending heavily on cream. However, a bisque is pureed, making it smooth, while a chowder remains chunky. Emeril Lagasse explains it from what seems to be his home office in this video:


So there we have it:

chowder= chunky
bisque= smooth

This affects the modifications I was going to make to this recipe, since I was going to leave some of the corn out of the blender to add in for texture. Does that make it a chowder? Not totally. I guess I will be making a chisque... or bowder. I hope neither of those are inappropriate words.


A final note before I get to the recipe: Corn is a summer veggie, but I love how quick and easy it is to use frozen corn, so I am going to modify the original recipe from LA Magazine to make it more NYC winter friendly (AKA: 11°F, feels like 0°. Ugh.)


They really shouldn't say that things are "easy as pie"...
let's change that to "easy as corn bisque"


Fage is the creamiest of the Greek yogurts I have tried,
so I like using a dollop on top of the soup.


The Recipe: Corn Bisque with Smoked Paprika Yogurt, adapted from LA Magazine

Yield: 6 servings
Weight Watchers Points: 3 pts. per serving (about 1 cup)

Ingredients:

  • 3 cups frozen corn kernels
  • 4 cups veggie broth
  • 1 cup cream
  • 1 yellow onion, diced
  • 1/2 stick butter
  • 3 cloves garlic
  • salt and pepper to taste
  • 1 tsp smoked paprika
  • 1 lemon, juiced
  • 1/4 cup plain greek yogurt
Preparation:
  • In a large pot, sweat the diced onion and garlic in the other half of the butter.
  • Add corn, veggie broth, cream, and a pinch of sugar.
  • Bring to a boil, then reduce the heat and simmer for about 90 minutes.
  • Meanwhile, mix together the yogurt, smoked paprika, lemon juice, and salt to taste. Refrigerate until serving.
  • Using a blender, puree the soup (carefully-- blenders don't like heat).
  • Salt and pepper to taste. Top with smoked paprika yogurt.
Only fill the food processor about a third of the way...
the soup rises to the top, and it is hot! No need for explosions.
Be sure the vent is open in your processor,
and hold a kitchen towel lightly over the opening just in case.
The Verdict:
This "bowder" ended up being the perfect consistency-- a teeny bit brothy, a little textured, not too heavy, but very creamy after timidly but successfully blending it in the food processor. The ingredients and process were both so simple that I couldn't really think of a way to mess this one up, and it was a big fan favorite. The natural sweetness of corn just begs for something a little more rough around the edges, which is where the smoked paprika steps in. Add some bread for serious dunking and you are all set! In a perfect world I would have let it sit on the stove a bit longer to evaporate some of the liquid. However, the extra moisture just gave me a reason to eat more bread!

Saturday, January 12, 2013

Tikka Masala: The Results and Modified Recipe


Check out this recipe on my new and improved website: thewalkingcookbook.com

With basmati rice and naan, this recipe is a hit!
The Process:
Getting back into the habit of memorizing recipes was quick and painless, with the Tikka Masala being the perfect starting recipe. We had a group of 8, and it was simple to multiply this recipe for a larger crowd. Since I am not completely familiar with Indian spices, I wasn't able to use the common-sense approach to memorizing the spices (I didn't actually know that coriander and cardamom are common in Indian recipes). However, the alliterative component helped me out a lot. For the marinade, remembering the "four Cs" was simple: cumin, coriander, cardamon, and cayenne. Are there any other hard Cs worth thinking about?
...
...
...
None that I can think of.

The onion/ginger/garlic base for the curry reminded me a lot of the Ethiopian recipes I cooked last year, so this base was simple to memorize as well. Anyone who has ever had Tikka Masala knows that it is tomato and cream based. The interesting twist was the almond powder... who knew?

Long story short, if I wanted to whip this up on a random weeknight, the overnight marinade would stand in my way a bit. But if I didn't mind a shortened marinade time, I know I'd have no problem remembering the ingredients while at the grocery store. Oh, and as a side note, we used naan from a restaurant. I am a procrastinator and the grocery store Washington Heights did not have the yeast I needed at the last minute. Looking on the bright side, it was delicious naan!


The 4 Cs for the marinade:
 coriander, cumin, cayenne pepper, and cardamom

The meat should marinate overnight. 
Here I have the two yogurt marinades and a dairy free olive oil marinade

The Verdict:
This was a delicious and comforting dish that was fairly easy to prep and make. I was able to finish it in under an hour, which I don't think is too shabby for a dinner party meal. I would love to see this recipe done on a really small scale... I wonder how the timing would turn out.

I ended up using salmon and chicken, which both were gobbled up. The salmon broke down into smaller pieces, making the flavor of the salmon infuse into the gravy. The chicken, on the other hand, maintained its structure. The gravy was a little less spicy and a little chunkier than the Tikka Masala that you get in a restaurant, but I didn't mind having something to chew on. It was still saucy enough for covering a bed of rice and dunking in a piece of naan.

I would definitely make this recipe again-- it was warm, filling, tasty, and felt fairly healthy once I added all the cauliflower. Basmati rice is really the way to go in terms of a side dish. I now have motivation to keep expanding my Indian repertoire!


My two pans ready to go: 1 for chicken, 1 for salmon.
The onion/ginger/garlic base is simple and delicious

The Modified Recipe: Chicken (or Fish) Tikka Masala, adapted from Grace Parisi at Food & Wine
Yield: 4 servings

Marinade Ingredients:
  • 1 cup plain lowfat yogurt
  • 2 garlic cloves, minced
  • 1 tbsp finely grated fresh ginger
  • 1 1/2 tsp ground cumin
  • 1 1/2 tsp ground coriander
  • 1/4 tsp ground cardamom
  • 1/4 tsp cayenne pepper
  • salt and pepper
  • 2.5 lbs meat (skinless, boneless chicken thighs; salmon or swordfish cut in 1.5" cubes)
Gravy Ingredients:
  • 2 tbsp plus 1 tbsp vegetable oil
  • 1/4 cup whole almonds, no skin
  • 1 large onion, finely chopped
  • 2 garlic cloves, minced
  • 1 tsp finely grated fresh ginger*
  • 1 1/2 tbsp garam masala
  • 1/2 tsp cayenne pepper
  • 1 35-oz can peeled tomatoes, finely chopped and juices reserved
  • 1/2 head cauliflower, cut into bite-sized pieces and lightly steamed (3-4 minutes)
  • pinch of sugar
  • 1 cup heavy cream
  • salt and pepper
Preparation:
  • Combine marinade ingredients in a large bowl.
  • Using a sharp knife, make a few shallow slashes in the pieces of meat. Add to the marinade, turn to coat, and refrigerate overnight.
  • Heat a cast iron grill pan over medium-high heat.
  • Remove the meat from the marinade and scrape off the marinade as much as possible. Place on the grill and cook until the bottom third of the meat is cooked through (3-5 minutes). Flip the meat, cover with an aluminum foil tent, and cook for another 3-5 minutes until the meat is cooked through. Keep in mind that with fish you will reduce these times significantly, since rare fish is far less dangerous (and disgusting) than rare chicken.
  • Transfer grilled meat to a cutting board and let rest.
  • Meanwhile, in a small skillet, heat 1 tbsp of the oil. Add the almonds and cook over medium heat, stirring constantly, until golden, about 5 minutes. Transfer the almonds to a plate and let cool completely. Move to a food processor* and pulse until finely ground.
  • In a large pan, heat 2 tbsp oil. Add onion, garlic, and ginger and cook over medium heat, stirring occasionally, until tender and golden, about 8 minutes.
  • Add the garam masala and cayenne, and cook, stirring, for 1 minute.
  • Add the tomatoes, their juices, sugar, salt, and pepper.
  • Cover partially and cook over medium heat, stirring occasionally, until sauce is slightly thickened, about 20 minutes.
  • Add the cream and ground almonds and cook over low heat, stirring occasionally, until thickened, about 10 minutes longer.
  • Stir in the meat and cauliflower; simmer gently for 10 minutes, stirring frequently, and serve.
*Tips:
  • Grating Ginger: I am never ever chopping ginger again. Between the frustrating fibers and the chewy bits that inevitably get into the food, it is too much of a hassle. What is not a hassle, though, is grating ginger. After a quick peel, just run it up and down a fine grater. What you will get is the smoothest ginger puree you will ever see.
  • Grinding almonds: The thought of hauling my entire food processor onto the counter just to grind up some almonds made me want to change recipes, but I realized that I could just as easily pulse the almonds in an electric coffee grinder. I did the same with my whole cardamom seeds. It's far quieter, easier to move around, and small enough to clean up quickly. Just be sure that you do give it a good cleaning before and after use so you don't have coffee-flavored Indian food or Indian food-flavored coffee (although that might become the next food trend!)

Thursday, January 3, 2013

Tikka Masala: The Recipe

Check out this recipe on my new and improved website: thewalkingcookbook.com

Aaaaand, we're back! I hope that everyone had a lovely and restful holiday filled with delicious food and all of the other important things in life.

The end of a year and beginning of the next is always accompanied by lists. So I am going to make a list of predictions for my culinary life for the upcoming year. Look forward to the following Walking Cookbook trends:

  • Indoor grilling (I just seasoned my cast iron grill pan/skillet and can't stop looking at it)
  • Bread (and other bread-related products, to overcome my fear of yeast)
  • Celiac-friendly, egg free, and dairy free dishes (shout out to my super-allergic best friend!)
  • Sauces of all varieties
  • Micro-portions (I got a tasting party dishware set for Christmas)

We'll kick off 2013 with some food that will heat things up in two ways... Indian Tikka Masala. I'll prep some chicken and some salmon (or maybe swordfish, a new favorite of mine for its steaky texture and chickeny flavor) in the Tikka Masala style, which takes two separate steps. First, I will marinade the meat and grill it. Second, I will make the gravy (the actual meaning of the word curry) and mix it all together. Served with rice and naan, it will be a full (though not very balanced) meal.

Quick note: The meat should marinade overnight, so keep that in mind when choosing when to make this recipe.
A cilantro garnish is the perfect topper, both in color and flavor
The Recipe: Chicken (or Fish) Tikka Masala, adapted from Grace Parisi at Food & Wine
Yield: 4 servings

Marinade Ingredients:

  • 1 cup plain lowfat yogurt
  • 2 garlic cloves, minced
  • 1 tbsp finely grated fresh ginger
  • 1 1/2 tsp ground cumin
  • 1 1/2 tsp ground coriander
  • 1/4 tsp ground cardamom
  • 1/4 tsp cayenne pepper
  • salt and pepper
  • 2.5 lbs meat (skinless, boneless chicken thighs; salmon or swordfish cut in 1.5" cubes

Gravy Ingredients:

  • 2 tbsp plus 1 tbsp vegetable oil
  • 1/4 cup blanched whole almonds
  • 1 large onion, finely chopped
  • 2 garlic cloves, minced
  • 1 tsp minced fresh ginger
  • 1 1/2 tbsp garam masala
  • 1 1/2 tbsp chile powder
  • 1/2 tsp cayenne pepper
  • 1 35-oz can peeled tomatoes, finely chopped and juices reserved
  • pinch of sugar
  • 1 cup heavy cream
  • salt and pepper
Preparation:

  • Combine marinade ingredients in a large bowl.
  • Using a sharp knife, make a few shallow slashes in the pieces of meat. Add to the marinade, turn to coat, and refrigerate overnight.
  • Heat a cast iron grill pan over medium-high heat.
  • Remove the meat from the marinade and scrape off the marinade as much as possible. Place on the grill and cook until the bottom third of the meat is cooked through (3-5 minutes). Flip the meat, cover with an aluminum foil tent, and cook for another 5-7 minutes until the meat is cooked through. Keep in mind that with fish you will reduce these times a bit, since rare fish is far less dangerous (and disgusting) than rare chicken.
  • Transfer grilled meat to a cutting board and let rest.
  • Meanwhile, in a small skillet, heat 1 tbsp of the oil. Add the almonds and cook over medium heat, stirring constantly, until golden, about 5 minutes. Transfer the almonds to a plate and let cool completely. Move to a food processor and pulse until finely ground.
  • In a large pan, heat 2 tbsp oil. Add onion, garlic, and ginger and cook over medium heat, stirring occasionally, until tender and golden, about 8 minutes.
  • Add the garam masala, chile powder, and cayenne, and cook, stirring, for 1 minute.
  • Add the tomatoes, their juices, sugar, salt, and pepper.
  • Cover partially and cook over medium heat, stirring occasionally, until sauce is slightly thickened, about 20 minutes.
  • Add the cream and ground almonds and cook over low heat, stirring occasionally, until thickened, about 10 minutes longer.
  • Stir in the meat; simmer gently for 10 minutes, stirring frequently, and serve.

Will I make naan from scratch? Not sure yet, but if I do I will use this recipe.

Time to Memorize: 6 days

Monday, November 12, 2012

Ethiopian Feast: The 5 Recipes (Whew!)

Check out this recipe on my new and improved website: thewalkingcookbook.com

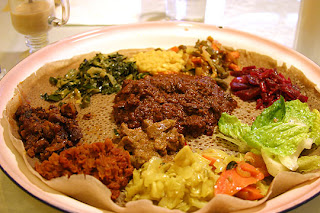
Ethiopian food is served on a piece of injera, with many dishes to try

One of the benefits of life in New York is the bounty of cuisines that it boasts. I use the word cuisine to refer to a set of culinary ingredients, styles, and techniques, all of which can be linked to a specific region (Japanese food, Southern food, Amazonian food), dietary preference (vegetarian, gluten-free, raw), dining culture (street food, fine dining) or even religion (kosher, halal). Within each cuisine are various subcuisines (just think of "American" food and all of its subcuisines). I feel like I can confidently say that if New York's five boroughs does not have a particular cuisine, it probably only exists in its region of origin. I can't imagine a regional cuisine traveling outside its birthplace and not making its way to this amazing city.

I had Ethiopian food for the first time when I visited New York to interview for my teaching job, and I have been a little obsessed with it ever since. In larger cities it is becoming more common to hear the words injera, alicha, and wat used when talking about what to get for dinner. However, it still has not had its big break to arise to the levels of Thai, Chinese, or Indian food.

In case you have not had Ethiopian food, here are a few things you can expect:

  • No utensils-- injera, a gluten-free spongey crepe-like bread, is used as a utensil to scoop up all of the food. I still haven't figured out what to do when they serve you salad-- please comment if you have some insight
  • A high presence of turmeric, cardamom, and berbere (pronounced somewhere in between "bear berry" and "Burberry"), a spice blend that adds heat to many dishes
  • Most dishes are stews or purees, slow cooked with aromatic ingredients
  • Plenty of vegetarian and meat options
I got excited about the prospect of learning Ethiopian cuisine when I read about it in my Food & Wine magazine (Nov. 2012). The article highlights a man named Hiyaw Gebreyohannes, who developed a line of prepared Ethiopian food, Taste of Ethiopia, which is actually now available at Fairway Market, Whole Foods, Brooklyn Fare, and Union Market. He included some recipes, which made me feel less daunted by the idea of making Ethiopian in my own kitchen.

This week I will be cooking a vegan and gluten-free Ethiopian feast with four dishes (I like going between multiple flavors as I eat) plus a boatload of injera (be advised that the injera needs to sit overnight, so get an early start!). Although the spices will be a little costly to get started, the staple ingredients are extremely affordable: onions, garlic, lentils, cabbage, collard greens, etc. If this is successful, then future Ethiopian dinners will be done on the cheap!

The Recipes:
Tear this bread apart to scoop up your food-- it replaces silverware
Injera (crepe-bread), adapted from Food & Wine
Yield: Eight 12" pieces
Ingredients:
  • 4 cups (5 oz.) teff flour
  • 5 cups water
  • 1 1/2 tsp salt
Preparation:
  • In a large bowl, whisk the teff flour with the water until a smooth batter forms. 
  • Cover the bowl with plastic wrap and let stand at room temperature overnight; the batter should be slightly foamy.
  • Heat a 12-inch nonstick skillet over high heat.
  • Whisk the salt into the batter.
  • Ladle 3/4 cup of batter into the skillet and swirl to cover the entire skillet.
  • Cook over medium-high heat until the injera starts to bubble, about 30 seconds.
  • Cover the skillet and cook for 30 more seconds, until the injera is cooked through and the surface is slightly glossy.
  • Invert the injera on a work surface and repeat with the remaining batter.
  • Fold the injera into quarters to serve.
NOTE FROM THE WALKING COOKBOOK:
This injera was an embarrassing failure and led me to buy premade Injera from a local Ethiopian restaurant... I attribute it to incorrect measurements in the recipe, which calls for 4 cups (5 oz.) of flour. Four cups is definitely not 5 oz (it's more like 20 oz), so unless they were referring to 5 oz per cup, the recipe was just wrong. See Ethiopian Feast: The Results and Modified Recipes for details!

Don't let the spoon deceive you-- you will still be scooping
Gomen (collard greens), adapted from Saveur
Yield: 4 servings
Ingredients: 
  • 1/4 cup plus 2 tbsp olive oil
  • 1/8 tsp cardamom seeds
  • 1/8 tsp ground fenugreek seeds
  • 1/8 tsp nigella seeds
  • 1 1/2 lbs. collard greens, stemmed and cut crosswise into 1/4" wide strips
  • 1 1/2 cups water
  • 1 large yellow onion, minced
  • 3 cloves garlic, minced
  • 2 Thai chiles or 1 jalapeño, stemmed, seeded, and minced
  • 1" piece of ginger, peeled and minced
  • salt and pepper, to taste
Preparation:
  • Heat 4 tbsp oil in a large pot over medium heat.
  • Add cardamom, fenugreek, and nigella and cook, stirring often, until fragrant, (1-2 minutes).
  • Increase heat to medium-high and add the remaining oil.
  • Add onions and cook, stirring often, until browned (10 minutes).
  • Add garlic, chiles, and ginger and cook, stirring often, until soft and fragrant (3 minutes).
  • Add collard greens, water, and salt and pepper.
  • Cover and bring to a boil.
  • Reduce heat to low and cook, stirring occasionally, until the greens are tender, 50-55 minutes. 
This dish is perfect for the guests that don't like spice.
I like going back and forth between the spicier Misir Wat
and this Kik Alicha to tame the spice on my own.
Kik Alicha (Mild Split Peas), adapted from The Culinary Life
Yield: 4 servings
Ingredients:
  • 1 yellow onion, minced
  • 1 large tomato, very finely chopped
  • 1/2 lb. yellow split peas
  • 2 cups water
  • 1/4 cup plus 2 tbsp. olive oil
  • 2 tbsp garlic, minced
  • 1" piece ginger, peeled and minced
  • 1 tsp turmeric
  • 1/2 tsp bessobela (Ethiopian basil-- dried basil works too)
  • 1/2 tsp ground cardamom
  • salt and pepper, to taste
Preparation:
  • Wash split peas in warm water. Drain and set aside.
  • In a large pot, cook onions over medium heat for about 5 minutes or until translucent, adding water as needed.
  • Add tomatoes and garlic and cook for 5 minutes (do not let them brown or burn)
  • Add the ginger and cook for 5 more minutes (add water if necessary but don't let the mixture get soupy)
  • Add olive oil and stir until well mixed. Cook briskly, uncovered, for 5 minutes.
  • Add split peas, turmeric, bessobela, cardamom, salt, and pepper.
  • Cook for 20 minutes, stirring frequently and adding water gradually until split peas are soft but the mixture is not watery (I would add 1/2 cup every time I see the mixture start to get dry).
Misir Wat-- I will probably try to cook mine so it is slightly thicker than in this picture
Misir Wat (Red Lentils with Berbere), adapted from Food & Wine
Yield: 4 servings
Ingredients:
  • 1/2 lb. red lentils
  • 4 cups water
  • 1/4 cup olive oil
  • 1 1/2 red onions, minced
  • 5 garlic cloves, minced
  • 1" piece of ginger, peeled and minced
  • 1 1/2 tbsp berbere
  • 1 tsp nigella seeds
  • 1/2 tsp ground cardamom
Preparation:
  • In a large casserole pan, heat the olive oil.
  • Add the onions and cook over medium-high heat until they are soft and just beginning to brown (8 minutes).
  • Add the garlic, ginger, berbere, nigella, cardamom, salt, and pepper and cook until fragrant and deeply colored (10 minutes).
  • Add the red lentils and water and bring to a boil.
  • Cover and cook over moderately low heat, stirring occasionally, until lentils are softened and the mixture has thickened (25 minutes).
  • Season with salt and pepper and sprinkle with berbere.
Atkilt Wat usually has potatoes as well,
but Food & Wine adapted the recipe, omitting them
Atkilt Wat (Cabbage and Carrots, minus the potatoes), adapted from Food & Wine
Yield: 4 servings
Ingredients:
  • 2 1/2 lbs green cabbage, cored and cut into 3/4" pieces
  • 1/2 lb carrots, quartered and cut into 1 1/2" lengths
  • 1/4 cup olive oil
  • 1/4 cup water
  • 1 1/2 red onions, finely chopped
  • 5 garlic cloves, minced
  • 1" piece ginger, peeled and minced
  • 1 tbsp turmeric
  • salt and pepper, to taste
Preparation:
  • In a large casserole pan, heat the olive oil.
  • Add the onions and cook over medium-high heat until they are soft and just beginning to brown (8 minutes).
  • Add the garlic, ginger, turmeric, salt, and pepper and cook until softened and fragrant (5 minutes).
  • Add the carrots and water and cook over medium heat, stirring, until the carrots are just starting to soften (7 minutes).
  • Stir in the cabbage in large handfuls, letting each batch wilt slightly before adding more. Add a little water if the pan begins to dry out.
  • Once all the cabbage has been added, cover and cook over medium-low heat, stirring occasionally, until the cabbage is soft and tender, (30-40 minutes).
Time to Memorize: 4 days (And yes, I will be memorizing all of these)