Thursday, January 3, 2013

Tikka Masala: The Recipe

Check out this recipe on my new and improved website: thewalkingcookbook.com

Aaaaand, we're back! I hope that everyone had a lovely and restful holiday filled with delicious food and all of the other important things in life.

The end of a year and beginning of the next is always accompanied by lists. So I am going to make a list of predictions for my culinary life for the upcoming year. Look forward to the following Walking Cookbook trends:

  • Indoor grilling (I just seasoned my cast iron grill pan/skillet and can't stop looking at it)
  • Bread (and other bread-related products, to overcome my fear of yeast)
  • Celiac-friendly, egg free, and dairy free dishes (shout out to my super-allergic best friend!)
  • Sauces of all varieties
  • Micro-portions (I got a tasting party dishware set for Christmas)

We'll kick off 2013 with some food that will heat things up in two ways... Indian Tikka Masala. I'll prep some chicken and some salmon (or maybe swordfish, a new favorite of mine for its steaky texture and chickeny flavor) in the Tikka Masala style, which takes two separate steps. First, I will marinade the meat and grill it. Second, I will make the gravy (the actual meaning of the word curry) and mix it all together. Served with rice and naan, it will be a full (though not very balanced) meal.

Quick note: The meat should marinade overnight, so keep that in mind when choosing when to make this recipe.
A cilantro garnish is the perfect topper, both in color and flavor
The Recipe: Chicken (or Fish) Tikka Masala, adapted from Grace Parisi at Food & Wine
Yield: 4 servings

Marinade Ingredients:

  • 1 cup plain lowfat yogurt
  • 2 garlic cloves, minced
  • 1 tbsp finely grated fresh ginger
  • 1 1/2 tsp ground cumin
  • 1 1/2 tsp ground coriander
  • 1/4 tsp ground cardamom
  • 1/4 tsp cayenne pepper
  • salt and pepper
  • 2.5 lbs meat (skinless, boneless chicken thighs; salmon or swordfish cut in 1.5" cubes

Gravy Ingredients:

  • 2 tbsp plus 1 tbsp vegetable oil
  • 1/4 cup blanched whole almonds
  • 1 large onion, finely chopped
  • 2 garlic cloves, minced
  • 1 tsp minced fresh ginger
  • 1 1/2 tbsp garam masala
  • 1 1/2 tbsp chile powder
  • 1/2 tsp cayenne pepper
  • 1 35-oz can peeled tomatoes, finely chopped and juices reserved
  • pinch of sugar
  • 1 cup heavy cream
  • salt and pepper
Preparation:

  • Combine marinade ingredients in a large bowl.
  • Using a sharp knife, make a few shallow slashes in the pieces of meat. Add to the marinade, turn to coat, and refrigerate overnight.
  • Heat a cast iron grill pan over medium-high heat.
  • Remove the meat from the marinade and scrape off the marinade as much as possible. Place on the grill and cook until the bottom third of the meat is cooked through (3-5 minutes). Flip the meat, cover with an aluminum foil tent, and cook for another 5-7 minutes until the meat is cooked through. Keep in mind that with fish you will reduce these times a bit, since rare fish is far less dangerous (and disgusting) than rare chicken.
  • Transfer grilled meat to a cutting board and let rest.
  • Meanwhile, in a small skillet, heat 1 tbsp of the oil. Add the almonds and cook over medium heat, stirring constantly, until golden, about 5 minutes. Transfer the almonds to a plate and let cool completely. Move to a food processor and pulse until finely ground.
  • In a large pan, heat 2 tbsp oil. Add onion, garlic, and ginger and cook over medium heat, stirring occasionally, until tender and golden, about 8 minutes.
  • Add the garam masala, chile powder, and cayenne, and cook, stirring, for 1 minute.
  • Add the tomatoes, their juices, sugar, salt, and pepper.
  • Cover partially and cook over medium heat, stirring occasionally, until sauce is slightly thickened, about 20 minutes.
  • Add the cream and ground almonds and cook over low heat, stirring occasionally, until thickened, about 10 minutes longer.
  • Stir in the meat; simmer gently for 10 minutes, stirring frequently, and serve.

Will I make naan from scratch? Not sure yet, but if I do I will use this recipe.

Time to Memorize: 6 days

Monday, December 10, 2012

Alfredo Sauce: The Recipe

Check out this recipe on my new and improved website: thewalkingcookbook.com

After my #1 reader (thanks, Mom!) informed me that I was slacking on my blog, I decided (well, she decided) that it would be smart to take a little holiday, so this will be my last entry until after the holidays. To keep it sweet and simple, I decided to take on Alfredo Sauce, which holds a sweet memory in my mind as the food I ate at the Olive Garden the day of my middle school graduation. That dry, summery San Diego afternoon, I sat surrounded by family, sipping on an Italian soda, sharing food and laughter over the large dining table. It truly did look like an Olive Garden commercial... "When you're here, you're family."
This is something that I will always love about food. No matter how old you get, how refined your palate becomes, or how many "better" versions of a dish you experience, any food memory has the power to extract vivid moments in time and bring them into the present. It's the sort of thing, as my cousin Lorri so eloquently puts it, that makes you go:
Of course, my smile faded a bit when I looked at the ingredients and realized it was butter plus cream plus cheese (and a few extras). So I turned to one of my favorite parts of America's Test Kitchen Feed, the section called It Doesn't Taste Low Fat. They did not let me down, and I was able to find an Alfredo Sauce recipe "minus 261 calories and 31 grams of fat." Let's see how it fares for this week's memorized family dinner.

The Recipe: Lower-Fat Fettucini Alfredo, adapted from Cook's Country on America's Test Kitchen Feed
Yield: 4 servings

Ingredients:
  • 1 tbsp. unsalted butter
  • 2 tsp. all-purpose flour
  • ¾ cup whole milk
  • ¼ cup half-and-half
  • 1 garlic clove, peeled and lightly crushed
  • Salt and pepper
  • Pinch nutmeg
  • 1 cup grated parmesan cheese
  • 1 (9-ounce) package fresh fettuccine

Preparation:
  • Bring 4 quarts of water to a boil.
  • Meanwhile, heat butter over medium heat in large saucepan until foaming. 
  • Whisk in flour until mixture is smooth and golden, 1 to 2 minutes. 
  • Whisk in milk, half-and- half, garlic, ½ teaspoon salt, ½ teaspoon pepper, and nutmeg and bring to simmer. 
  • Reduce heat to medium-low and simmer until sauce is slightly thickened, 1 to 2 minutes. 
  • Discard garlic, stir in Parmesan, and remove from heat.
  • Stir 1 tablespoon salt and pasta into boiling water and cook, stirring constantly, until al dente, 2 to 3 minutes. 
  • Reserve 1 cup pasta cooking water, then drain pasta.
  • Return sauce to low heat, add ⅓ cup pasta water and cooked pasta; toss until evenly coated. 
  • Cook until sauce has thickened slightly, about 1 minute. 
  • Add more cooking water as needed to thin sauce to proper consistency and adjust seasonings.
  • Serve immediately.
Time to Memorize: 3 days

Sunday, December 9, 2012

Ethiopian Feast: The Results and Modified Recipes

Check out this recipe on my new and improved website: thewalkingcookbook.com

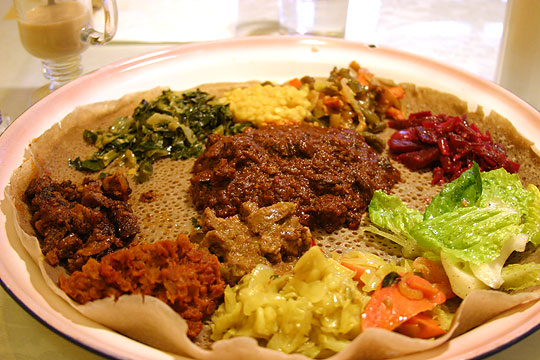
Serve family style on a "plate" of injera
The Process:
The process of memorizing the four different Ethiopian dishes (besides the injera) came down to minuscule but significant differences. Essentially every dish I prepared looked like a variation of this basic recipe:


  1. Heat 1/4 cup oil with finely chopped onions, garlic, ginger, and spices
  2. Cook for 10 minutes or so, stirring frequently
  3. Add the main ingredient and some water
  4. Cook until it is soft but not watery, about 30-40 minutes, stirring frequently

Somehow this process allowed me to make four very different tasting dishes. As long as I remembered all of the small variations (red vs. yellow onion, which spices to use for each dish, and what the main ingredient is), the rest was either based on the pattern above or just made sense (I know what it means for something to be soft but not watery, so I don't have to memorize the cook times).


Misir Wat: Red Lentils with Berbere
(red lentils, red onion, and berbere/nigella set this dish apart)
Kik Alicha: Split Peas (split peas, yellow onion, no berbere,
and turmeric/cardamom make this dish different from the Misir Wat)
Like I mentioned in my last post, as soon as all the spices are secured (I spent about $30 for a good supply of berbere, nigella, turmeric, cardamom, and shiro), the other ingredients are not expensive at all. Also, these dishes can be made in enormous batches, so the hour-long preparation time is well worth it if you enjoy leftovers.

The Verdict:

This story has a sad beginning and a happy ending. I had let the injera batter sit overnight (I realized that the volume and weight measurements were woefully inaccurate on the Food & Wine recipe-- 4 cups do not equal 5 ounces-- so I used the measurement that made most sense, volume). I prepared the hot pan, poured in the batter, let it bubble (the top looked really good!), covered it for 30 seconds, and flipped the injera out onto a wooden cutting board to cool only to find that the bottom of the injera was still soaking wet. It was like a pancake that had just been put on the griddle. In other words, it was gross. Determined to make my own injera despite this set back, I started experimenting. I'll spare you the details, but it basically went like this:


  • Attempt #1: 1/2 cup batter in hot dry pan
  • Attempt #2: 1/2 cup batter in hot dry pan (expecting different results... am I insane?)
  • Attempt #3: 1/4 cup batter in hot dry pan
  • Attempt #4: 1/2 cup batter in pan with safflower oil
  • Attempt #5: Mixed 1 cup of coconut flour into the batter, then 1/2 cup batter in hot dry pan
All of the results ended up on my cutting board in a sad clump of sadness (I do believe that is the appropriate culinary term). My roommate walked by, gave an impressed nod at the cutting board, and when hearing that my bread was terrible, said, "Oh... that's not meat?" Ouch.


Left: The meat-like remains of failed injera attempts
Center: The watery batter
Right: The way I felt 
My other two roommates saved dinner by running to our nearest Ethiopian restaurant, Queen of Sheba, which sadly does not have gluten-free injera. My gluten-free friend would just have to settle with rice, because I was NOT feeding her the abomination of a pancake that I had made out of teff flour.

Now you know the sad beginning of my story, but the happy ending is short and sweet:
  • The other food was awesome (we all had favorites, but at least one person dubbed each dish their favorite)
  • The Queen of Sheba injera was amazing, as usual
  • We had two new family dinner guests
  • We had very few dishes to wash-- 4 pots and 2 serving trays
I am still determined to find a gluten-free injera recipe that works, but until that happens I must respectfully veto the reappearance of the Food & Wine injera recipe on this blog. All others can be found without modifications on the Ethiopian Feast: The 5 Recipes page.


Grab a piece of injera, scoop the filling you want, and enjoy.
No silverware, no plates, no problem!

Tuesday, November 20, 2012

Happy Thanksgiving!

Dear Readers,

Happy Thanksgiving to you and your loved ones! Whether you are sharing it with family, celebrating "Friendsgiving," or find yourself alone on Thursday, know that there are many things to be thankful for. More importantly, know that the world has many reasons to be thankful for YOU!

Enjoy your holiday, and I will pick back up next week for another lovely (and memorized) family dinner. If you have any exciting or favorite Thanksgiving recipes, post them in a comment. I would love to hear from you!

Thank you for being supportive readers and interested cooks... cooking is far more special to me when I get to share it with others!

Monday, November 12, 2012

Ethiopian Feast: The 5 Recipes (Whew!)

Check out this recipe on my new and improved website: thewalkingcookbook.com

Ethiopian food is served on a piece of injera, with many dishes to try

One of the benefits of life in New York is the bounty of cuisines that it boasts. I use the word cuisine to refer to a set of culinary ingredients, styles, and techniques, all of which can be linked to a specific region (Japanese food, Southern food, Amazonian food), dietary preference (vegetarian, gluten-free, raw), dining culture (street food, fine dining) or even religion (kosher, halal). Within each cuisine are various subcuisines (just think of "American" food and all of its subcuisines). I feel like I can confidently say that if New York's five boroughs does not have a particular cuisine, it probably only exists in its region of origin. I can't imagine a regional cuisine traveling outside its birthplace and not making its way to this amazing city.

I had Ethiopian food for the first time when I visited New York to interview for my teaching job, and I have been a little obsessed with it ever since. In larger cities it is becoming more common to hear the words injera, alicha, and wat used when talking about what to get for dinner. However, it still has not had its big break to arise to the levels of Thai, Chinese, or Indian food.

In case you have not had Ethiopian food, here are a few things you can expect:

  • No utensils-- injera, a gluten-free spongey crepe-like bread, is used as a utensil to scoop up all of the food. I still haven't figured out what to do when they serve you salad-- please comment if you have some insight
  • A high presence of turmeric, cardamom, and berbere (pronounced somewhere in between "bear berry" and "Burberry"), a spice blend that adds heat to many dishes
  • Most dishes are stews or purees, slow cooked with aromatic ingredients
  • Plenty of vegetarian and meat options
I got excited about the prospect of learning Ethiopian cuisine when I read about it in my Food & Wine magazine (Nov. 2012). The article highlights a man named Hiyaw Gebreyohannes, who developed a line of prepared Ethiopian food, Taste of Ethiopia, which is actually now available at Fairway Market, Whole Foods, Brooklyn Fare, and Union Market. He included some recipes, which made me feel less daunted by the idea of making Ethiopian in my own kitchen.

This week I will be cooking a vegan and gluten-free Ethiopian feast with four dishes (I like going between multiple flavors as I eat) plus a boatload of injera (be advised that the injera needs to sit overnight, so get an early start!). Although the spices will be a little costly to get started, the staple ingredients are extremely affordable: onions, garlic, lentils, cabbage, collard greens, etc. If this is successful, then future Ethiopian dinners will be done on the cheap!

The Recipes:
Tear this bread apart to scoop up your food-- it replaces silverware
Injera (crepe-bread), adapted from Food & Wine
Yield: Eight 12" pieces
Ingredients:
  • 4 cups (5 oz.) teff flour
  • 5 cups water
  • 1 1/2 tsp salt
Preparation:
  • In a large bowl, whisk the teff flour with the water until a smooth batter forms. 
  • Cover the bowl with plastic wrap and let stand at room temperature overnight; the batter should be slightly foamy.
  • Heat a 12-inch nonstick skillet over high heat.
  • Whisk the salt into the batter.
  • Ladle 3/4 cup of batter into the skillet and swirl to cover the entire skillet.
  • Cook over medium-high heat until the injera starts to bubble, about 30 seconds.
  • Cover the skillet and cook for 30 more seconds, until the injera is cooked through and the surface is slightly glossy.
  • Invert the injera on a work surface and repeat with the remaining batter.
  • Fold the injera into quarters to serve.
NOTE FROM THE WALKING COOKBOOK:
This injera was an embarrassing failure and led me to buy premade Injera from a local Ethiopian restaurant... I attribute it to incorrect measurements in the recipe, which calls for 4 cups (5 oz.) of flour. Four cups is definitely not 5 oz (it's more like 20 oz), so unless they were referring to 5 oz per cup, the recipe was just wrong. See Ethiopian Feast: The Results and Modified Recipes for details!

Don't let the spoon deceive you-- you will still be scooping
Gomen (collard greens), adapted from Saveur
Yield: 4 servings
Ingredients: 
  • 1/4 cup plus 2 tbsp olive oil
  • 1/8 tsp cardamom seeds
  • 1/8 tsp ground fenugreek seeds
  • 1/8 tsp nigella seeds
  • 1 1/2 lbs. collard greens, stemmed and cut crosswise into 1/4" wide strips
  • 1 1/2 cups water
  • 1 large yellow onion, minced
  • 3 cloves garlic, minced
  • 2 Thai chiles or 1 jalapeño, stemmed, seeded, and minced
  • 1" piece of ginger, peeled and minced
  • salt and pepper, to taste
Preparation:
  • Heat 4 tbsp oil in a large pot over medium heat.
  • Add cardamom, fenugreek, and nigella and cook, stirring often, until fragrant, (1-2 minutes).
  • Increase heat to medium-high and add the remaining oil.
  • Add onions and cook, stirring often, until browned (10 minutes).
  • Add garlic, chiles, and ginger and cook, stirring often, until soft and fragrant (3 minutes).
  • Add collard greens, water, and salt and pepper.
  • Cover and bring to a boil.
  • Reduce heat to low and cook, stirring occasionally, until the greens are tender, 50-55 minutes. 
This dish is perfect for the guests that don't like spice.
I like going back and forth between the spicier Misir Wat
and this Kik Alicha to tame the spice on my own.
Kik Alicha (Mild Split Peas), adapted from The Culinary Life
Yield: 4 servings
Ingredients:
  • 1 yellow onion, minced
  • 1 large tomato, very finely chopped
  • 1/2 lb. yellow split peas
  • 2 cups water
  • 1/4 cup plus 2 tbsp. olive oil
  • 2 tbsp garlic, minced
  • 1" piece ginger, peeled and minced
  • 1 tsp turmeric
  • 1/2 tsp bessobela (Ethiopian basil-- dried basil works too)
  • 1/2 tsp ground cardamom
  • salt and pepper, to taste
Preparation:
  • Wash split peas in warm water. Drain and set aside.
  • In a large pot, cook onions over medium heat for about 5 minutes or until translucent, adding water as needed.
  • Add tomatoes and garlic and cook for 5 minutes (do not let them brown or burn)
  • Add the ginger and cook for 5 more minutes (add water if necessary but don't let the mixture get soupy)
  • Add olive oil and stir until well mixed. Cook briskly, uncovered, for 5 minutes.
  • Add split peas, turmeric, bessobela, cardamom, salt, and pepper.
  • Cook for 20 minutes, stirring frequently and adding water gradually until split peas are soft but the mixture is not watery (I would add 1/2 cup every time I see the mixture start to get dry).
Misir Wat-- I will probably try to cook mine so it is slightly thicker than in this picture
Misir Wat (Red Lentils with Berbere), adapted from Food & Wine
Yield: 4 servings
Ingredients:
  • 1/2 lb. red lentils
  • 4 cups water
  • 1/4 cup olive oil
  • 1 1/2 red onions, minced
  • 5 garlic cloves, minced
  • 1" piece of ginger, peeled and minced
  • 1 1/2 tbsp berbere
  • 1 tsp nigella seeds
  • 1/2 tsp ground cardamom
Preparation:
  • In a large casserole pan, heat the olive oil.
  • Add the onions and cook over medium-high heat until they are soft and just beginning to brown (8 minutes).
  • Add the garlic, ginger, berbere, nigella, cardamom, salt, and pepper and cook until fragrant and deeply colored (10 minutes).
  • Add the red lentils and water and bring to a boil.
  • Cover and cook over moderately low heat, stirring occasionally, until lentils are softened and the mixture has thickened (25 minutes).
  • Season with salt and pepper and sprinkle with berbere.
Atkilt Wat usually has potatoes as well,
but Food & Wine adapted the recipe, omitting them
Atkilt Wat (Cabbage and Carrots, minus the potatoes), adapted from Food & Wine
Yield: 4 servings
Ingredients:
  • 2 1/2 lbs green cabbage, cored and cut into 3/4" pieces
  • 1/2 lb carrots, quartered and cut into 1 1/2" lengths
  • 1/4 cup olive oil
  • 1/4 cup water
  • 1 1/2 red onions, finely chopped
  • 5 garlic cloves, minced
  • 1" piece ginger, peeled and minced
  • 1 tbsp turmeric
  • salt and pepper, to taste
Preparation:
  • In a large casserole pan, heat the olive oil.
  • Add the onions and cook over medium-high heat until they are soft and just beginning to brown (8 minutes).
  • Add the garlic, ginger, turmeric, salt, and pepper and cook until softened and fragrant (5 minutes).
  • Add the carrots and water and cook over medium heat, stirring, until the carrots are just starting to soften (7 minutes).
  • Stir in the cabbage in large handfuls, letting each batch wilt slightly before adding more. Add a little water if the pan begins to dry out.
  • Once all the cabbage has been added, cover and cook over medium-low heat, stirring occasionally, until the cabbage is soft and tender, (30-40 minutes).
Time to Memorize: 4 days (And yes, I will be memorizing all of these)

Sunday, November 11, 2012

Veggie Pot Pie: Recipe and Results

Check out this recipe on my new and improved website: thewalkingcookbook.com

The Process:
When I was vegan (2006-2009-- I rolled with the social justice crew in college), I got a super hip cookbook by a super hip vegan named Sarah Kramer. With her kitten heels (I bought some), dyed black hair (got pretty close), bright red lipstick (had some but was too afraid to wear it), tattoos (still want one), and ugly/awesome ultra-short bangs (didn't do that, thank goodness), I somewhat secretly thought she was the coolest person ever. Of course, I knew would have to move to Europe and change my name in order to pull off being Sarah Kramer (same reality check as when I wanted to be Gwen Stefani in high school), so I proceeded to be myself... just the vegan version.

Her book, La Dolce Vegan, had a phenomenal Veggie Pot Pie recipe that I made on a regular basis. I think I may have even taken one to my family's Thanksgiving dinner to share. It worked beautifully as a main course for me and a side for all the turkey eaters. When I decided that this would be the week to do a Veggie Pot Pie, I discovered that my vegan cookbook was back in California, stored with all my other childhood and college artifacts. So, of course, I started searching online. I remembered that there were a lot of root vegetables and that it had thyme and soy sauce. Random memory, I know. The closest recipe I found was an adapted version of the book's Portobello Pot Pie, so I adapted the adaptation and rolled with it. I took only a few days to memorize the recipe, which is why I only have one post for you.


The Verdict:

The filling of the pot pie could have been a bit soupier (it was quite starchy-- not a bad thing, but not what I think of when considering pot pie). Aside from that, it had magnificent flavor. Don't be afraid of all the soy sauce-- when mixed in with the water it does not taste too salty. This dish definitely should be served with a light fall salad (mine was mixed greens, pomegranate, and toasted walnut). It is quite simple-- make the crust, make the filling, put together, and bake. If you have a vegan guest, make this for a fall get together and pat yourself on the back for being such an accommodating host!
Hearty enough for a main course, and very inexpensive thanks to root veggies
The Recipe: Veggie Pot Pie, adapted from food.com
Yield: 1 pot pie (8 servings)
Ingredients:
Crust:
  • 2 cups all-purpose flour
  • 2/3 cup vegetable shortening, chilled
  • 5 tbsp ice water
  • 1/2 tsp salt
Filling:
  • 5 red potatoes, cut into 1" cubes
  • 1/2 yellow onion, cut into 1/2" thick half-rings
  • 2 portobello mushroom caps, cut into 1" cubes
  • 2 celery stalks, chopped
  • 1 carrot, chopped
  • 1 cup dried shiitake mushrooms, roughly chopped
  • 1/4 cup soy sauce
  • 5 tbsp all-purpose flour
  • 3 tbsp olive oil
  • 3 sprigs fresh rosemary
  • 2 tsp dried sage powder
  • 1 tsp dried thyme
Preparation:
  • Bring a large pot of water to a boil. Add the potatoes and cook for 15-20 minutes, until soft. At the 10-minute mark, add the dried shiitake mushrooms to reconstitute them. Save 2 cups of cooking water in a separate bowl, drain the rest and return to the pot.
  • Meanwhile, heat olive oil in a large pan.
  • Add the onion, celery, and carrot and cook until slightly translucent, about 4-6 minutes.
  • Add the portobello mushrooms, rosemary sprigs, sage, and thyme. Cook for about 3 minutes.
  • Pour in soy sauce and reserved potato cooking water and simmer for 5 minutes. Gradually add the flour, stirring until the liquid thickens and resembles a gravy. Turn off the heat and remove rosemary sprigs (the leaves can stay as long as the stems are gone).
  • Pour the vegetable mixture over the potatoes and shiitake mushrooms. Stir thoroughly until incorporated.
Using the cooking water to make the gravy preserves the veggie flavor 
Be sure to stir carefully so you don't break up the rosemary too much.
You'll need to remove the stems later.
Measure out the flour ahead of time,
and it will be easier to control how much goes in the pan.

Mix thoroughly to ensure the most even distribution of ingredients.
  • To make the crust, mix the flour and salt together, then cut in the shortening.*
  • Once the dough looks looks like it has large pearls of shortening in it (we don't want the lumps much bigger or smaller), add the water gradually and stir until the dough comes together.
  • Divide the dough into two equal pieces. Roll them out on a floured surface to make two pie crusts (9" diameter).
  • Line a pie tin with one of the crusts. Press gently around the bottom of the tin, so there is no air in between the tin and the crust. The crust edge should slightly hang over the edge of the tin.
  • Fill the crust with the filling.
  • Lay the second crust over the top. Pinch the edges closed and cut off the excess pie crust.
  • With a fork, gently poke the top of the crust about 5 times.
  • Put the pot pie in the oven for 30-40 minutes, until the crust has baked to a firm, golden-brown shell.
The dough should not feel wet, but it should be soft and stay together fairly well.
My roommate tackled and mastered the pie crust on his first try!
My preferred surface for rolling out dough is a floured counter or table...
cutting boards are far too wiggly. 
I made two pot pies :)
Pinch and cut
Poke, poke, poke, poke, poke 
Don't be fooled by the size of the pie-- these portions are dense!
*Tips:
  • Cutting in shortening: The thing that makes pie crust nice and flaky is the small pockets of fat (shortening, in our case) that stay separate from the flour until the dish is baked. For that reason, you should take every precaution possible to ensure that the fat does not get too warm and therefore mix in too thoroughly with the flour. Some tricks for this are below:
    • Use chilled shortening
    • Use ice water
    • Use your hands as little as possible. To incorporate the flour and shortening, I use two table knives and move through the dough in an X motion, cutting first from top-left to bottom-right (with my right hand), then from top-right to bottom left (with my left hand). Check out this video for the cutting technique (skip to :50 for the cutting technique-- the ingredient list is a bit different from ours, so you can ignore it)
    • Make your pie crust not too long before you fill and bake the dish (otherwise keep them in the fridge until you are ready to bake).

Wednesday, November 7, 2012

Pop Quiz! Mac & Cheese

Check out this recipe on my new and improved website: thewalkingcookbook.com

This is the first of (many?) pop quizzes that I bring upon myself. Any dish that is part of my Walking Cookbook index (aka: my memory) could be the topic of a pop quiz, meaning I will make it again without looking back at the recipe I used. This time it was Macaroni and Cheese.

Why Mac and Cheese? Well...

  • The Mac and Cheese from my first run had twice the amount of pasta as it was supposed to (remember that?)
  • I couldn't actually taste or smell anything the first time I made it because of my cold
  • I had pasta, cheese that was going to expire soon (don't worry-- it was still good), cream, milk, and eggs on hand
  • I had an extra hour
  • The fridge and pantry were really full, so it was partially a clear-out meal
  • I was cold and the oven heats up the kitchen nicely
Really, there was really no reason NOT to make Mac and Cheese. So I did, and it was incredible! I used whole-wheat pasta, which lets me pretend it's healthy, and I didn't have whole milk so I just used normal milk. I also added a little bit of parmesan. Here are the answers I came up with for my pop quiz:


Pop-Quiz Mac and Cheese
Yield: 8 servings
Ingredients:
  • 3/4 lb. whole-wheat penne (or any other bite-sized pasta)
  • 4 oz. extra sharp cheddar cheese, grated
  • 4 oz. sharp cheddar cheese, grated
  • 4 oz. colby jack cheese, grated
  • 2 oz. parmesan cheese, grated
  • 4 oz. cream cheese, cut into small chunks
  • 2 cups heavy cream
  • 1 cup milk
  • 2 eggs
  • 1/2 tbsp butter
  • 1/2 tsp nutmeg
  • salt
  • pepper
Preparation:
  • Preheat the oven to 350°F.
  • Bring water to a boil on the stove.
  • Add the pasta and cook for 5-6 minutes (whole-wheat pasta) or 3 minutes (white pasta), until the outside of the pasta has softened but it is still uncomfortable to chew.
  • Meanwhile, mix all grated cheeses with the cream, milk, nutmeg, eggs, and salt and pepper to taste.
  • Butter the bottom and sides of a casserole dish or high-edge saucepan (about 10-12" diameter).
  • Drain the semi-cooked pasta, rinse once with cool water, and add to the sauce mix.
  • Pour into the casserole dish or pan, even out any huge clumps of cheese, and plop the cream cheese on top
  • Bake for 5 minutes, spread out the cream cheese on top, then bake for 30 more minutes, until bubbly and golden on top.
The Grade: 98%
This was a delicious Mac and Cheese... it is everything I love about the dish: hearty, gooey, and flavorful (different cheeses stand out in different bites). It was obviously cheesier and less crunchy than the mistaken Mac and Cheese from before, but it also was greasier. With less pasta to soak up the sauce, there was a bit of a greasy residue in the dish (particularly the next day after reheating).

At the school where I teach, we define mastery of a topic as the understanding and use of skills with 80% accuracy. In other words, 80% is the minimum grade required to pass a test, class, etc.

Although I lost 2% for the oily nature of this dish, I still totally mastered it with a 98%!