Sunday, March 10, 2013

Classic and Fancy Grilled Cheeses and Sarabeth's Cream of Tomato Soup

Check out this recipe on my new and improved website: thewalkingcookbook.com

Counter-clockwise from top:
Classic, French Onion, Cranberry Brie, and Butternut Squash 

Growing up, the bane of my existence was soup and grilled cheese sandwich night. I'll never forget my parents, bless their hearts, calling my brother and me to the kitchen around dinner time and letting us know what we were having. I can't completely remember if my misery was held in or if I wailed about it (feel free to chime in here, Mom and Dad), but I do know that my world came crashing down every time I heard the announcement. I clearly lived a very difficult life.

Time passed, and for some reason or another my former dinner nemesis became my dinner acquaintance and eventually my dinner friend. Now that I am on the East Coast and I have the joy of a winter season, Grilled Cheese with Soup has become a dinner savior. Despite the fact that Punxsutawney Phil did not see his shadow, it is still cold in New York at the beginning of March, so I made this nostalgia-inspiring (for better or for worse) dinner combo this week to keep us cruising towards our early spring.


The dill offers a unique flavor to the soup,
and quartered sandwiches allow a large group
to sample all the different types of sandwiches

About Grilled Cheese and Tomato Soup
There is not much to say about this classic except a brief explanation of how it got so classic. According to Grilled Cheesery, people began to melt processed cheese on inexpensive bread beginning in the 1920s, when these products became affordable. It lasted through the Great Depression and (obviously) into modern day. The sandwiches began open-faced, but in a likely effort to make them more filling without being much more expensive, a second piece of bread was added. What explains the Tomato Soup? The Food Timeline claims that tomato soup was considered a substantial dose of Vitamin C when this meal first came about, and the tradition seems to have stuck.

Anyone who has purchased cheese knows that it is not cheap. However, American Cheese as we know it (Kraft Singles) is actually considered a pasteurized process cheese product, making it far less expensive. What is the difference between cheese and cheese product? Here is a summary of what I read in Chemical and Engineering News and the FDA Code of Federal Regulations (Note: It is actually someone's job to make rules about cheese. That makes me chuckle, but someone's gotta do it!): 
  • Pasteurized Process Cheese: Food prepared by mixing one or more cheeses of the same or different variety (with a few exceptions). The process involves heat, an emulsifying agent, and one or more optional ingredient. The milkfat content must not be lower than 47% and the moisture content must not be more than 43%.
  • Pasteurized Process American Cheese: A pasteurized process cheese resulting from a mixture of cheddar cheese, washed curd cheese, colby cheese, granular cheese, or two or more of these.
  • American Cheese: A pasteurized process cheese resulting from a mixture of cheddar cheese, washed curd cheese, colby cheese, granular cheese, or two or more of these as well as an additional variety of cheese.
  • Pasteurized Process Cheese Food: Food prepared by mixing a dairy ingredient (milk, dried cream, buttermilk, whey, etc.) with a cheese ingredient (basically, cheese) into a "homogeneous plastic mass." The process involves heat and one or more optional ingredients. The milkfat content must not be lower than 23% and the moisture content must not be more than 44%.
  • Pasteurized Process Cheese Product: Something similar to the above products, but the milkfat and moisture content regulations are not met.
I'm not going to deal with pasteurized process cheese spread here, but that has its own definition. As you can see, our beloved(?) Singles do not qualify as cheese, process cheese, or even process cheese food. So why do we use them for these melty cheesy treats? The moisture, of course! They melt so much better than cheese with less moisture. If you are thoroughly disgusted by this concept, however, read on to see how I cheated to get less-processed and non-processed cheeses to melt into a great sandwich.

Choosing the Recipes
As I sat on my couch on Sunday doing research for this week's recipe, I thought to myself:
What kind of mess have I gotten myself into? Grilled cheese should be so easy, but everywhere I turn there is a new and different and "better" sandwich! American cheese seems so classic. But has classic become boring? The number of cheeses and breads in this world confounds me (Wikipedia contributors have assembled a list of over 500 cheeses and 150 breads), so multiplied out and without ANY condiments or extra ingredients, I already have over 75 THOUSAND grilled cheese options! 75 THOUSAND! Let's add on top of that veggies (arugula, grilled onions, caramelized onions, corn, mushrooms, peppers), fruit (apricot, pear, apple, fig, quince, cranberry), meat (prosciutto, mortadella, bacon, lardons), and sauces (aioli, chutney, marmalade, mustard)... what is a girl to do who just wants to make a mean grilled cheese sandwich with some soup to go along with it?

I decided to go with a few different sandwiches from the myriad websites listing the "Best Grilled Cheese in NYC" or the "Best Grilled Cheese Recipes." I also searched the menu at Little Meunster, whose grilled cheese I tried last summer at The Great Googa Mooga, a music and food festival in Brooklyn's Prospect Park. On that legendary day I bought five sandwiches (to share) at $10 a pop after waiting 82 minutes in line in the heat, and I will never regret my decision. 

At the end of the day, I had to accept that I would never make the "perfect" grilled cheese because everyone likes it a little different, but that I could focus on the technique that would make every sandwich turn out beautifully. So I picked four sandwiches and rolled with them:
  • Asiago, Parmesan, Muenster, and Butternut Squash Grilled Cheese with Sage Brown Butter from Little Muenster
  • Classic American Grilled Cheese, adapted from Food Network
  • French Onion Soup Grilled Cheese, from Tasty Kitchen
  • Cranberry Brie Grilled Cheese from Joy the Baker
As for the soup recipe, I have always felt that tomato soup is too acidic. However, I had brunch this week at Sarabeth's, where my brother ordered the Velvety Cream of Tomato Soup. I snagged a bite of it to see if I would try to make it with dinner this week, and my life was changed. Something about it-- the luscious, creamy thickness paired with some hard-to-identify herbs-- gave me such pleasure that I couldn't wait to memorize it as my go-to tomato soup. Fortunately, Sarabeth herself is a blogger, and the Goddess of Bakedom was generous enough to share her Tomato Soup recipe with us. I had no reason to search for a better recipe, because I just don't believe that one exists.

Memorizing the Recipes
Memorizing the sandwiches was easy enough-- bread, a cheese or blend of cheeses, something to make it exciting, and butter for the outside. The soup was a bit trickier, since the timing had to be spot on in order for the hot milk and cream to not curdle. I was happy to see that all of the base ingredients were alliums, making it very easy to remember. I used a 1-2-3-4 onion-shallot-garlic-scallion ratio in the base then proceeded to add the tomatoes and dairy, make a roux, incorporate the roux, and simmer away. Pretty simple as long as everything is done with a level of awareness. I almost forgot to add the roux, and I was panicking about the soup being so thin! Fortunately I remembered that the thickening agent had not yet been added. Overall, it was a simple memorization process this week.
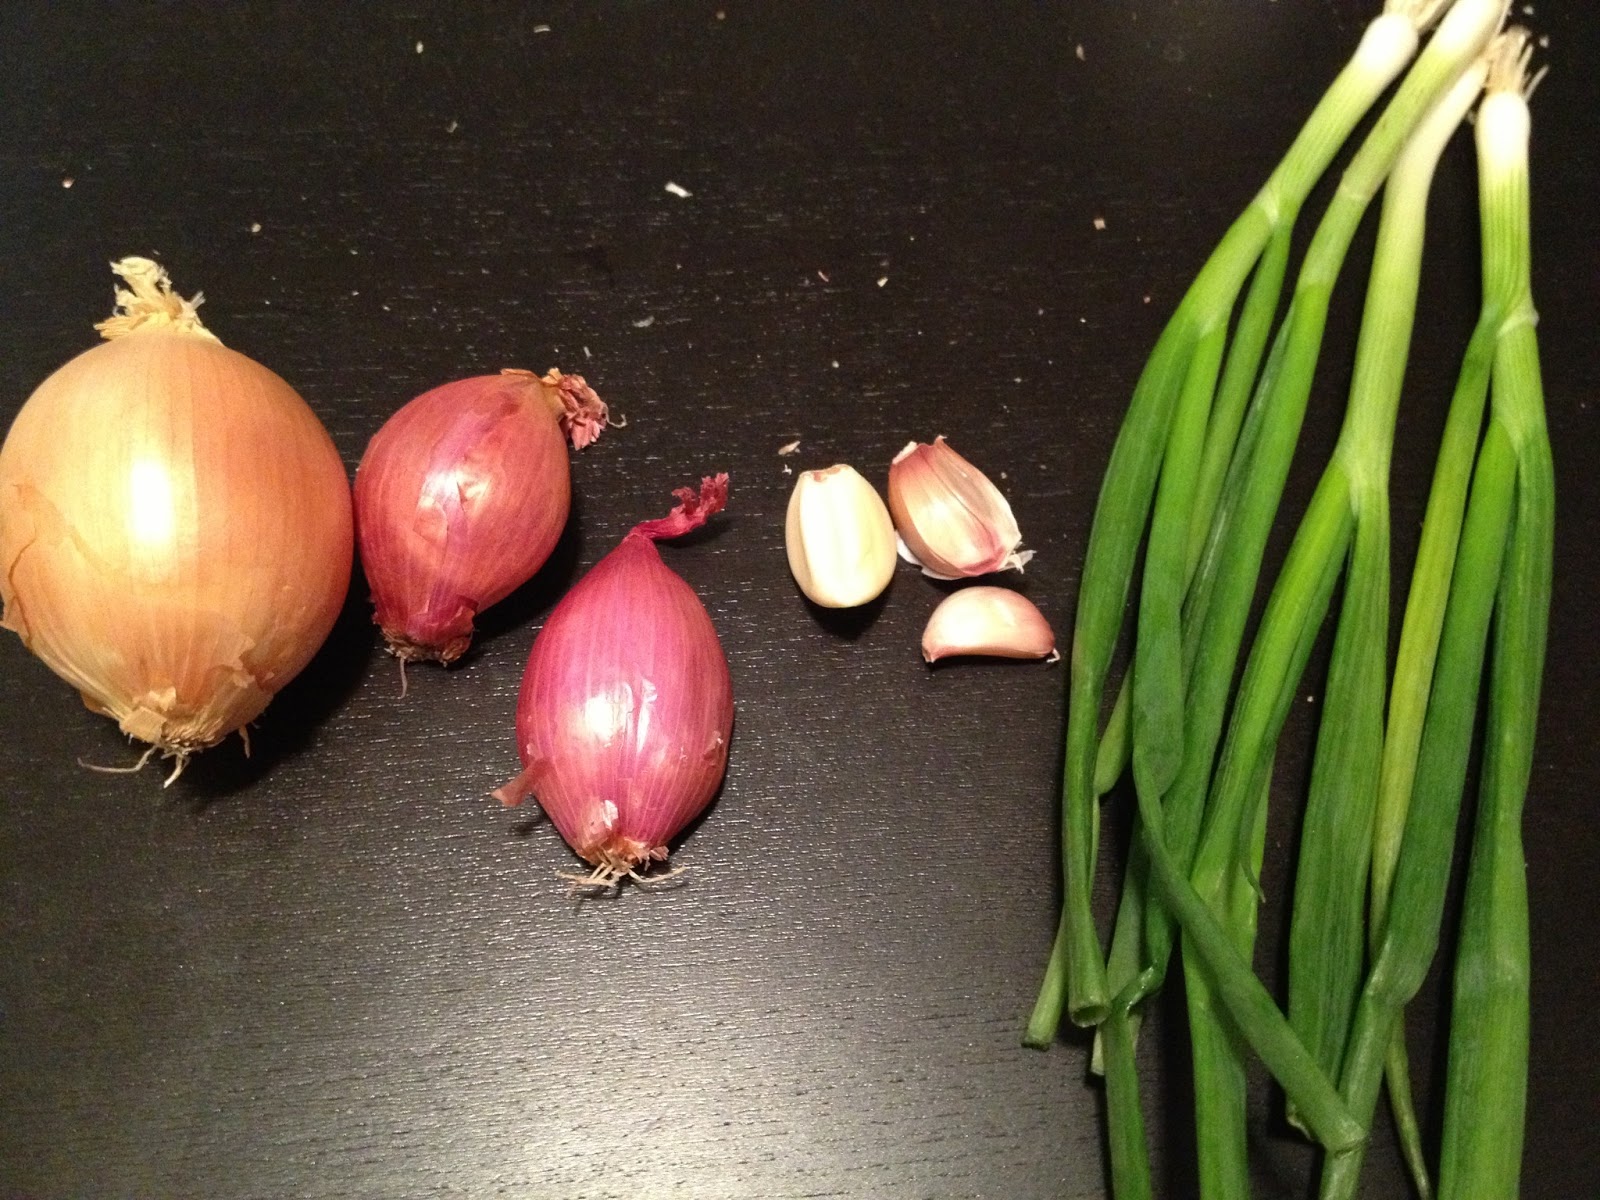

1-2-3-4 ratio of these cancer-fighting bulb veggies
is tasty and simple to remember
Remember to only use the top of the four scallions

The Verdict
Making four types of grilled cheese for a large group takes either lots of space or lots time, and I had more space this week than time. With that in mind, I laid out all of the sandwiches on my table and assembled them all before grilling up a storm on the stovetop.


I covered my kitchen table with cut apart paper grocery bags,
making an easy-to-clean work surface that was both
recycled and recyclable.
I used big binder clips to secure the paper to the table.
HUGE time saver.

I was disappointed to see that in the first round of grilled cheese, the cheese was just not melting (it must have been real cheese rather than cheese product!). I followed all of the advice that I learned from Food & Wine's How to Ruin a Grilled Cheese, and The Kitchn's more positive spin, How Not to Ruin a Grilled Cheese, but somehow the bread just got too dark before the cheese melted sufficiently. Here's what they recommended:
  • use enough cheese and not too much bread
  • grate the cheese; don't use slices
  • put butter on the outside of the bread, not in the pan
  • use a nonstick pan
  • add unique condiments
  • use a lid
  • use interesting cheese
  • transfer it to a rack or serve immediately to avoid steam making them soggy
  • get creative with bread
At the eleventh hour, even with these techniques in place, I was not seeing the melty results I wanted and had to make a decision. One of my friends suggested microwaving them before placing them on the stove, and it seemed like the fastest option for a hungry crowd. For all the sandwiches except the Cranberry Brie, this was the essential step that helped start the melting process. Maybe it's cheating, or maybe it is just strategic cooking. After all, cooking is just preparing food with the use of heat. Thirty seconds did the trick for a plate of three sandwiches, and the outside of the bread got just as crispy as the non-microwaved sandwiches.

The Tomato Soup recipe instructed me to use a double boiler, which I don't have but I created using a large pot, a steaming rack with the center pressed down, and the inside of my rice cooker. The entire recipe didn't fit inside the rice cooker bowl, however, so I actually had to transfer half of the soup into a smaller pot and put it over direct heat. I'm happy to say that there wasn't a very big difference. I turned the heat down significantly in the direct-heat pot, and I stirred much more frequently, but aside from that the results were pretty darn similar. Next time I'll just skip the hassle.

I always wonder if chefs put a slightly modified version of their best recipes out in public so we try to make it but always fall a little bit short of the original, driving us to come back to the restaurant for more. However, Sarabeth's recipe was true to the soup that I remember tasting at the restaurant. It was absolutely delicious.

The favorite sandwiches of the night were definitely the Cranberry Brie and the French Onion. Read on for all four sandwich recipes and the soup recipe as well.

The Recipes
Asiago, Parmesan, Meunster, and Butternut Squash Grilled Cheese with Sage Brown Butter
from The Walking Cookbook, inspired by Little Muenster
Yield: 4 sandwiches

Ingredients:

  • 1/2 cup shredded parmesan cheese
  • 1/2 cup shredded asiago cheese
  • 1/2 cup grated muenster cheese
  • 1 cup butternut squash, cubed
  • 6 tbsp. unsalted butter
  • 1/2 tsp. dried sage powder
  • 8 slices hearty wheat bread
  • salt and pepper 
Preparation:
  • Prep squash: Bring water to a boil in a large pot and add the butternut squash. Cook on medium high for 15 minutes or until the squash is very soft. Drain and mash the squash into a puree (use a potato masher, pastry blender, or fork). Add salt and pepper to taste. Set aside.
  • Prep brown butter: In a stainless steel frying pan, melt the butter. Wait until the edges of the butter turn brown, then stir gently with a rubber spatula. Allow the butter to continue browning, adding sage a few minutes into the process. Continue stirring until you can smell a toasty butter smell and the entirety of the butter is brown. Transfer the butter to a glass or ceramic dish and place in the freezer for ten minutes or until a spreadable texture.
  • Prep cheese: Mix the cheeses together in a bowl.
  • Butter the bread: Spread the sage brown butter on one side of each slice of bread and place butter-side down.
  • Load the sandwiches: On four of the slices of bread, spread the butternut squash puree in a layer about 1/8 inch thick. On the other four slices, put 1/4 of the cheese mixture. Place the butternut squash slice over the cheese slice and press.
  • Cook: Microwave the sandwiches for about 30 seconds, then place in a non-stick pan over medium-high heat. Cover with a lid or piece of foil and flip once the bottom piece of bread is toasted, about 45 seconds. Cover again and let cook for another 45 seconds. Remove from the pan, cut in half or quarters, and serve immediately or transfer to a rack.
The toasty, fragrant brown butter with sage
just needs a short chilling time to become...
...spreadable butter for the outside of the bread

Classic American Grilled Cheese
adapted from Food Network
Yield: 4 sandwiches

Ingredients:
  • 8 slices country white bread
  • salted butter, softened
  • 4 oz. American cheese, grated
Preparation:
  • Butter the bread: Spread the butter on one side of each slice of bread, and place butter-side down.
  • Load the sandwiches: Divide the cheese evenly between four slices of bread. Place the empty slice over the cheese slice and press.
  • Cook: Microwave the sandwiches for about 30 seconds, then place in a non-stick pan over medium-high heat. Cover with a lid or piece of foil and flip once the bottom piece of bread is toasted, about 45 seconds. Cover again and let cook for another 45 seconds. Remove from the pan, cut in half or quarters, and serve immediately or transfer to a rack.

French Onion Soup Grilled Cheese
adapted from Tasty Kitchen
Yield: 4 sandwiches

Ingredients:
  • 2 yellow onions, sliced 1/4 inch thick
  • 3 tbsp butter, plus more for buttering bread
  • 1/4 cup beer (I like a nice winter ale)
  • 1 tsp sugar
  • 1/2 tsp salt
  • 4 oz. grated gruyere cheese
  • 8 slices country white or sourdough bread
Preparation:
  • Prep onions: Place 3 tbsp butter in a saute pan and heat over medium high. Add the sliced onions and soften, about 5 minutes. Sprinkle on the salt and sugar and stir. Lower the heat to medium-low and cooking for another 10 minutes, stirring frequently. The onions should begin to caramelize, or get brown all the way around without charring. Add the beer and turn up the heat to medium-high, stirring the onions to get an even coating. Once the liquid has evaporated, remove the onions from the heat.
  • Butter the bread: Spread the butter on one side of each slice of bread, and place butter-side down.
  • Load the sandwiches: Divide the cheese evenly between all eight slices of bread. Place 1/4 of the onions on top of the cheese on four slices of bread. These are more difficult to fold together, so work quickly and carefully. Match an onion slice with a cheese slice and place the longest side of the bread close together (for me, this was the bottom edge of the slice). Fold both pieces up like you are closing a book, then squeeze together and place flat on a flat surface.
  • Cook: Microwave the sandwiches for about 30 seconds, then place in a non-stick pan over medium-high heat. Cover with a lid or piece of foil and flip once the bottom piece of bread is toasted, about 45 seconds. Cover again and let cook for another 45 seconds. Remove from the pan, cut in half or quarters, and serve immediately or transfer to a rack.
The onions before the caramelization and beerization took place

Cranberry Brie Grilled Cheese
from Joy the Baker
Yield: 4 sandwiches

Ingredients:


  • 8 oz. of brie (about 1/2 large wedge), sliced thin
  • 3/4 cup cranberry sauce (Don't have any? Easy! 1/2 cup water, 1/4 cup sugar, 1 cup fresh or frozen cranberries-- boil, simmer, stir a bunch, and mash)
  • 4 tbsp whole grain mustard
  • 4 tbsp butter, softened
  • 8 slices french bread

Preparation:


  • Prep cranberry sauce: Use leftovers, canned, or make your own! It's ridiculously easy. Bring 1/2 cup water and 1/4 cup sugar to a boil, stirring like crazy. Add 1 cup fresh or frozen cranberries and leave it at a low boil, stirring frequently, until the sauce thickens and the cranberries pop. Once it is fairly thick, mash it up and remove from the heat.
  • Butter the bread: Spread the butter on one side of each slice of bread, and place butter-side down.
  • Load the sandwiches: Spread 1 tbsp of mustard on four of the slices of bread. Place 2-3 slices of brie on top of the mustard. On the remaining slices of bread, spread the cranberry sauce to coat the entire slice. Place the cranberry slice on top of the brie slice and press.
  • Cook: Place in a non-stick pan over medium-high heat. Cover with a lid or piece of foil and flip once the bottom piece of bread is toasted, about 45 seconds. Cover again and let cook for another 45 seconds. Remove from the pan, cut in half or quarters, and serve immediately or transfer to a rack.
Three simple filling ingredients made this sandwich a group favorite


Velvety Cream of Tomato Soup
adapted from Goddess of Bakedom
Yield: 10-12 servings

Ingredients:
  • 6 tbsp butter
  • 1 onion, chopped
  • 2 shallots, chopped
  • 3 cloves garlic, minced
  • 4 scallions (green parts only), chopped
  • 2 28-oz cans of tomato in puree (not juice)
  • 4 cups whole milk
  • 4 cups cream
  • 1/3 cup all purpose flour
  • 1/3 cup fresh dill, torn into little pieces
  • 1 cup white cheddar cheese
  • Salt and pepper
Preparation:
  • Melt 2 tbsp butter in a saute pan and add the onion, shallots, garlic, and scallions. Cook until softened, about 4 minutes
  • Place the onion mixture in a large pot and add the tomatoes, milk, and cream. Cook over medium heat until the mixture comes to a simmer. Use a spoon, knife, or potato masher to break up the tomatoes into pieces and stir gently.
  • Meanwhile, in a small saucepan, melt the remaining 4 tbsp butter and whisk in flour to make a roux. Add 1 1/2 cups of the tomato mixture to the roux and stir, then place the roux-tomato blend into the main cooking pot. Stir to mix the roux in throughout the entire pot. The soup will begin to thicken nicely.
  • Simmer for about 35 minutes, stirring frequently.
  • Remove from the heat, add some salt and pepper, and mix in the torn dill fronds.
  • Top with white cheddar cheese and serve hot.
For this soup base, we aren't looking for caramelization.
Just soften the alliums (onion, shallot, garlic, and scallion)
enough to simultaneously soften and bring out their flavor
While the makeshift double boiler had less agitation in the soup
throughout the cooking process, the end result was not different enough
for me to use this method in the future when I make this soup.

Saturday, March 2, 2013

Mole Poblano Enchiladas

Check out this recipe on my new and improved website: thewalkingcookbook.com

Mole has always fascinated me, but my fascination with it has developed over time. At first it was: "What?! Chocolate in a sauce?" Then it was: "It's so dark... what else is in it?" After that: "Good gracious, how many ingredients can they cram into one sauce, and who figured out that it tasted good?" And now I am most interested in the different varieties of Mole and how I can determine the best one for me. Finding the most authentic is a nearly impossible feat until time travel is discovered.

A sprinkle of queso fresco and a dollop of sour cream is the perfect topping to these smokey, cheesy enchiladas

About Mole Poblano
Mole Poblano (pronounced MOH-lay) is the typical Mole sauce that is found on Mexican menus in the United States, but it is far from the only kind of Mole that exists in Mexico. According to a fascinating interview with Liz Galicia, a highly reputed Mexican chef specializing in the cuisine of Puebla, there are multiple varieties within each state.

It is widely accepted that Mole Poblano was developed by 16th century nuns, with legends and myths branching out from that common point. The most believable story, in my opinion, is that of the nuns of the Convent of Santa Rosa found out the Archbishop was visiting and went into a panic trying to figure out what to serve him. After a lot of praying and even more toasting, grinding, chopping, and simmering, a sauce came together that pleased the Archbishop and has been adapted and used ever since. Mole Poblano is what I like to call a mega-dish. It is served at big events and made in mass quantities, and it is known for its seriously long cooking time, though I was able to find some speedier recipes.

The basics of Mole Poblano are the following, with some of the variations in parentheses:
  • dried peppers (ancho, mulato, pasilla, chipotle)
  • spices and seeds (peppercorn, clove, cinnamon stick, sesame seeds, anise)
  • nuts (almonds, peanuts)
  • chocolate (Mexican chocolate, which should be sweet)
  • fruits and vegetables (onion, garlic, tomatillo, raisins)
  • other ingredients (broth, French bread, corn tortillas)
Choosing the Recipe
Clearly, there are some unique components that set some Moles apart from the others, so finding the right one for the task at hand is the most important part. For a weeknight meal, I looked to a Mole recipe with slightly fewer ingredients and a moderate cook time. For those who want to go all out, however, there are plenty of choices out there. See the Mole comparison chart below for some comparisons I drew between a few appealing Mole recipes that I researched. If you would like a higher quality version of this chart feel free to contact me and I'll pass it along.

All of these recipes can be found by doing a quick online search with "Mole Poblano" and the author's name
I ultimately decided on the Mole recipe from Epicurious. I like the overall simplicity in procedure without sacrificing complexity in flavor. Also, the 2 hour prep and cook time inspires confidence in me that the sauce will have a deeply rich taste without stressing me out before dinnertime.

I prepared the Mole and used it to make cheese enchiladas. I used a Cotija and Monterey Jack blend for the cheeses, then sprinkled some extra Cotija on top. Some beer and wine as well as a healthy dose of chips and guacamole rounded out the delicious meal.

Memorizing the Recipe
Clocking in at twenty ingredients, this Mole is a baby version of the alleged original recipe, which had over 100 components. Memorizing them was surprisingly easy, though, because I knew that if I added something extra it was probably in the original recipe anyway! Forgetting was the big fear, but by clumping the ingredients into groups based on when I would add them to the recipe, I felt more confident. My chart helped me visualize the types of ingredients as well.

Shopping for the ingredients was a blast, and it gave me a perfect excuse to go back to my favorite (and so far the only worthwhile) Mexican grocery store and food counter, Chinelos II on W. 136th St. I'm a little scared to share this information for fear of infiltration of my utopian hole in the wall, but if it helps their business, I am in. I walked around for a while in a space smaller than my Manhattan bedroom and found fresh tomatillos and corn tortillas. I was a little disappointed at first, but I asked the man at the counter for some help and magically he produced all of the ingredients on my list in mass quantities. They were out of Mulato peppers, but since Mulato and Ancho chiles come from the same fresh pepper (Poblano), I just used more of those. I'm telling you... the bag was the size of my head.

The steps in the recipe seem so complicated in print, but they were simple and straightforward in practice. I tried to remember the whole thing in bunches: keep chile puree and tomatillo puree separate, then cook them together, stirring regularly, forever and ever. I've made enchiladas in the past, so the steps of that recipe were not nearly as difficult to remember. Basically, here is what I came up with for the recipe in shorthand.

Clean, fry, and soak chiles. Meanwhile...

Food processor, part 1: Blend tomatillos, garlic, and ground spices and seeds. Fry up the raisins, nuts, and pumpkin seeds (I call this the unhealthy trail mix section), add, and blend some more. Fry up the bread and tortillas, add, and blend some more. Transfer to another dish.

Food processor, part 2: Drain chiles and save the water. Blend with some of the water in food processor. Put in a pot with oil and cook for 15 min.

Stovetop: Combine the two purees, add broth, stir, stir, stir. Cover, simmer, uncover, simmer, just be sure to simmer and stir. Add the chocolate, stir, simmer, stir, simmer.... you get the idea. And we're done!

The Verdict
Frankly, I could have stopped with the tomatillo puree. Once all the random ingredients were added (bread? really? I'm still not over that), the flavors were divine and I could have just made that the sauce! I'm glad I didn't stop there, however, because the Mole that came from my own kitchen truly felt like the Mole that belonged in a Mexican kitchen. The flavors were a bit smokey with a little bitterness from the peppers, tanginess from the tomatillos, spice from the cinnamon, peppercorns, cloves, and chile seeds, nuttiness from the seeds and almonds, and sweetness from the raisins, chocolate, and cinnamon. The consistency was perfect-- liquid enough to spread around the enchilada dish but reduced enough to stay put on its own.

The Enchiladas themselves were filling, comforting, and gooey with cheese. The queso fresco really took them up a notch with its salt and moisture. I would not make enchiladas without this feta-like staple. We housed 2 1/2 batches of Enchiladas and probably could have done more if we could put our shame to the side. I must say that this is one of my favorite, and definitely one of the most gratifying, recipes that I have made so far. And the best news is that I have leftover Mole in the freezer now, just waiting for the next time I want to make some Mexican food.

The Recipe
Mole Poblano Enchiladas
Mole Poblano recipe adapted from Tom Gilliland, Miguel Ravago, and Virginia B. Wood on Epicurious
Enchilada recipe from The Walking Cookbook


Sauce Yield: 9 cups
Enchilada Yield: 12 enchiladas

Mole Poblano Ingredients:
  • 9 mulato chiles*
  • 7 pasilla chiles
  • 6 ancho chiles
  • 2 cups vegetable oil
  • 5 tomatillos
  • 5 whole cloves
  • 20 whole black peppercorns
  • 1 inch piece of Mexican cinnamon stick*
  • 1 tbsp seeds from the chiles, toasted
  • 1/2 tsp anise seeds, toasted
  • 1/4 tsp coriander seeds, toasted
  • 8 tbsp sesame seeds, toasted
  • 4 garlic cloves, roasted
  • 1/4 cup raisins
  • 1/2 cup whole almonds, blanched
  • 1/4 cup pumpkin seeds (pepitas, hulled)
  • 2 corn tortillas, torn into pieces
  • 3 stale french rolls, cut into 1 inch slices
  • 6-7 cups vegetable broth
  • 1.5 oz Mexican chocolate, chopped*
Enchilada Ingredients:
  • 12 corn tortillas
  • 3 cups shredded Monterey Jack cheese
  • 1 1/2 cup Mexican queso fresco, crumbled
  • 4 tbsp vegetable oil
Preparation:
Making the Chile Puree
  1. Use a combination of chiles, ensuring that you have a total of 22 (different proportions are okay).
  2. Clean the chiles by removing stems, veins, and seeds with a knife. Be careful; do not touch your eyes, nose, or mouth before washing your hands. The chiles aren't too spicy, but the oils will affect you. Reserve 1 tbsp of the seeds.
  3. Heat 1/2 cup of oil in a pan and fry the chiles until crisp, about 10-15 seconds, turning once.
  4. Drain chiles on paper towels.
  5. Put fried chiles in a nonreactive bowl, covered in hot water, for 30 minutes. (Begin tomatillo puree during this time)
  6. Drain the chiles and reserve the soaking water.
  7. Place the chiles in a blender or food processor with a half ladle of the soaking water. 
  8. Blend to make a smooth paste, adding more soaking water if necessary.
  9. Heat 1/2 cup oil in a large pot or dutch oven. Add the chile puree (it will splatter because of the water content) and cook for 15 minutes, stirring often. Remove from heat.
Making the Tomatillo Puree
  1. While chiles are soaking, husk and rinse tomatillos and boil until soft (about 5 minutes). Drain.
  2. Puree the tomatillos in a blender or food processor. 
  3. Add the cloves, peppercorns, cinnamon, and toasted seeds to a spice grinder.
  4. Grind until a smooth, fine powder. Add the spice and seed mixture and garlic to the pureed tomatillos and blend until smooth.
  5. Heat 6 tbsp oil in a heavy frying pan. Fry each of the following ingredients separately, removing with a slotted spoon: raisins (until they puff up), almonds (to a golden brown), pumpkin seeds (until they pop). Add to the blender or food processor.
  6. Refill oil to ensure there are 4 tbsp in the pan. Gather your stale bread and tortilla pieces.
  7. Fry the tortilla pieces until golden brown, about 15 seconds per side. Remove.
  8. Fry the bread pieces the same way, about 20 seconds per side. Remove.
  9. Add the fried bread and tortilla to the tomatillo mixture and blend, adding chile soaking water as necessary to make the sauce smooth. 
  10. Once pureed and no big pieces remain, transfer to a separate bowl and rinse blender or food processor to continue the chile puree.

Putting it all together
  1. Add the tomatillo puree to the pot of chile puree and cook over medium heat for 5 minutes, stirring often.
  2. Add the Mexican chocolate pieces and continue cooking for 10 minutes.
  3. Add the remaining 5 cups of broth and cook over low heat for 45 minutes, stirring frequently enough to prevent the mixture from scorching.
Rolling the Enchiladas
  1. Preheat the oven to 350°F. Mix the Monterey Jack and 3/4 of the queso fresco in a bowl and keep near the stove.
  2. Cover the bottom of a casserole dish with a thin layer of Mole Poblano sauce. Place the casserole dish near the stove. Place a pile of 3 paper towels near the stove as well.
  3. Heat the vegetable oil in a small pan over medium heat. Add a tortilla and heat in the oil for 15 seconds. Remove the tortilla from the pan with tongs and place on the pile of paper towels.
  4. Fill the tortilla with about 1/3 cup of the cheese mixture. Roll the sides of the tortilla over one another and place in the casserole dish, seam side down.
  5. Repeat with the remaining tortillas until all tortillas are side by side in the casserole dish.
  6. Spoon and spread an even and ample coat of Mole Poblano over the tortillas until they are covered. Sprinkle the remaining queso fresco on top and bake for 15-20 minutes, until the cheese inside is melted and the edges of the tortillas are slightly crispy.
*Tips

  • Chiles to use: The "Holy Trinity" of Mexican dried chiles includes Mulato, Ancho, and Pasilla. However, Ancho and Multato both come from the fresh Poblano chile so they can easily be substituted for one another. Pasilla is a bit different and is named after a "little raisin" because of its wrinkled skin. Don't all dried peppers have wrinkled skin, though? My way of remembering the difference between the two is that Pasilla sounds like pasillo, which means hallway, which is a long, narrow space. Pasilla peppers are long and narrow, especially compared to Ancho chiles, which mean just that: ancho, or wide.
  • Mexican cinnamon: Mexican cinnamon comes from the true Cinnamon tree (which incidentally is native to Sri Lanka) and not from the Cassia tree, which is where most US cinnamon is from. The stick is very flaky and has a less bitter and slightly sweeter taste (kind of like Red Hots).
  • Mexican chocolate: Mexican chocolate is a sweet chocolate with some cinnamon (or cinnamon flavor). It is very dry and a bit chalky because it is meant to be crumbled and dissolved into hot chocolate. I used Nestle's Abuelita, even though I am not a particularly huge fan of some of their business practices. That's what they had at Chinelos II, however, so that's what I got.

Saturday, February 23, 2013

Chicken & Chick Pea Tagine and Naan Reattempted

Check out this recipe on my new and improved website: thewalkingcookbook.com
Preserved lemon, cilantro, and yogurt added a trio of accent flavors
to this already savory Tagine.
The tasty charred bubbles on the naan were achieved by a cast iron pan,
since most home cooks don't own tandoor ovens!
When I made Chicken and Salmon Tikka Masala, I had grand plans of making homemade Naan. I knew that I had to let the dough rise for 2-4 hours, so I planned ahead and took all of the ingredients for the dough to school with me. I teach a cooking club after school, so I figured I could sneak in some dough preparation and make it a bonus lesson for the kids. However, yeast is not easy to find in Washington Heights, NYC, so we ended up with delicious but non-homemade Naan from our favorite Indian delivery spot, Indus Express. This week, I attempted the homemade dough again, but this time to serve alongside a Moroccan dish, Chicken and Chick Pea Tagine.


About Tagine
A tagine is actually a cooking vessel used in northern Africa (etymology ties it to the Greek word teganon, which means "frying pan") and the namesake of the stewy entree. Tagines are beautiful, and I am sure that one of these days I'll end up with one. They are made of ceramic or clay and work to retain moisture in food through the tall, conical design of their lid. This traps the moisture, then allows it to cool far from the food and return to the food below. However, not everybody is convinced that the traditional equipment is essential to making a successful and moist tagine. Cook's Illustrated tested multiple models of tagines alongside modern dutch ovens. The vessels that lost the least water were those with the heaviest, tightest-fitting lids rather than the tagines themselves. So whether you are a traditionalist or a use-what-I-have-ist, be sure to cook your Tagine (the food) in a vessel with a tight-fitting, heavy lid.


I used foil to cover the vents on my own lids,
helping preserve the moisture retention that a tagine provides
Choosing the Recipe
My roommate's father is one of our valued family dinner guests. A renowned cook himself, he has wowed all of the roommates with his stories of fishing in Mexico and eating sea urchin straight from the ocean, among other adventurous gastronomic tales. Because my roommate knew that I was looking for a reason to make Naan again, he suggested pairing it with his dad's recipe for Chicken Tagine. He was able to round up the recipe, which I am thrilled to share with you. 

Now, we are all aware that Naan is Indian and there must be a more locally appropriate bread for Morocco. However, despite their origins on separate continents, Naan and the Moroccan bread, khobz (pronounced like a person with a thick French accent saying "robes," with a raspy effect in the initial sound-- technically a uvular fricative, I believe, but this is far too much nerdiness for one set of parentheses) have a lot in common. Both are both fairly flat, eaten with almost all meals, and used as a side dish as well as a utensil. Naan would definitely work, but I wanted authenticity, so I made Khobz too! Who says that two breads is a bad thing?


Memorizing the Recipe
This week, I made Chicken Tagine (and Chick Pea Tagine, for those like me who don't eat chicken), homemade Naan, and homemade Khobz. I memorized the Tagine and the Naan recipes, but not the Khobz.

To commit the Tagine to memory, I had to remember all six of the spices (plus salt and pepper). For this I categorized the colors in the spice blend: 3 browns (cumin, coriander, and cinnamon), 2 reds (cayenne and paprika), and 1 yellow (turmeric). It helped! The steps were simple, since most recipes with onion and garlic involve sweating them early in the process. Since this is a stew, I knew I'd want to get a good brown on the meat before all the liquid came in, so the browning step was logical as well.
3 browns, 2 reds, and 1 yellow: my way of memorizing the spices in Tagine
Memorizing the Naan was a bit more challenging. Baked recipes always are because they are so dependent upon precision; so many white powders are involved; variations occur in timing, temperature, and mixing process; and you can't taste along the way to see how the food is doing. I got by with knowing my dry ingredients (flour, salt, sugar, baking powder) and my liquids (oil, yogurt, and yeasty water), since they all got mixed separately then put together. The measurements, however, required a little cramming.  I think that I will have to make Naan a few more times before it's really engrained in my mind. 
Liquids and dry ingredients, before they came together.
The Verdict
While the Tagine remained quite soupy, which is different from my roommate's childhood memories, the roomie of honor said that his dad would be impressed. That was all I needed to hear! The Tagine was seriously complex in its flavors, with a spicy kick that only got stronger as we worked our way through leftovers. I used half of the cayenne pepper called for, but I left the recipe as is for those who like more spice. I also made some quick preserved lemons, so we had spice, yogurt, cilantro, and the salty-sour bitterness of whole lemons all taking place in each bite. Needless to say, this dish is not for the simple-taste-budded. If you are daring with your flavors, however, you will walk away a very happy eater.

The Naan was a glorious success, the cast iron skillet contributing to its beautiful charred and bubbly exterior. The interior of the Naan was chewy and perfect for scooping up bits of the chicken and chick peas in the Tagine. In the future, I would love to try to make Naan with some onions or garlic on top too. Naan is annoyingly expensive to buy from a restaurant (one little flat for $3?), so now I have a go-to recipe for making my own. Since the prep time is so long with the yeast, I'll have to experiment with freezing Naan (or its dough) and report back.
The naan dough, so light and airy, was intimidating to handle at first,
but it rolled out beautifully and was very forgiving.
As for my non-memorized recipes, the Khobz was the fastest and easiest bread I have ever made. It's not supposed to rise a lot, so the rising time was only an hour. The dough was easy to prep and knead, and when it came out of the oven after only 25 minutes it had a beautiful toasted crust surrounding a center that was moist enough to eat on its own but dry enough to soak up all the lovely spiced tomato broth from the Tagine. It paired beautifully with a young Parrano gouda, and I can see it making a tasty sandwich. The side dish I served, Green Beans with Mustard Butter, was a hit, and I can't wait to make it again for company. With shallots, vinegar, cream, and mustard seeds in a compound butter, it brought some fresh tang to this meal.
When the Khobz came out of the oven, I felt like we were truly ready to break bread together.
The crackling of the crust when we broke it apart made it appeal to all five senses.
The whole meal came together in about 1 1/2 hours once the bread dough had risen. Not too shabby for a stew, two breads, preserved lemons, and a side of green beans. It was a beautiful spread and I am happy to have attempted it.
Clockwise from top left:
Khobz, Chicken Tagine, cilantro, Naan, preserved lemons,
Green Beans with Mustard Butter, and Chick Pea Tagine
The Recipes
Chicken Tagine (with Chick Pea Tagine modifications)
from Ron Garrett the First
Yield: 4 servings

Ingredients:
  • 4 boneless, skinless chicken breasts, cut into bite-sized pieces
  • 2 tbsp olive oil
  • 1 large onion, sliced
  • 4 cloves garlic, minced
  • 1 tbsp cumin
  • 1 tbsp coriander
  • 1 tbsp cinnamon
  • 1 tbsp cayenne pepper (modify to your preferred level of spice)
  • 1 tbsp paprika
  • 1/2 tbsp turmeric
  • 1 cup golden raisins
  • 2 cans Italian stewed tomatoes
  • plain yogurt, for serving
  • cilantro, for serving
Preparation:
  • Heat olive oil in a pan. Place chicken pieces in the pan and begin to brown them.
  • Add onion and garlic and cook until they are sweating.
  • Mix and add all spices (cumin through cayenne). Allow chicken to brown, about 4 minutes on each side.
  • When meat is browned, add tomatoes and raisins.
  • Cover and let the stew simmer on low heat for 45 minutes.
  • Top with yogurt and cilantro and serve over rice or couscous.
  • To make this dish vegetarian, replace the chicken with 1 can of chick peas (garbanzo beans), drained. Add to the pot after onions have sweated and proceed as instructed.
If you prefer a thicker stew, you can use a slotted spoon to control
how much tomato broth is in your bowl... or you can just sop it up with Khobz and Naan!
Stovetop Naan
Adapted from Aarti Sequeira, Food Network
Yield: 6 flats, each about 8x3"

Ingredients:
  • 1 tsp active dry yeast
  • 3/4 cup warm water (100°F)
  • 2 tsp sugar
  • 2 cups all purpose flour, plus more for rolling
  • 1 tsp salt
  • 1/8 tsp baking powder
  • 3 tbsp plain yogurt
  • 2 tbsp olive oil
  • 1/4 stick melted butter
Preparation:
  • In a large glass, dissolve the yeast and 1 tsp sugar into the warm water. Let sit for about 10 minutes or until frothy.
  • Mix remaining dry ingredients in a large mixing bowl. Stir with a whisk to incorporate.
  • When the yeast is frothy, add the yogurt and olive oil to the glass and stir.
  • Pour the liquids into the bowl of dry ingredients and begin to mix lightly with a fork. 
  • Once the dough has mostly come together, use your hands to finish mixing it. Do not over mix; as soon as the dough has come together into a soft and slightly sticky mass, cover it with a towel and let sit in a draft-free, warm area for 2-4 hours. (I placed mine on top of the radiator cover with a folded dish towel underneath and left it there for only 2.5 hours)
  • Once the dough has risen, lightly flour your countertop and gently remove the dough from the bowl. Place on the countertop and separate into 6 even pieces.
  • Roll each piece into a ball and coat in ample flour before setting to the side.
  • One at a time, place a dough ball on the floured surface and flatten into a teardrop shape. Roll with a well-floured rolling pin until 1/4 inch thick, about 8-9 inches long, and 4 inches across at the wide end of the teardrop. Lift the dough every once in a while during the rolling to make sure it does not stick to the counter.
  • Roll out all dough balls and set aside, covered.
  • Place your melted butter in a bowl near the stove with a pastry brush. Have a little dish of salt ready as well.
  • Heat a cast-iron skillet over high heat until it is nearly smoking.
  • Place a naan on the skillet and cook for 1 minute. Flip the bread, cover, and cook for 30 seconds to 1 minute more.
  • Remove from the skillet and transfer to a plate. Brush with butter and sprinkle some salt on top.
  • Repeat with the rest of the naans and serve.
I don't have a lid that would work, so I fabricated one out of foil.
It worked like a charm.
Add melted butter when the naan is still hot.
Chewy, bubbly, and charred: everything I want in Naan.
Everyone was eyeing the last piece before we split it up!