Pages

Saturday, October 19, 2013

Whole Roasted Cauliflower: From Drab to Fab

Check out this recipe on my new and improved website: thewalkingcookbook.com

Throughout my teenage years I had a tendency to read teen magazines that encouraged girls to take their look "from drab to fab!" Of course, my love for denim shorts and my oversized Rancho Bernardo High School hoodie proved more powerful than the influence of Seventeen's rhyming headlines, and my "look" remained about the same until I moved to New York (though if the high school where I now work made a hoodie, I know I would sport it day in and day out).

I'm not a huge fan of trying to get people to change their personal style to meet an arbitrary societal expectation, but in the world of foods there are definitely some ingredients that tend to be "drab" without a little accessorizing. Cauliflower ranks among the most notorious yawn-worthy foods, in my opinion. Sauteed, it never gets quite tender enough. Steamed, it just tastes watery. Even the color is boring. But there is hope for the poor, boring stepsister to broccoli.


My first glimmer of excitement came in the form of a comically enormous head of cauliflower served as a main course at The Fat Radish in the Lower East Side. It was nothing but cauliflower, and it was fabulous! The next ray of hope was a cauliflower sandwich at The Crown Inn in Brooklyn. A tender, roasted, seasoned slab of the crucifer made for a hearty filling. Finally, Num Pang's roasted cauliflower Cambodian sandwich brought new life to the veggie, sealing the deal and creating love at third sight. In fact, I made a version of that sandwich over the summer.

After my love for cauliflower was kindled, Food 52 seduced me further into the world of cauli-cooking by running a recipe for a tender, toasty, and flavorful Whole Roasted Head of Cauliflower. It had always seemed like something that could only be done in restaurants, but after memorizing and trying the recipe I now know the secret. A 15 minute poach provides the flavor and tenderizes the inside, while a nice hot 40 minute roast guarantees the crackly exterior and charred taste without fear of burning. The overall preparation time is long, but the hands-on part is minimal. Plus, it leaves so much leftover broth that I am already planning round two.

Whole Roasted Cauliflower
Memorized and modified from Food 52
Yield: 4 side servings or 2 entree servings

Ingredients:


  • 8 1/2 cups water
  • 2 1/2 cups white wine (I used Pinot Grigio)
  • 1/3 cup olive oil
  • 2 heaping tbsp salt
  • 1 tbsp sugar
  • 2 tbsp lemon juice
  • 1 heaping tbsp red pepper flakes
  • 2 tbsp butter
  • 1 head cauliflower, leaves and stems trimmed

Preparation:


  • Preheat the oven to 475°F.
  • Combine the first eight ingredients in a large pot and bring to a boil.
  • Carefully place the head of cauliflower into the liquid. Reduce the heat to a low flame and simmer for 15-20 minutes, spooning the liquid onto the exposed cauliflower every once in a while. Halfway through the simmer time, carefully turn the cauliflower over (I used a spoon and tongs).
  • Turn off the heat and lift the cauliflower out of the pot. Place in a colander to drain for a couple of minutes.
  • Transfer the cauliflower to a baking dish and put in the oven (middle rack) for 40-50 minutes. Rotate the pan halfway through.
  • Remove from the oven, slice into wedges, and enjoy!


Each step is simple yet valuable in the creation of this beautiful vegetable dish.

The results of this recipe were fabulous. Not only did the cauliflower take on the multiple flavors of the poaching broth, but it also caramelized those flavors around the edges during the roasting process. The single head of cauliflower made four servings, technically, but I wouldn't put it past myself to eat the whole thing. It had the slightest hint of spice, lots of flavor from the wine, and the perfect amount of fat to round out the texture. I served my cauliflower with a kale and split-pea salad and some bread and cheese. Delicious, simple goodness.

The key components of the broth were basic enough that I bet they would transfer to other flavor profiles as well:

  • Water
  • Alcohol for flavor: wine/ sake/ mirin
  • Something salty: salt/ soy sauce/ mustard
  • Fat: olive oil/ vegetable oil mixed with a little sesame oil/ butter only
  • Acid: lemon juice/ lime juice/ orange juice/ grapefruit juice/ vinegar
  • Sweet: sugar/honey/maple syrup
  • Spicy: red pepper flakes/ cayenne/ sriracha


The options are endless, and the flavors end up complex. Play around with it and leave a comment if you try a version of this easy and unique recipe.

Saturday, September 28, 2013

Move over hummus... there's a new high-protein dip in town

Check out this recipe on my new and improved website: thewalkingcookbook.com


Greetings, cooks! In case you think I have disappeared, I have not! But the school year has begun, redirecting my memorizing efforts to new student names, seating charts, and who has mastered the difference between ser and estar (I am a Spanish teacher, and here's the answer in case you are feeling curious). I continue to cook, however, and once I get back into my teaching groove, my recipe memorization groove will follow close after. Until then, I will try to keep up blogging with some fun little recipes that I either encounter or invent.

Today I bring you my new favorite high-protein snack: Eggamole. OK... that is the only time I am going to call it that, because it sounds kind of gross. But what is a girl to do when she craves guacamole and opens both avocados to find out that they are not good? First, she puts the bad avo in her new favorite place: the food scrap bin!* Then, she stares at the hard-boiled egg sitting in her fridge and says, "I can make guacamole out of you." Fortunately nobody is home to hear this conversation.

After my pep talk with the egg, I got out all of my quick guac fixins (I have a number of guacamole styles) and mashed them all together with the egg. The end result was definitely not guacamole, but I was really excited about how delicious it was. The lime juice cut through a lot of the sulfuric egg flavor and the cilantro kept it fresh. A little sprinkle of salt, garlic powder, and cayenne pepper provided just enough zest to round out the flavor without that lingering garlic taste.

Nutritionally speaking, it is quite healthy: 72 calories, 5 grams of fat and 6 grams of protein for one egg's worth of the dip (2 WW points for you, Mom!). Pair it with tortilla chips to negate all of that information, or enjoy it with some crudités and be truly nutritious! 

Here's the less-than-scientific recipe. Modify as you see fit, and remember that you can always add more seasoning, but it is really hard to take away.


Cilantro-Lime Healthy Egg Salad
By The Walking Cookbook
Yield: about 1/2 cup

Ingredients:

  • 1 hard boiled egg (this is a good recipe, though I usually only let them sit for 10 minutes)
  • 1-2 tsp lime juice
  • 1-2 tbsp chopped cilantro
  • pinch of salt
  • pinch of garlic powder
  • dusting of cayenne pepper
  • For dipping: tortilla chips or crunchy veggie slices
Preparation:
  • Put the egg in a bowl and add all the other ingredients.
  • With the back of a fork, mash the egg until the yolk is scattered and the egg whites are broken into little bits. The mixture should be mildly spreadable.
  • Taste and adjust seasoning.
  • Dip away!
Let me know if you discover any extra mix-ins for this recipe, and happy cooking!


*I recently learned that food scraps can be saved in the freezer (no smell or bugs!) and taken to a variety of GreenMarkets in the NYC area. It is a new effort on my part, and in one month I have already rerouted over 5 pounds of vegetable peels, banana skins, egg shells, pistachio shells, and coffee grounds to the city's compost heaps rather than the landfill. Of course, the goal is to reduce even that number by making use of every part of a plant and not letting things go bad, but it's an improvement nevertheless! Here's where I collect my scraps to freeze until drop-off day: 

Thursday, August 22, 2013

Salad & Sandwich Summer: Farmer's Sandwich and Green Bean Tomato Salad

Check out this recipe on my new and improved website: thewalkingcookbook.com

In my little world of blogdom, fame comes from one or two people saying, "Hey, I noticed you haven't written anything recently." And ladies and gentlemen, I have reached that level of fame! Thanks to some fans (well... fams may be the more honest term) asking me about the Walking Cookbook, it is time to do my last installation of Salad & Sandwich Summer. It all came about quite serendipitously, actually. To lead up to it, here's a recap of my summer:

School ended, I went to a wedding, and then I visited California... fabulous start to the vacay, but no cooking involved.
The Hearst Castle in San Simeon, CA. Beautiful!

I taught summer school. My evenings were spent packing and frantically searching for a new apartment. Read this for some insight on the worst task in the world... finding an NYC apartment. Very little cooking involved.

I moved. No cooking involved. But I do have a nice big living room and a pretty city view!
New living room. So big!
City view at night. That little purple thing towards the right
is the Empire State Building honoring the
Women's Tennis Association tonight
.

I started to settle into my new kitchen (always an adjustment). No pots, pans, or cutlery at first, but I am now equipped and in love with my set of Victorinox knives. Best deal in town, folks. Now there gets to be some cooking involved.


I have enjoyed playing tourist in my own urban backyard... I was at Battery Park, the southernmost point of Manhattan, one day and Inwood Hill Park, the northernmost point of Manhattan, the next. I went on food tours with Sidewalks of NY, exploring the culinary delights of the Lower East Side and Greenwich Village. I walked the Brooklyn Bridge and stopped right in other people's way to get the perfect picture. I hosted my brother's visit, got 18th place in a city scavenger hunt, rented a rowboat from the Central Park Boathouse, went to Coney Island, and watched a Mets game. I love this city.
A goose in the Central Park lake
Economy Candy, and jam-packed old school candy store in the LES
Mets game at Citi Field 

My plan for this evening was to make a nice picnic and enjoy it in Central Park for their free film festival screening of West Side Story (did I mention how much I love this city?). It poured rain most of the day, though, and soggy grass isn't really my thing. So Central Park became my living room floor, West Side Story became Mary Poppins, and my picnic became an indoor affair. Thus emerged my last summer salad and sandwich set... perfect for any picnic, whether outdoors or in.
Next time I am bringing my projector from school!


Farmer's Sandwich
From The Kitchn
Yield: 4 sandwiches

This sandwich was perfect as detailed in the recipe from The Kitchn, so I feel no need to repeat it here. Follow the link, and take the time to make the Onion-Thyme Jam. It is absolutely worth it. This sandwich, if you can find delicious, quality ingredients, will not let you down. I used Shelburne Two Year Cheddar that I bought at Saxelby Cheesemongers in the Essex Street Market (yet another exploration) and fresh Ciabatta from Fairway Market

Since I did not have to transport my sandwiches, I set up a sort of buffet and added a few extra toppings than are in the recipe: thinly sliced turkey breast, avocado, and mayo. Once all the ingredients are prepped, just layer, layer, layer, and the sandwich will be ready to go.

Green Bean and Tomato Salad with Tarragon Dressing
From Food & Wine
Yield: 12 servings (I cut this recipe into fourths for my purposes)

Like the sandwich, there is nothing about this recipe that needed to be changed to share with you. I don't really think about tarragon too often, so I decided to take advantage of the opportunity to use it and learn a little more about it. It tastes a bit like anise/fennel/licorice, though much milder, and many websites recommend pairing it with shallots, which this recipe does. I was surprised how tasty this simple salad was, but with nice, fresh ingredients I was pleased with the turnout. I used baby heirloom tomatoes to get some colorful variety in the salad since I was not able to find yellow green beans (oxymoron?). I recommend letting the shallots and tarragon hang out in the oil for a little while. That way when you toss the beans in it the flavors will be all throughout the salad.

I hope that summer has been as good to you as it has been to me. I look forward to memorizing more recipes and continuing my quest to become a Walking Cookbook. As all teachers will understand, happy new year to you!

Monday, June 24, 2013

Salad & Sandwich Summer: BBQ Tempeh Sandwiches and Elote & Sweet Potato Salad

Check out this recipe on my new and improved website: thewalkingcookbook.com

When people find out I don't eat meat (even after I tell them that I do, because fish is a meat), they always ask if I like tofu. My answer is always shockingly specific. I like the ultra-firm kind that does not have any juiciness to it, and I like the ultra-soft, almost custard-like, melt-in-your-mouth fresh tofu that is served warm. I had this recently on a food tour of Chinatown in Flushing, Queens. The woman selling the homemade tofu had a shop set up within a flower store, and her product was phenomenal. Anything that is not completely solid or sold at a florist's, however, I'm not a huge fan of.

Tempeh, tofu's overlooked fermented soy bean brother, is a completely different story. It is firm, crumbly, and nutty. It sometimes has a slightly tangy flavor, which is an acquired taste, but its texture makes it a great ingredient to use in dishes that can contain meat. Don't get me wrong--it's not a substitute-- but it does bear some resemblance to meat. A nice chart on the differences between tofu and tempeh can be found at FitSugar.


This week I made BBQ Tempeh Sandwiches topped with sprouts, avocado, tomato, and a cumin honey-mustard spread. To accompany it, I made an Elote & Sweet Potato Salad. Elote is the name for corn on the cob served in Mexico with mayo, chile powder, lime, and crumbly fresh cheese. I adapted this delicious and indulgent dish into a healthier but still hearty salad with a lime-yogurt dressing and sauteed sweet potatoes. It's perfect served room temperature or slightly cooler.


BBQ Tempeh Sandwiches with Cumin Honey Mustard Spread
From The Walking Cookbook
Yield: 4 sandwiches
Ingredients:
  • 1 pack tempeh
  • 1 tbsp vegetable oil
  • 1/3 cup BBQ sauce
  • 2 avocados
  • 1 cup alfalfa sprouts
  • 2 tbsp dijon mustard
  • 1 tbsp honey
  • 1 tbsp mayonnaise
  • juice from 2 limes
  • 1/2 tsp cumin
  • salt to taste
  • 4 hamburger buns, toasted
Preparation:
  • Cut each rectangle of tempeh in half. Then slice down the middle of each piece to make four thin rectangular slices.
  • Steam the pieces of tempeh for 3-4 minutes each, then place in a preheated pan with 1 tbsp oil.
  • Cook on each side until browned, about 1 minute per side. Remove and place on a plate.
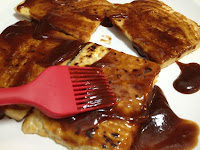
  • Brush the tempeh on both sides with BBQ sauce and return to the pan. Cook for 2 minutes on each side. Remove and brush again with BBQ sauce.

Cut and steam

Cook, then add more sauce
  • Slice the avocados and tomatoes and place on a serving platter. Place the sprouts in a bowl (or if you are like me, keep them in a container to save a dish!)
  • In a bowl, combine the spread ingredients (dijon mustard through salt) and mix well.
  • Assemble the sandwich: Spread the toasted bun with cumin honey mustard. Place a slice of tempeh, avocado, tomato, and sprouts on top. Add more BBQ sauce if desired. Enjoy!

Elote & Sweet Potato Salad
From The Walking Cookbook
Yield: 6 large servings

Ingredients:

  • 2 large sweet potatoes
  • 3 tbsp vegetable oil
  • 5 large ears of corn
  • 1/2 cup greek yogurt
  • zest and juice from 1 lime
  • 1 tbsp fresh cilantro leaves, chopped
  • 1/2 tsp salt
  • 1/2 tsp smoked paprika
  • 1/4 tsp cayenne pepper
  • 1/2 cup queso fresco, crumbled (another crumbly, fresh, salty cheese like feta will work too)
Preparation:
  • Peel the sweet potato and cut into small cubes (just smaller than a board game die). Place in a bowl and toss with oil.
  • Heat a non-stick pan over a medium-high flame and put one layer of sweet potato cubes in the pan (I did this in three batches). Cook for 4 minutes, flip, cook for another 4 minutes, pour in 1/4 cup of water, cover, and cook for 4 minutes. Remove the lid and test the largest cube to make sure the sweet potato is cooked through. Once cooked, place on a plate to cool off a bit.
  • Repeat with the remaining sweet potatoes.

Slice and organize by size

Cut each stack into strips then into cubes
They will probably fall. That's ok. Just coat them in some oil and cook.
  • Simultaneously heat a separate pan over a medium-high flame and place the husked ears of corn inside. Cook for 2-3 minutes, and rotate once the corn kernels begin to char a bit. Continue until all sides of the corn have a browned exterior.
  • Once the corn has cooled a bit, cut the kernels off the cob and place in a bowl.
A grill pan would work beautifully for this corn.
  • Add the cooled sweet potatoes to the bowl of corn.
  • In a separate bowl, combine the dressing ingredients (greek yogurt through cayenne pepper) and mix well. Taste, and add more yogurt and/or lime juice if the dressing is too spicy.
  • Dress the salad and mix well.
  • Crumble in the cheese and mix well. Serve room temperature or slightly chilled.

Friday, June 14, 2013

Salad & Sandwich Summer: Coconut Shrimp & Curried Cauliflower Báhn Mì with Cucumber Lemongrass Salad

Check out this recipe on my new and improved website: thewalkingcookbook.com

Báhn mì have been trendy in New York City since 2009. Although bao, arepas, and other street food, filling-smooshed-between-starch delicacies have had their moments since then, but the lovely Vietnamese sandwich has not yet been overshadowed. I've never cared much for trends... by the time I catch on they are usually on their way out (like the prairie skirt of 2005). Fortunately, even when food trends go out of style, they are still delicious and nobody will criticize you for enjoying them. In case you're curious, Bon Appetit published this list of food trends for 2013. Keep your eyes open!

This week for Salad & Sandwich Summer I made two types of báhn mì: coconut shrimp and curried cauliflower. I was inspired by Num Pang, a New York restaurant that serves Cambodian sandwiches (which are, naturally, very similar to báhn mì due to geographical proximity). In addition, I put together a Cucumber Lemongrass Salad, a cool, refreshing side dish with homemade dressing.

These sandwiches have a lot of components and may seem overly arduous, but fear not: Each component can be done quickly and in advance. Then they just hang out until you are ready to use them. I'll break the whole meal down in the order that I did everything, from pickled veggies to salad dressing to sandwich assembly. All of these can be made in large quantities and made into a make-your-own-báhn mì buffet. Yummm...


Coconut Shrimp Báhn Mì
Curried Coconut Cauliflower Báhn Mì
Step 1: Pickle the vegetables

Ingredients (yield: 3 cups pickled veggies):
  • 1 daikon radish
  • 2 carrots
  • 1 cucumber (Optional: Use if you are not also making the salad. Otherwise it's cucumber overkill!)
  • 1/2 cup rice vinegar
  • 1/4 cup sugar
  • pinch of salt
Preparation:
  • Peel the veggies and cut off the stem.
  • Using a food processor slicing blade, a mandoline, or your awesome knife skills, slice the vegetables very thin.
  • In a wide bottom dish, whisk together the vinegar, sugar, and salt until dissolved.
  • Add the veggies, toss in the vinegar, and let sit. Stir and flip the veggies every 15 minutes or so. Can be made up to 1 day in advance if covered and refrigerated. The longer they sit, the more pickley they are.


Step 2: Prepare the shrimp


Ingredients (yield: 4 sandwiches' worth):
  • 1/2 jalapeño, seeded and julienned
  • 1/2 can coconut milk
  • zest and juice of 1/2 lime
  • 1 lb shrimp, peeled, deveined, and tails removed
  • 2 tbsp vegetable or coconut oil
Preparation:
  • Mix all ingredients together.
  • Add the shrimp, toss in the marinade, cover, and refrigerate for at least 30 minutes. Can be made up to 1 day in advance.
  • When it is time to cook (step 6), heat the oil over a medium flame.
  • Discard the jalapeño from the marinade and add the shrimp and marinade to the pan.
  • Cook for about 4 minutes, or until shrimp turn pink. Pour into a bowl and serve with a slotted spoon.

Step 3: Prep the salad and dressing


Salad Ingredients (yield: 3 cups):
  • 2 cucumbers
  • 1 avocado
  • 1 green onion (green and white part)
  • 1 tbsp fresh mint
Dressing Ingredients:
  • 1 inch piece of ginger, peeled
  • 1 small stalk lemongrass, cut into inch-long pieces
  • 1/2 lime, peeled
  • 2 tbsp vegetable oil
  • 2 tsp soy sauce
Preparation:
  • Slice the cucumbers thin (I used a food processor) and place in a bowl.
  • Chop the green onion and mint and add to the cucumber.
  • Place all dressing ingredients in a food processor with the normal chopping blade. Pulse until a dressing is formed. With a spatula, push down any dressing that stuck to the sides.
  • Dress the salad, toss, and refrigerate for up to an hour.
  • When you are ready to serve, cut the avocado into small cubes. Toss with the salad and serve.

Step 4: Make the Ginger Sriracha Sauce


Ingredients (yield: 1/2 cup):
  • 1/4 cup olive oil
  • 1/4 cup vegetable oil
  • 1 medium egg (large works too-- just up the oil a little)
  • 1 clove garlic
  • zest and juice from 1/2 lime
  • 2 tsp sriracha sauce
Preparation:
  • Rinse out the food processor and insert the chopping blade.
  • Place the egg, ginger, lime zest, and garlic (missing from my picture-- last minute add-in) into the processor.
  • Pulse until solids are chopped and incorporated into the egg.
  • Turn on the processor and slowly pour in the oil.
  • Once the egg has mostly emulsified, with the machine still on, squeeze in the lime juice and add the sriracha. Mix for another 5 seconds, pour into a container, and refrigerate. The sauce will keep for 5 days in the refrigerator.

Step 5: Cook the Curry Coconut Cauliflower


Ingredients (yield: 6 sandwiches' worth):
  • 1/4 cup unsweetened coconut flakes
  • 4 tbsp coconut oil
  • 1 head cauliflower
  • salt, pepper, and curry powder
Preparation:
  • Heat a non-stick pan over a medium flame.
  • Add coconut flakes and toast, stirring frequently, until golden brown. Remove from the pan and let cool on a separate plate.
  • Slice head of cauliflower into 1/2 inch steaks. Some will crumble, but you should be able to get a few good disks.
  • Rub each slice with coconut oil and season with salt, pepper, and curry powder (a few shakes of each) on one side.
  • Heat 2 tbsp coconut oil in the same non-stick pan. Place the cauliflower steaks in the pan curry side down. Sprinkle salt, pepper, and curry on the top side and cover.
  • Cook over medium heat for 4 minutes, then flip, cover again, and cook for 2 more minutes. The cauliflower should be browned and just soft enough for a fork to go all the way through with a tiny bit of resistance). Remove from the heat, place on a plate, and sprinkle both sides with toasted coconut flakes.

Step 6: Cook the shrimp
See step 2.

Step 7: Finish the salad
See step 3.

Step 8: Assemble the sandwich

Ingredients (yield: 4 sandwiches):
  • 1 Vietnamese baguette (buy or bake your own), divided into 4 pieces and sliced sandwich style
Preparation:
  • Toast the baguette pieces.
  • Laying the bread on the plate in front of you, slather a bunch of Ginger Sriracha Sauce on the inside of each piece.
  • Top with pickled vegetables and some sprigs of cilantro.
  • Add the cauliflower or a few coconut shrimps.
  • Top with toasted coconut, if desired.
  • Gobble down the sandwich and say Cám ơn (thank you) to Southeast Asia.

Tuesday, June 11, 2013

Salad & Sandwich Summer: Caprese Sandwich with Pine Nut Aioli and Shaved Brussels Sprout Salad

June is here, and although the solstice is not yet upon us, summer is here in my mind. To celebrate the breezy, fun, and warm joys of summer, The Walking Cookbook will feature simple salads and sandwiches all summer long. Why salads and sandwiches?
  • First of all, it's awesome alliteration (Salad & Sandwich Summer)
  • Less cooking means less heat! There will be some stovetop and toaster oven action, but the goal is to reduce the use of our big, hot, poorly insulated oven in our non-airconditioned apartment.
  • Sandwiches and salads are just so easy to make. The ingredients can be prepped ahead of time and layered or tossed together just before serving.
The layout of Salad & Sandwich Summer will be a little simpler than normal, since I'll be focusing less on memorizing master recipes and a little more on playing with culinary ideas. So let's get the ball rolling with a recap of my Caprese Sandwiches with Shaved Brussels Sprout Salad.

Caprese Sandwich with Pine Nut Aioli
One of my favorite appetizers growing up was Insalata Caprese, the delicious layered "salad" with slices of fresh mozzarella, tomato, and basil. It originated in Capri, Italy, and is best known in the US as having olive oil, salt, pepper, and balsamic vinegar as a dressing (though the balsamic was added by Americans).

I decided to use the freshness of Caprese in a main course by turning it into a sandwich. The basic assembly came from the various ingredients. My own special touch was to add a pine nut aioli, which is basically a fresh, garlicky mayo with pine nuts added in. I was scared at first, but now I want to make everything into aioli! It is definitely better than just adding flavors to pre-made mayo.


The Recipe: Caprese Sandwich with Pine Nut Aioli
From The Walking Cookbook
Yield: 4 sandwiches
Sandwich Ingredients:
  • 1 long baguette, cut into fourths and each section split down the middle
  • 1/4 cup extra virgin olive oil
  • 1/4 cup balsamic vinegar
  • 1/4 cup pine nut aioli (see recipe below)
  • 1 log fresh mozzarella cheese, sliced
  • 3 tomatoes, sliced
  • 1 cucumber, sliced thinly at an angle
  • 2 handfuls fresh basil leaves, torn into medium pieces
  • salt and pepper
Sandwich Preparation:
  • Lay the bread open and brush the inside of each piece with olive oil.
  • Heat a non-stick pan or griddle to medium heat.
  • Place each piece of bread oiled-side down onto the heat until just toasted around the edges. Remove and repeat until all bread is lightly toasted.
  • Brush the inside of each bottom piece of bread with balsamic vinegar. Don't skimp!
  • Spread 1 tbsp aioli on the inside of each top piece of bread.
  • Assemble each sandwich: Layer tomato slices and cucumber slices on the bottom piece of bread. Layer basil pieces and mozzarella slices on the top piece.
  • Grind some black pepper and sprinkle some salt over the toppings.
  • Fold the sandwich together and enjoy!
My first gif! Awesome!!
Pine Nut Aioli Ingredients:
  • 1 large egg
  • 2 cloves garlic
  • 1/2 cup canola oil
  • 1/2 cup olive oil
  • juice of 1 small lemon
  • 1/4 cup pine nuts, toasted
  • salt to taste
Pine Nut Aioli Preparation:
  • In a food processor, blend the garlic and egg until the garlic is chopped and well mixed in.
  • Remove the food pusher from the food processor and turn the machine on. Very slowly pour in the oils until the the mixture is smooth, cream colored, and looks like mayo (that's what you just created!!)
  • Squeeze in the lemon juice, sprinkle in some salt, and toss in the pine nuts. Pulse until the pine nuts are chopped but not pureed.
Shaved Brussels Sprout Salad
I had dinner a few months ago at Left Bank in the West Village, and although I was impressed with everything there, the real winner was the Brussels Sprouts Salad. The sprouts were raw and thinly shaved, tossed with a light dressing of lemon juice, olive oil, salt, and pepper. Finally, they topped the salad with shredded aged cheese and toasted hazelnuts.

I have recreated this recipe many times since, and I am always happy with it. Since I am not a huge hazelnut fan, I have used walnuts and pine nuts as substitutes. I tend to add in some lemon zest and a healthy dose of parmesan cheese as well (always cutting a hunk off to nibble on while I cook).

The Recipe: Shaved Brussels Sprout Salad
From The Walking Cookbook, inspired by Left Bank
Yield: 4 servings
Ingredients: 
  • 1 lb fresh brussels sprouts
  • 2 tbsp extra virgin olive oil
  • 1 lemon, zested and juiced
  • 1/2 cup toasted pine nuts (or nuts of your choice)
  • 1/4 cup freshly grated parmesan cheese
  • salt and pepper
Preparation:
  • Cut the stem off of the Brussels sprouts and shave or chop them into fine shreds. Toss into a bowl.
  • Dress with olive oil, lemon juice, lemon zest, salt, pepper, and parmesan cheese. Hand toss and serve cold.